Welcome to (The Occasional) Photo Tip of the Day! Please also visit my main site jeffwignall.com. Text and photographs Copyright 2016 Jeff Wignall.


“The best way out is always through.”


Wednesday, December 31, 2008

Tell a Story in a Single Picture

If there's one thing that a photograph can do well it's to tell a story in a single picture. Think of all the great images in history: Alfred Eisenstaedt's photo of a sailor kissing a woman in Times Square on VJ day, Edie Adams' horrific image of a man being assassinated in the streets of Saigon--these are images that have burned themselves into our collective consciousness and recorded important moments in history in a single frame.

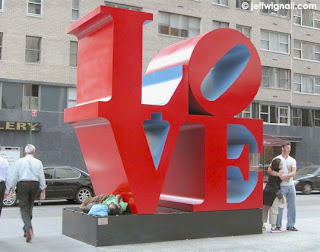
You may not be witness to such iconic moments in history, but there's no reason you can't use your camera to tell powerful stories. All it takes is a ready camera and an awareness of those interesting vignettes in life that happen around us everyday. I took this photo of the famous "Love" sculpture, for example, while walking in Manhattan one afternoon. As I approached the statue I saw this young couple (on the right) posing for a friend with a camera, then I noticed the homeless person sleeping on the sculpture. It seemed like such a vast contrast in how people were relating to the sculpture: to one it was a romantic venue, to the other, a bed. To the left businessmen were passing by, seemingly oblivious to the contrast in life experiences happening a few feet away from them. The whole event happened so quickly that I didn't even have time to put the camera to my eye, I simply aimed the camera from the hip and fired two quick frames. The photo was later used in my book The Joy of Digital Photography and has gotten a lot of comments from readers. Of course, some people that look at the shot only notice the sculpture, which astounds me! I guess they are like the businessmen: completely jaded to human moments in the city.

Telling stories with you camera is great fun and even if you don't shoot for a living, you can share these pictures with the world through your own website or Flickr photostream. Interestingly, you have almost as much of a potential audience through Flickr or another photo-sharing community as Eisenstaedt or Adams did via the front-pages of newspapers and magazines. The Internet has the potential to make photojouralists out of anyone that is in the right place at the right time to tell an interesting story. And if you do happen to stumble into a major news event, the many opportunities you have to share your photos instantly with major news agencies, via programs like CNN's "iReports," offer huge potential to have your photos seen by the world. The Internet and global television stations have created the most democratic journalistic opportunities in history.

Tuesday, December 30, 2008

Linger with the Light

Very often when I'm out shooting, I arrive at a location an hour or so before I am actually planning to shoot. This gives me plenty of time to compose carefully and also gives me time to wait for the right light. Often I'll just pull out a lawn chair and sit next to my tripod, waiting. If I'm in a touristy area or photographing a famous landmark, other photographers will drive up, shoot a quick picture and drive away. I'm sure they wonder why I'm just sitting there reading with a camera on a tripod next to me.

The truth is that the best lighting happens just before the sun sets and the golden yellow rays are scuttling low across the landscape. This beautiful late light often ignites subjects, as it has with this Maine lighthouse (Nubble Light near York, Maine), especially if there is a dark or cloudy sky behind it, and I find it the most beautiful and gentle light of the day. Often too, the sun will come and go from behind clouds late in the day and while other photographers think the show is over when the sun disappears, I'm happy to wait to see if it makes one more appearance before it sets.

If you're out shooting toward the end of the day, linger and wait for the light a while. You'll get a lot of nice surprises if you do it often enough and you'll have everyone wonder why in the world you're sitting there waiting.

Monday, December 29, 2008

Drive the Blue Highways

Whether you're on a family vacation or just driving back and forth to work each day, if you're a photographer it's fun to find new and interesting things to photograph. One way to do that is to get off of the interstates and drive the "Blue Highways" or back roads. Let's face it, you're never going to find much (other than car bumpers) to photograph on the interstate.

The Blue Highways got their name from old road maps in which all the traditional routes (the pre-highway roads) were colored blue on the map. This is where America used to live and even though many of these roads are lost to history because of the scourge of ugly (and meaningless) strip malls, there are still some roads that remain as they have since the beginning of driving. These roads are treasure troves for a curious photographer and they're disappearing so fast that photographing them is like photographing a vanishing species.

Last year we took a drive from Corpus Christi to Kingsville in south Texas and rather than hop on the interstate and be there in a 40 minutes, we decided to explore a bit and take the local roads down. In south Texas the local roads are flat, wide and empty, so speed limits mean nothing anyway--but they are fascinating. I found myself pulling over every few miles just to photograph the road because it was so flat and empty! Along the way we also found great little shots like this tiny post office in Chapman Ranch, Texas (the woman behind the counter told us to be careful where we stepped--rattlesnakes sometimes came in to get out of the sun). Even in Texas you will never see stuff like this from the highways.

So next time you're heading somewhere and you've got an extra hour on your hands, see if you can't find a Blue Highway route instead of the interstate. You never know what cool subjects you'll come across. Oh, and if you're looking for a great read this winter, go to the library and check out William Least Heat-Moon's fantastic book Blue Highways. If that book doesn't give you driving fever, nothing will--a great read.

Sunday, December 28, 2008

Photograph a Stained-Glass Window

Photographing stained-glass windows is pretty simple and the photos can make a great addition to a digital slide show or to your Flickr Photostream, etc. There are only two inherent problems in photographing stained glass and they're obvious: there's not always a lot of light and, if they're in a church, they're often up high and hard to frame tightly. Fortunately most churches are rich enough these days to have a lot of different windows and you will almost always find a few that let you get close enough to fill the frame.

I tend to work in the aperture-priority mode when photographing stained-windows because I want to be able to select an f/stop that's small enough (typically f/8 or smaller) so that I have enough depth of field to keep the entire window sharp. Unless you're working on a very sunny day, however, the glass (especially darker colors like dark blues and reds) sucks up a lot of light, so you may have to bump up the ISO quite a bit (I shot this scene at ISO 800) in order to retain a shutter speed fast enough to prevent camera shake. Since most churches won't let you use a tripod, this is a case where vibration reduction can be a big help. You can work in a straight "auto" mode and get good results, just keep an eye on sharpness from edge to edge.

The lens you use will depend on how close you can get to the windows and whether or not you want the entire window or just a close-up segment. In Notre Dame, for example, the Snowflake window (show here) is up very high and you need a moderate telephoto to get a frame-filling shot. I've shot in other cathedrals (the Dom in Cologne, Germany for example) and churches where I've been able to walk right up to the window. Cathedrals and churches aren't the only places you'll find good stained glass, by the way, I've also found tons of it in college campuses, like Yale.

Wherever you find your stained glass, just take your time, try to fill the fame and check your exposures on the LCD. The important thing is to work when the lighting (outside) is even and try keeping the camera as steady as possible.

Saturday, December 27, 2008

Hunt for Shadow Treasures

For every bright ray of sunshine there's a nearby shadow to be found and some of those shadows can make interesting photo subjects, either used in combination with the subject (top photo) or by themselves (bottom).

Part of the fun of using a shadow with its originating subject is that they usually mimic the shape of the main subject but with a slightly distorted twist. The trick to capturing both the subject and its shadow is finding a good vantage point for revealing them both, preferably against a simple background. I discovered this very graphic composition of a treasure hunter and his shadow on St. Augustine Beach in Florida by shooting down from the nearby pier. The thing I find interesting about shots like this is that the subject has no idea he's creating such a fun visual design.

The other option with shadows, of course, is to eliminate the subject and just shoot the shadow. In some ways this is more interesting because the viewer has to guess what the actual subject was and in some cases it's pretty difficult to tell. I found this interesting shadow at a highway overlook near Phoenix, Arizona and spent more time shooting it than the overlook view. Exposure for shadows is pretty easy, just take your reading from the brighter areas and let the shadows go black.

Friday, December 26, 2008

Shoot Pictures Through Airplane Windows

There is nothing I love more than flying. I hate the security lines, the luggage shuffle (I love curbside check-in though) and the tiny seats, but I just love to sit back and fly somewhere--almost anywhere. And I love getting a window seat because I am absolutely fascinated by watching the clouds, the cities and towns and the geology below. I can easily sit there for five or six hours and never take my eyes away from the window. Naturally then, I like to take pictures of what I see.

Taking photos through an airplane window is very simple and while there aren't many choices to make about technqiue, there are some tricks to getting good quality. Even though the photos are obviously not as sharp as they could be since you're shooting through inch-thick glass, for example, you can help the sharpness by making sure your camera is selecting a high shutter speed (1/125 or faster is good) in the auto mode; if not, try bumping up the ISO one or two stops. Also, don't rest the camera right on the body of the plane or the window or the vibration will shake the camera; instead either hold it an inch or so away from the body or roll up a sweater to absorb the shock. To prevent reflections, turn off the overhead light and keep the camera as close to the glass as possible. If reflections are still a problem and you're traveling with a friend, try to coerce them into holding a dark airplane blanket or sweater behind the camera to block interior lights, etc. Also, check to see if the window is clean inside (they probably won't let you climb out on the wing to clean the outside) and if not, use a napkin to get smudges off.

There are lots of things to shoot from commercial airplane windows including geographic features (mountains and lakes look cool), rivers, sunrises and sunset and, of course, cloud formations. If you're obsessive like me, you can even take notes on what you think the features are that you're shooting and then look them up on a map later.

Taking photos from airplanes makes the times pass more quickly, I think, which can be a good or a bad thing!

Thursday, December 25, 2008

Friday, December 19, 2008

Replace Boring Skies in Photoshop

One difficulty that all landscape photographers run into is that very often you'll find a good foreground subject with a very ho-hum sky. And nothing ruins a good landscape like a boring sky. If you happen to live near a particular scene and can return when the sky is more dramatic, that's fine. But what if you're traveling and find a really great scene but it has a boring sky?

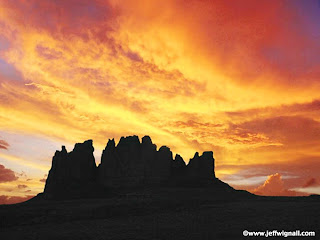
Replacing the sky in a landscape is a pretty simple editing chore and even the most basic programs will let you do it. Even more fun, you can shoot the landscape part of the scene in one locale and the sky from somewhere else. In the scene here, the rock formation was shot in the Valley of the Gods in southern Utah and the sky was shot in Florida! Putting them together in Photoshop took me all of fiftteen minutes.

You really only need two things: a landscape scene that needs a new sky and a good shot of a colorful sky (just the sky, no foreground subjects). To replace the sky you merely select the sky that you don't want using a selection tool (the "magic wand" in Photoshop and Photoshop Elements works best) and delete it. This works best if you have a very simple foreground/horizon shape, as I did with the rock formation. Then you open the shot of just the sky, use the "select all" command (Command A on a Mac, Control A on a PC), use the "copy" command to copy that sky and then use the "paste into" command to past the dramatic sky into the area where the blah sky was. It's much simpler to do than to describe and with a little playing and patience you'll be successful on your first attempts.

There is a very detailed step-by-step tutorial on my site. Start collecting sky shots when you see them (clouds, sunsets, etc.) and save them to give new life to your otherwise great landscapes.

Thursday, December 18, 2008

Use Off-Center Subject Placement

Here's a very quick tip that will improve about 90-percent of the photos you take: next time you're composing a photograph, make an effort to place the main subject off-center. Most of us automatically place our main subjects smack dab in the center of the frame largely because that's where the focusing indicator is in the viewfinder. Placing the center of interest in the middle of the frame creates a very static design with no surprises, no reason to explore the rest of the frame.

Using off-center subject placement creates a sense of visual intrigue and, if done well, a sense of balance within the frame. In this shot of a Japanese garden, by placing the stone lantern to the extreme right and balancing it with a large open area, I've used that open area to balance the "heavier" portion of the frame (the tree and lantern). The eye roams around the rest of the frame, curious about the vastness of the space surrounding the subject. I think that in this particular case, the design also reinforces some of the Zen feeling of the garden.

Don't be a slave to the center of the frame. Try some extreme placements and see if you don't enjoy them more!

Wednesday, December 17, 2008

Manipulate White Balance for Better Color

White balance is a very useful and creative control, but unfortunately it's also very underused and often misunderstood. Essentially what the control does is to match the sensor's color response to the existing light. Most cameras have numerous white balance options that include choices like sunlight, shade, overcast days, fluorescent lighting and flash. By selecting the option that matches the type of lighting you're using, theoretically you'll get the best color match.

But using white balance is one of those confusing situations when choosing the "correct" option might not be the best choice. For example, if you're outside photographing a scene like this barn and it's a bright, sunny day, you'd think the best option would be to choose "sunny day" or "clear daylight." And that is exactly the setting that I used for the top photo here. The problem is that the photograph is too neutral. It's bland. By selecting the "shade" option (or you can use "cloudy day") instead, the camera adds extra warming filters to the scene (because it thinks it needs you want to compensate for the extra blue coloring typical of a cloudy day) and your image will turn out much warmer and more inviting (as the bottom shot demonstrates). Manipulating white balance in this way will help you get exactly the color balance that you want--whether it's correct or not.

In fact, I use the "cloudy day" (which adds a lot of warming to scenes) almost all the time for daylight scenes simply because I like the warmer look. If you want to find out what each different setting does, it's easy: mount your camera on a tripod and shoot several exposures of a scene using each of the different white balance options. That's what I did for this test, though the entire test consisted of about eight different frames and settings.

Tuesday, December 16, 2008

Zoom the Lens

I'm guessing that about five minutes after the first zoom lenses were introduced, some clever photographer discovered the "zooming" technique. He showed a friend, then he showed a friend and pretty soon the whole world was zooming (if you were around and looking at photography in the 1970's, you remember this well). And while it was probably overdone to some degree back then, it's still a fun and creative technique and can save you creatively in certain (albeit rare) situations.

Using the technique is very simple: you just rack the zoom lens from one focal-length extreme to another during a long exposure--typically between about 1/4 second and a full second. The technique works best with DSLR cameras because there is a physical lens barrel to twist (or push-pull) during the exposure. I think you could mimic the technique with some (or even all) point-and-shoot cameras but to be honest I haven't tried yet.

To get somewhat predictable and controllable images (though everything is something of an experiment when you're playing with techniques like this), it's best to use a tripod to steady the camera. Then select your framing and, with the zoom lens either at its shortest or longest focal length, use the manual mode (or the shutter-priority exposure mode) to select a long shutter speed. Then simply push the shutter release button and rack the zoom to the opposite end of its focal length range. Experiment with faster/slower zooms and using a limited range to see the different effects you get.

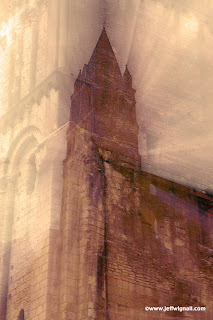
I used the zooming technique for this shot of a church in Loches, France because when I got to the church it was nearly dark and the lighting was horrible. I had this feeling that if I zoomed the shot during a full-second exposure I might recreate something of the medieval auro of the town. Look at the shot carefully and you'll see two sharp images of the church: one at either end of the zoom because I paused at both extremes, very briefly. I actually like the shot a lot and I'm glad I shot a few dozen frames that way. There is additional info on zooming in my Night Photo Tutorial on my main site.

Monday, December 15, 2008

Be Hip, Shoot from the Hip

During the 1960's there was a breed of photographer called "street photographers" that roamed the streets of big cities (most notably New York) taking very impromptu and hyper-realistic images of city life. Their style of photography was to shoot from the hip, rarely (if ever) using the viewfinder and instead, just pre-focusing on an area, using a small aperture to get lots of depth of field, and then wading into crowds and capturing whatever the camera saw. Though their work might have seemed casual and random, in fact, these photographers were really street journalists who learned the very difficult skill of being able to photograph strangers without being noticed and thereby creating extremely honest and unfiltered photographs.

I often try to imitate that style of photography when I'm traveling. Rather than carefully composing well-balanced scenes of street life, I prefer to put on a wide-angle lens, set a small aperture (using the aperture-priority exposure mode) and then shoot without looking through the viewfinder or LCD. I shot the photo here, for example, while sitting at a sidewalk cafe in Paris and I really just wanted an honest shot of the locals sitting around me. So rather than bring the camera up to my eye and draw attention to myself (and my camera), I just casually held the camera at my side and fired several shots. It's possible someone noticed what I was doing, but I doubt it. When you are holding a camera at your side, no one thinks you're taking pictures with it. I love the authenticity of this shot, the very casual nature of Parisians at lunch.

Next time you're out in the city (or even at a holiday party), try your "street" shooting skills out. Just put the camera on auto, use a wide-angle zoom setting and shoot. Don't worry about composition and framing, the fun and un-posed nature of the shots will more than make up for a few crooked frames or out-of-focus areas. And by the way, if you'd like to know more about street photography, check out Mason Resnick's very interesting site. Mason is a great street photographer and also teaches a course in street shooting at the (online) Perfect Picture School of Photography. You might also want to look at Joel Meyerowitz's fantastic street work. Joel is one of the originators of street photography, one of my heroes in photography, and his work is amazing.

Sunday, December 14, 2008

Avoid Flash Reflections

As much as I don't like using on-camera flash very often, there are times when you're in a relatively dark room and you have no choice. And for the most part built-in flash does a respectable job of lighting nearby scenes. It's especially useful when you're taking people shots indoors. One danger of using flash indoors though is that flash will bounce back from any reflective surface, such as mirrors, windows and even shiny painted surfaces.

Flash reflections are not only distracting (it looks like a car headlight outside the window in this shot) but they can fool your camera's meter into underexposing the main subject. (In fact, I had to lighten this shot in Photoshop just to get some detail back in the faces.) Because the reflective surface is a far more efficient reflector than your "average" subject, it reflects back much brighter. The meter sees that bright light and thinks the entire scene has enough light.

You can avoid flash reflections easily by just being careful about what's behind your subjects. If there's a window or a mirror, for example, just alter your shooting position a bit so that you're not firing the flash right into the surface. If you can't get rid of a window, try just closing the curtains or the blinds. If I had closed the blinds all the way for this shot I probably would have still had a bright highlight, but it would have been much more subdued. Another option, if you have an accessory flash unit that has a bounce feature, is to tilt the flash head up and bounce the flash off of the ceiling (provided you have a white ceiling at normal height). The ceiling will act as a big diffusion panel and not only prevent flash-back, but also soften the overall light.

Saturday, December 13, 2008

Extend Depth of Field with the Landscape Mode

In an earlier posting I talked about the benefits using selective focus and a shallow depth of field. Depth of field is the near-to-far distance in a scene that is in acceptably sharp focus. There are three factors that contribute to how much depth of field a shot will have: lens focal length, lens aperture and distance to your subject. All other things being equal, a wider lens (shorter focal length) and a smaller aperture create more near-to-far sharpness.

One fast and easy way to get a lot of depth of field is to put your camera in the "landscape" exposure mode. In this mode the camera automatically selects the smallest possible aperture giving the amount of existing light and the ISO you have set. (The camera will also try to select a shutter speed that is safe for hand holding.) In this rural Iowa scene, for instance, I wanted to keep everything from the grass in the foreground to the distant hills in sharp focus. I could have taken manual exposure readings and then choosing the smallest available aperture--and that's usually what I do. But there are times when I'm just taking a quick snap of a pretty scene and in those circumstances, I simply flip the camera to its landscape mode and shoot.

Read your manual for more info about these specialty exposure modes (often called "scene" modes in manuals); they can provide some very useful technical shortcuts.

Friday, December 12, 2008

Create Frames within Frames

There are a lot of little tricks that both photographers and painters use to tie together various elements of landscape or other outdoor scenes. One that I often find myself using is the idea of a "frame within a frame." Using framing devices has several advantages. For one, it lets you bridge the foreground and the background together, as I've done here by framing a pier in Rockport, Texas with a big rusty loop on an old anchor I found on shore. In that case, having a thematic connection between foreground and background also helps strengthen the shot.

Unrelated frames can also be used to focus attention on your main subject: framing a full-length portrait through a pretty garden gate, for example. Still another good use of internal frames is to hide distracting elements: using a clump of arching tree branches to surround a church steeple, for example, to hide nearby power lines or telephone poles. In all cases it's important to keep the frame a bit darker and more subdued tonally than the rest of the frame otherwise the frame will compete for attention with your main subject. I tend to let the frames fall slightly out of focus for the same reason, but that really depends on the specific situation. There are times when it works better if both frame and subject are in equally sharp focus. Remember, these aren't rules, just guidelines and ideas.

Next time you're out shooting a landscape or an informal portrait, look around and see if you can't find an existing frame that you can work into the composition. My guess is that once you start looking for them, you'll see them everywhere: doorways, windows, tree limbs, etc.

Thursday, December 11, 2008

Bring Home Photo Souvenirs

I love to travel and when I travel, like most people, I love to bring home souvenirs. The trouble is that when you're traveling to take pictures, whether its your job or your hobby, there's enough gear to contend with without lugging home a lot of extra stuff. One solution I've come up with is to photograph things that I'd really like to buy but don't have the energy (or the money) to bring back home.

Photographing souvenirs is a great way to remember some of the neat things you found along the way--and it's free (and there's no chance they'll get broken on the way home). If I'm photographing something I really want and think I'll regret not buying, I usually grab a business card so I can order it later from home. But the real benefit of photographing interesting finds (like these Mexican pots I found in Tubac, Arizona) is that they add an interesting and colorful twist to digital slide shows or to your Flickr Photostream. Sourvenir photos are also a great way to preserve memories--and they can help you decide later if you chose the right pot or not if you gave in and bought one anyway.

Wednesday, December 10, 2008

Jiggle the Camera

A lot of effort goes into making cameras and lenses that take sharp pictures but there are times when I like to throw sharpness out the window and just have fun with color and lights. One of my favorite tricks is to set the camera with a slow shutter speed (use your shutter-priority exposure mode to select a long shutter speed) and then jiggle the camera during the exposure. The technique works particularly well with Christmas lights because they're very colorful and you get wild patterns depending on how you move the camera and how long you keep the shutter open.

The actual shutter speed you use will depend more on the effect you want than the actual exposure since you're really not after a perfect exposure, but rather a curious pattern of color and light. Typically though shutter speeds ranging from about 1/4 second to one or two full seconds work well and provide you with enough time to get a good jiggle going. I used an exposure of 1/3 second (in my Nikon camera it's displayed as .3 seconds) to take this abstract shot of a lighted Christmas ball (one of those 10" balls with multi-colored lights) and, because I was using the shutter-priority exposure mode, the camera selected the proper f/stop for me. I shot dozens of photos of the ball experimenting with different camera motions: side-to-side, big circles, little circles and also just randomly shaking the camera. All of the photos were fun to create and fun to look at.

Perhaps the best part of taking abstract photos like this is that there are no rules and you can have a lot of fun not worrying about getting sharp photos. You will have to turn off your anti-shake mode (if your camera has one) otherwise the camera is trying to compensate for the motion--one more case of technology getting in the way of creativity. Shoot lots of pictures once you find a good subject--you may come up with a great shot for next year's Christmas cards.

Tuesday, December 9, 2008

Visit a Wildlife Sanctuary

One of the greatest challenges in photography is getting a good close-up shot of a bird or animal. Much of the reason that it's so difficult, of course, is that birds and animals are intensely shy and tend to avoid human company (and who can blame them). One way to get closer to wildlife of all types is to visit a local or national wildlife refuge and there are literally thousands of these around the world, from tiny neighborhood sanctuaries to the giant national parks.

While the wildlife in sanctuaries still won't walk up to you and pose for your camera, they feel much safer in a protected area and so act very naturally and also have less fear of humans. Many sanctuaries have walking trails and boardwalks that will bring you closer to the local wildlife and some of the larger ones even have wildlife drives that let you observe animals from the safety (yours and theirs) of your car. I shot the photo of the great egret here at the Merritt Island National Wildlife Refuge in Titusville, Florida from the very beautiful 10-mile Blackpoint Wildlife Drive. The drive follows a canal and tidal flats where thousands and thousands of birds gather at certain times of year and you can get great photos from inside your car. In fact, shooting from a car is a great way to get close to the birds becuase they don't see a car as a threat. As long as you remain in the car you can get within good shooting range for even moderate telephoto lenses (200-300mm in 35mm equivalents).

Just do a Google search on "wildlife sanctuaries" or "wildlife drives" and the name of your town or the towns you'll be visiting and you'll find lots of good places to shoot. Some states (like Florida and Arizona) have so many preserved areas that it's like choosing from an embarassment of riches. Always pick up a map of the local state parks, too, since most have well-established wildlife viewing areas. And be sure to make a donation at the visitor center or in the trail collection box; like everyone else these sanctuaries are hurting for donations and a few dollars from each visitor really adds up.

Monday, December 8, 2008

Organize Visual Elements

You'd never know it to look at the jungle that is my writing office, but when it comes to composing photos, I am very devoted to organization. In fact, I spend the largest part of my time finding vantage points and angles of view that allow me to create the most organized image design possible. I suppose this comes from the fact that I grew up with a mother who saw the precise placement of a lamp on a table as an important artistic challenge. In other words, I inherited my design obsession.

In the photo here, for example, I was fascinated by the intense artistic design that went into a simple lifeguard station (it's in Fort Lauderdale, Florida) and I wanted to let the building speak for itself. I was really taken with the cool concrete spirals of the low seawall and the combination of straight and slanted lines in hut itself. I spent about an hour walking around this tiny building and up and down a hill across the street looking for just the right angle to show off the elegance of the design in the simplest possible way. I also wanted to include the hard line of the sea in the design, as well as the ship that was anchored offshore.

Finding just the right composition for scenes like this is almost always a matter of trial and error and of paring down the number of visual elements. I always find its best to shoot a few informal frames when I first come upon a subject and then analyze the shot and see what it is that I can improve upon or what I feel is missing from the design. I then slowly refine the shot (thank God for the LCD!), moving closer or farther away (optically or by foot), finding higher or lower vantage points and experimenting with different subject placements. Sometimes the images come to me quickly, but other times its a frustrating battle of wits between me and the subject (and sometimes the subject wins and I walk away frustrated).

Above all, minimize, organize and keep refining the image. You'll know when you've found the best shot.

Sunday, December 7, 2008

Isolate Natural Patterns

Anyone who has sat and studied a spider's web for a moment or two knows that nature has some admirable skill when it comes to creating interesting patterns. In fact, a lot of manmade structures and artistic designs are based on natural patterns. Finding patterns is easy--they seem to be everywhere--and shooting and collecting photos of them is a fun pastime.

Patterns range from very formal, like the spirals in a chambered nautilus shell (a pattern design that has fascinated artists and scientists for centuries), to very random, like the patterns of frost on a cold windshield. Some patterns are even predictable--like the concentric circles you get when you toss a pebble into a pond. A lot of natural patterns, of course, have important purposes and are used by as identification tools: to help us (and other bugs) to identify one bug from another. In fact, nature relies heavily on patterns to help categorize and organize the plant and animal worlds.

The trick to making strong photos of natural patterns is to isolate them--to fill the frame with just the pattern. That's a relatively easy task with shots like the mud cracks (shot at a botanical garden in Corpus Christi, Texas), but it's a tougher one when you're trying to photograph smaller patterns like those on a bug's back. To capture smaller patterns effectively you'll need to switch to a close-up mode (with a point-and-shoot camera) or, with a DSLR, to use a macro lens (and possibly even extension tubes or a bellows attachment). Some patterns too are very ephemeral in nature--like the bands of color in a rainbow--and capturing them is largely a matter of luck and timing.

Think about natural patterns the next time you're out hiking or even just gardening in the back yard. And remember that the best way to reveal the pattern is to exclude everything else.

Saturday, December 6, 2008

Use Exposure Compensation with Snow

Well, we've reached that time of year here in Connecticut when we're starting to see snow. As much as I hate cold weather, I have to admit that snow is wonderful to photograph--particularly when you can photograph it from indoors. I shot the photo here from my bathroom window looking out at some tall trees in my neighborhood. It was still snowing when I shot the photo and the skies were laden and gray, but the snow was wet and looked great clinging to the branches of the trees.

One problem with photographing snow (whether you're shooting from a warm cozy house or not) is that it fools light meters into thinking that there is more light than there really is. This causes the camera to underexpose (give too little light) the snow, which creates photos of gray rather than white snow. The solution is simple though: just add some extra exposure using your camera's exposure-compensation feature. This feature lets you add or subtract light from the exposure, usually in 1/3 stop increments. The typical increase for snow is about 1 2/3 stops of + compensation. If the snow is very bright you might even want to give it a full +2 compensation. Experiment a bit and you'll learn which settings work best.

You might also try the auto-exposure-bracketing feature if your camera has one and have it expose for the normal, plus one stop and plus two stops of exposure. Then your camera will fire three quick frames, automatically adjusting the exposure for you. Read your manual for more on this feature.

If you live in a snowy part of the country, you might as well get some good pictures of it!

Friday, December 5, 2008

Photograph Concerts from the Audience

Over the years I've attended more concerts than I can even begin to count and I've photographed a huge number of them. Though I've had permission to photograph a lot of them, and I've been paid to photograph many of them, very often I just sneak a camera in under my jacket and shoot for the fun of it. I love having photos of concerts and so far I've only been pestered by security a few times.

The key to getting good shots, of course, is to have good seats (unless you're lucky and have a photo pass and can wander around a bit) and to shoot simply. I bring one lens with me usually (70-300mm Nikkor), one body and I never turn on the flash (if you want to get caught quickly, turn on the flash). The light is notoriously low in most venues so you'll have to really crank up the ISO. I pushed the ISO to 1600 for these photos of Pete Seeger and Guy Davis (that was with a Nikon D70s, newer Nikon and Canon bodies go much higher). The lighting wasn't great and even though I was there photographing the event as an assignment, I shot virtually all the photos that night from my second-row seat. It was just simpler to shoot sitting down and I was very close to the stage and had a clear view of the stage from where I was sitting. The event was pretty thrilling and Pete Seeger is amazing and still touring at 89 years young, so I'm glad to have some photos of it.

By the way, if you see a good concert coming to your area and you have some good samples of concert work, call the venue manager and offer to trade stage access for website photos--most venues love fresh new photos for their sites.

Thursday, December 4, 2008

Shoot the Moon


Photographing the moon always seems somewhat exotic to me because not only are you making a night (or at least a twilight) photograph, but you're also photographing a landscape that only a dozen or so people have actually walked on. Taking pictures of the moon is also fun because you get another chance--weather permitting--almost every night. Although I prefer to shoot the moon when it's full, it's also great to capture one of those thin silver crescents in the twilight sky.

Photographing the moon is very simple and you can even do it in your "automatic" exposure mode. Interestingly enough, the correct exposure for a bright full moon (excluding whatever landscape you have in the foreground) is the same as for a sunny day: about 1/250 at f/16 at ISO 200. And why not, after all, it's being illuminated by the sun! You may have to adjust your exposure a bit if you want some foreground detail, but as a starting point, I would just put the camera in auto (or try night mode) and check your first shots on the LCD. If it looks too dark, add some exposure using the exposure compensation dial.

There is one trick to shooting the moon though and that's being sure to include a good ground reference. When you look at a huge full moon (especially when it's first rising in the twilight sky) it looks huge and the reason is because you have the horizon or some other ground reference. As the moon rises in the sky it becomes smaller and smaller. That's why it's also good to consult a tide/moon chart and see when there is going to be a good full moon and get to your location before it starts to rise. That way you can get a number of exposures before the moon gets too high in the sky and the size diminishes.

Sometimes a great moon will surprise you, too. I shot the full moon and power lines here in Port Aransas, Texas after photographing a sunset (and the afterglow) intently for about an hour. I turned around to pack up my gear and saw this huge full moon, so I slapped my 300mm lens back on the Nikon D70s body and started shooting. Remember, the sun sets in the west and the moon rises in the east, so next time you're photographing a sunset, turn around and look for the rising moon! And check out my site for more tutorials on night photography.

Wednesday, December 3, 2008

Focus Selectively

While there are many photo situations, such as a landscape, where you goal is to make the entire frame sharp, there are other times when you might want to limit focus to a very shallow area of the frame. This technique is called selective focus and it requires restricting what is called the depth of field, or the near-to-far area in a frame that is in acceptably-sharp focus. Selective focus is particularly useful in outdoor portraits (human or animal) because it enables you to subdue distracting backgrounds and focus attention on just your subject. In this shot of a wild horse that I photographed on the King Ranch in Kingsville, Texas, I used the technique to "pull" the horse out of somewhat distracting surroundings.

There are three primary things that affect how much will be sharp: aperture, focal length and your distance to the subject. All other things being equal, using a wider aperture (f/5.6 instead of f/11, for example) will create a much more shallow depth of field. Longer focal length lenses also limit sharp focus. In order to separate this horse from the dense underbrush, for example, I combined using a long (300mm) lens and a wide (f/5.6) lens aperture to limit sharp focus to just the horse. Also, because I was relatively close to the horse, the depth of field was even more shallow.

Depth of field is not as complex or scary as most books make it sound. Just remember that to limit depth to a narrow zone, use a wider aperture, a lens with a relatively long focal length (longer than normal, at least) and get as close to your subject as you can. For a very thorough look at depth of field, check out my book Exposure Photo Workshop.

Tuesday, December 2, 2008

Hide the Sun in Your Sunset Photos

Sunset photos are relatively easy to expose for because there is a lot of latitude or leeway in creating a "good" exposure. If you underexpose a bit (give too little exposure) then the photo will be dark; if you overexpose (give too much exposure) the photo will be too light. Because sunsets are so colorful and bold, however, it's likely that unless you really miss the mark, a wide range of exposures will look good.

One exception is when you include a very bright sun in the frame when you're setting the exposure. Because the sun is so bright (bright enough to light half the planet at a time), it will wreak havoc with exposure and cause your camera to think there is far more light in the scene than there actually is. Result: a grossly underexposed (dark) photo. One way to avoid that is to aim the lens away from the sun itself (actually exclude the sun from the composition) and meter from a bright area of sky without the sun. Then use your meter-lock function (usually this means holding the shutter release partially down) to lock in that reading. Now recompose and shoot and you should have an exposure based on the sky, but not the sun.

The problem is that sometimes there is no clear area of bright sky to meter from. When I was shooting this pretty sunset at Cypress Gardens in Florida, for example, I was surrounded by trees and didn't have a clear shot at open sky. Instead, I took advantage of the trees in the scene and simply hid the sun behind the center tree when I set my exposure. In fact, I found that once the sun was behind the tree, I was able to expose for the scene exactly as the composition shows. I got a perfect exposure with the camera in the Program (auto) mode.

So next time you're shooting a bright sunset and can't take a sky reading, just hide the sun behind something in your scene and your exposures should be perfect.

Monday, December 1, 2008

Join Flickr and Get Famous

One of the absolutely coolest things about digital photography and the Internet is that you can instantly share you photos with people all over the world. Photo-sharing communities are a great place to show off your best images and to share photos and ideas with like-minded people that you'd otherwise never meet. Of all the photo-community sites (just do a Google search and you'll find lots of them), I think that Flickr is far and away the best and most fun site. The interface is incredibly simple to use and unless you plan on posting more than a few hundred images, the service is entirely free. You can even use their online image-editing tools (called Picnic) to improve your images.

And don't think for a moment that no one will see your photos just because there are millions there--in fact, you could get downright famous. More than 13,000 people, for example, have viewed my Photoshop-created image of a blue rose. (And yes, the number one question I get is if I colored it or not!) Think about that: 13,000 people have viewed my photo--amazing. There are tricks you can use to increase the number of views and comments you get too: be sure to title and caption all of your photos, for example. And also, add as many "tags" as you can think of so that people searching for specific subjects will find your photos easily. For this photo, for instance, I used tags that included: "rose, blue, blue rose, Photoshop CS2, infrared and curves adjustment." (I created the image using the Photoshop curves adjustment, so for Photoshop users, those tags will be relevant.)

You can post photos on Flickr in galleries or "sets" (collections of similiar images) that are entirely your own, or you can join community theme-based "groups" and share your images with a larger audience. Some groups have requirements (that you have to comment on a certain number of other photographers' photos, for instance), but I prefer to join groups that are much less restrictive and that have no requirements. This is supposed to be fun, not a chore. But all groups post their requirements and if you like commenting on others' images, there's no reason not to join those groups--getting positive comments can be a great creative boost.

You can buy a "Pro" account on Flickr for just $25 a year that allows you to post an unlimited number of photos--an excellent holiday gift for the photographer in your family.