Welcome to (The Occasional) Photo Tip of the Day! Please also visit my main site jeffwignall.com. Text and photographs Copyright 2016 Jeff Wignall.


“The best way out is always through.”


Thursday, February 28, 2013

The World's Biggest Panoramic

If you're a panoramic-photo lover like me, you'll find this story from American Photography's Pro Photo Daily very interesting. If printed out the pano would be 322 feet across and 79 feet high! The photo takes a few minutes to load but it's pretty cool.

World Records: 320 Gigapixel Shot Is the Biggest Panorama Ever

PetaPixel   Tuesday February 26, 2013
An image of London made by stitching together 48,640 exposures taken with seven Canon EOS 7D DSLRs is the hugest panoramic photo ever, reports PetaPixel. The big picture, taken from the top of London’s BT Tower, offers a detailed, browsable 360-degree view of the city. (Go here to start your browsing.) Each of the 7Ds was equipped with an EF 400mm f/2.8L IS II USM lens and Extender EF 2x III teleconverter, and then attached to a Rodeon VR Head ST robotic panorama head. It took three weeks to stitch the images together.   Read the full Story >>

American Photography's Pro Photo Daily is a free newsletter about what's happening in the photo world and you can subscribe for free by visiting their site.

Monday, February 25, 2013

The Glory of Melting Snow

I shot this photo years ago with one of my first digital cameras, an Olympus C5050 (still one of my favorite cameras of all time) and it's been published in a few of my books. The flower is called Glory of the Snow and it's one of the very first flowers that blooms here in New England and often comes up when there is still snow on the ground. My garden is still buried in up to two feet of snow but this week is supposed to be very warm and I'm hoping by week's end the snow has pretty much disappeared--and that the flowers begin to make their valiant return. With the exception of one giant blizzard the winter wasn't that bad (at least in terms of snow), but I'm thrilled that spring is only 24 days away.

The time is now to begin to gather up and organize your close-up gear. My favorite tool the past few years has been a set of close-up extension tubes that I bought (Kenko) for around $200. Close up tubes have no glass elements so they don't degrade image quality at all; they simply reduce the close-focus distance of your lenses. The tubes are sold as kits of three different-sized extensions that can be used individually or together in any combination. There are cheaper versions out there on Ebay but be sure they fit your camera and lenses and that they retain all auto functions in terms of exposure and autofocus.

Monday, February 11, 2013

Some Scenes of My House in the Blizzard


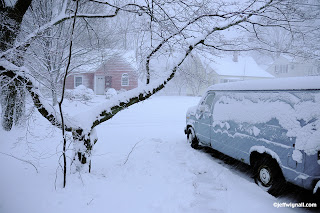
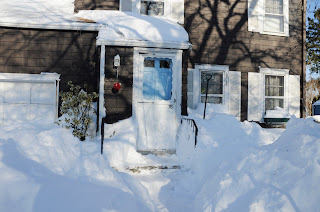
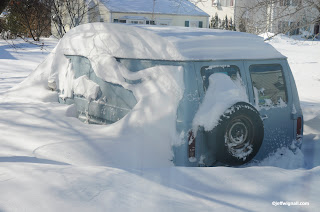
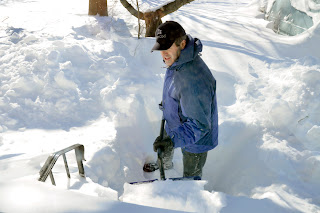
Well, you've no doubt heard about the Blizzard of 2013 in Connecticut--here's what it looked like in my front yard. Official totals say we got about 33" in my town, but I'd say it was closer to 40" based on looking at the level areas (which were hard to find). In the top photo you can see the view from my front door during the start of the storm (on Friday) and in the next photo, you can see the view on Saturday morning. My poor van is buried for a while--I have no intention of digging it out just yet. The bottom photo is my great neighbor Rich who, seeing that I couldn't push my door open with a five-foot drift against it, climbed over a mountain of snow to dig out my front door! Thanks Rich! The next day Rich dug out the entire sidewalk for our 85 year old neighbor who lives alone. I am guessing she'll bake Rich a cake pretty soon. It's been quite a storm so far--and as of this writing, not a single plow has come down our street--and the storm ended on Saturday, it's now Monday morning.

Thankfully we all kept electricity in the neighborhood and it's been kind of fun hanging out with neighbors in the street and shoveling and talking, meeting neighbors some of us didn't know, etc. And a lot of my neighbors, like me, are second generation (some even more) homeowners, so we have childhood tales to tell of the igloos we built in storms long ago. Everyone seemed in really nice spirits and several families were walking a mile into town to buy pizza, etc. (Thankfully, too, the great people at Paradise Pizza stayed open.) Of course, those who braved the walk (not me!) had to walk in the single traffic lane of Main Street since you can't even find the sidewalks, let alone walk on them. Drifts everywhere are up to six feet everywhere. It's pretty incredible. Normally at this time of year, though, we'd all be huddled inside hiding from nature, but this blizzard pulled everyone outside, which was nice.

I wasn't at all prepared for this storm--had no food in the house, very little heating oil, etc., but it's been just fine. And the cats have been enjoying that when I come in from shoveling, I immediately take a nap. They just love to nap on snowy days, and so do I!

And best of all, we'll all have tales to tell about the Blizzard of 2013.

Tuesday, February 5, 2013

Straight vs Artsy, Take Your Pick


Today was a "phone day" for some reason--I had several long conversations in a row and it was a nice way to kill a Tuesday afternoon (let's hope none of my writing editors are reading this). But not being one who likes to waste time (or who can keep his paws off of Photoshop for very long) while I was talking I started doodling with a shot I took last week (of a marine repair boat on the Housatonic River near my home in Connecticut) and came up with a few variations of the original. I started both as I usually do with a quick crop and a quick curves correction (to get the tonalities close to the correct range), and then I started dipping into a few things like gradient mapping, posterization and some basic drawing filters. I really wasn't too thrilled with the original because it was a tad too warm (I shot it very late in the day) and also, parts of the boat sort of merged into a dark strip of marsh in the background.) The two variations are pretty predictable, but as I always say, the more you play in Photoshop the more avenues you explore and you can always put what you learn to work on important shots that need some creative tweaking.

Before I make any changes to a shot, I always dupe the background layer (Command J on a Mac, Control J on Windows) and then do the rest of the work on that duplicate layer. There are two reasons for this: one is so that if I don't like where I'm going with something, I can just drag the background-copy layer (and any additional layer that I don't want) to the trash but leave the original background layer alone. Then I don't have to bother re-opening the original image--it's still sitting there as the background-layer original. The other reason is that once I've got some creative work done to the dupe layer, I can experiment with layer blending modes, changing the relationship between the background layer and it's duplicate layer(s). I can also adjust the opacity between layers, further changing the relationship between the two. In fact, I often create multiple dupes of layers so that I can use blending modes and opacity adjustments between each layer.

This is all  much simpler than it sounds and if you've never experimented with adjustment layers (and opacity changes), try it. Just duplicate the background layer and then, at the top of the layers palette, use the pull-down menu to try different blending modes. It's kind of hard to explain what each blend mode does, it's much simpler to just experiment and see what happens. I learned a lot about the blending modes from a workshop I took with the legendary Ben Willmore--one of my Photoshop heroes. Ben doesn't seem to write books any more, but his older books are a treasure trove of great info and advice. Ben is a really interesting guy who lives (I kid you not) in a big classic old tour bus and travels the country shooting and teaching Photoshop. Do check out his site & blog.

In the meantime, you can't hurt your computer or your software by messing around with Photoshop and while a lot of what I come up with might be kind of artsy or trite, I find that for me, playing is the absolute best way to learn.

Wednesday, January 23, 2013

Sunsets: Timing, Lens Choice and Horizons


Believe it or not, I shot both of these sunsets on the same day standing in essential the same place (on the shore of Long Island Sound) with the same camera (an Olympus UZ-810) and they were shot only about 10 minutes apart. The photos look very different from one another and that is due largely to three choices that I made for each shot: when I took the picture, the focal length that I chose and, very importantly, where I placed the horizon for each shot.

The top shot was taken first and was made with a zoom setting (in 35mm equivalent) of 159mm. That's on the long side of the medium telephoto lens range (typically a medium-telephoto lens is in the 85 to 135mm range, so this is just outside that, but not yet in what I would call the super-telephoto range). You can see in this shot that space has been compressed and that the stone jetty (that dark finger sticking out into the water) is much closer and larger. Also, by aiming the camera down at the foreground the shot emphasizes the foreground, not the sky. And finally, the sun was still a few degrees above the horizon when I took the picture. The thing that I like about the shot is that the color of the sky is reflected nicely in the little tidal area in the foreground. What I don't like is that the sunset sky seems awkwardly  cropped out of the frame. Probably a better choice would have been to widen the zoom setting a bit to take in a bit more sky while still keeping the foreground dominant.

In the second (bottom) shot, I waited until the sun was just touching the horizon--which is my favorite time to shoot sunsets. You have to shoot quickly when the sun gets this low because there is an odd little phenomenon going on: the closer the sun gets to the horizon, the faster it disappears from view. Also, I switched to the widest setting of the zoom lens (around 24mm--and that Olympus has a huge 36x optical zoom--it goes from about 24mm to nearly 900mm!). I also aimed the camera upward because I wanted to emphasize the sky and that beautiful whispy cloud pattern that was happening. The clouds look to me like an artist had put some dabs of white paint in the sky and then smeared them a bit with a wide brush or a comb--and I guess that's exactly what happened with Mother Nature being the artist. Whenever you place the horizon low in the frame you emphasize the sky.

So there you have two very different looks at one sunset based on three simple technical and creative decisions. Both of these shots were made handheld, by the way, something I almost never do. But the camera has image stabilization and I was out for a ride with a friend and just didn't want to inflict a tripod on him. Oh, by the way, you'll notice in the bottom shot that I lined up the sun right over the tip of the jetty. In art terms that's known as a "point of tension" and it's a small compositional trick that really works--your eye naturally goes to that spot because the tight spacing and close alignment create a kind of visual anticipation that something is going to happen there.

My latest book is the Digital Photography FAQs Book and you can read more about it or order it on Amazon or find it in your local shop. Or see if your local library has it and you can read it for free.

Tuesday, January 15, 2013

Dreams of a Young Pharaoh

OK, one more Photoshop montage (for now) and I'll try to move back to photography. I have no idea where this burst of Photoshop energy came from, but I haven't been shooting much lately and so I guess the fire to create something still burns and so I turn to existing images. Combining old images in this way is actually a lot of fun (and I have no idea whatsoever what these images mean) and, as I said in a previous posting, it gives you a lot of editing practice. Creating montages is a nice way to spend a cold winter's evening, too.

One of the more interesting aspects of doing this kind of work for me is that I have no idea where I'm going when I begin. When it comes to taking straight photos, of course, I know exactly what I'm after and I know how to get there. With these montages, on the other hand, I just start with one image, then keep adding more and doing things like changing the sizes, the shapes, the colors and, most fun, the layer blending modes. Another fun thing is that these images come from all different times and places. The montage here, for example, includes the shot of the pharaoh (taken in an antiques store in Connecticut), the water lilies (shot at Longwood Gardens near Philadelphia) and the peacock tail (shot in southern Florida). How could I have any idea they would end up together in one image? Interestingly too, I have a writer friend that wrote a very pretty and insightful poem based on this montage.

So, when you start meandering down a creative path, you never know where you'll end up. Also, I've learned that I need to take some advanced classes in Photoshop. While I've been working with the program a long time (since 1993) and I'm pretty good at it, there are some things I need to learn about montage work--like creating gradients between layers/images and refining selections. But every time you work an image you learn more about Photoshop--and about your own imagination--and so while it might seem you're wasting time, you're really not. At least, that's my story and I'm sticking to it.

Sunday, January 6, 2013

Today's Creation: The Birth of a Flower

Created from two scanned images: one of a chambered nautilus shell, the other of an eggplant blossom. Both elements physical elements scanned on an Epson flatbed scanner. There is only one flower image, repeated multiple times, re-sized for each layer and then each layer was blended using different layer-blending modes for each flower image.