Welcome to (The Occasional) Photo Tip of the Day! Please also visit my main site jeffwignall.com. Text and photographs Copyright 2016 Jeff Wignall.


“The best way out is always through.”


Friday, March 22, 2013

Train-Hopping Photographer Mike Brodie and His 50,000-Mile Odessey


If you’ve always fantasized about chucking it all and hopping a fast freight but just didn’t have the nerve, not to worry—you can still sample this gritty lifestyle through the eyes of an incredibly gifted and brave shooter: photographer Mike Brodie. Brodie hopped his first freight train when he was just 17 and rode it from his home in Pensacola, Florida to Jacksonville and then home again. Seems innocent enough. But that trip ignited something in Brodie’s imagination and what started as a whim turned into an all-out passion. Between 2002 and 2012 he rode on more than 170 freight trains in 46 states and logged more than 50,000 miles. In 2004 he started recording his journeys, at first with an old Polaroid and then in 35mm. His pictures are an amazing record of a lifestyle most of us have only seen through Hollywood's eyes and they have now been collected and published in a hardcover book called A Period of Juvenile Prosperity published by Twin Palms Publishers. A non-signed casebound first edition is available immediately and there is a signed version on back order. The latter should be available on March 25, 2013. A fascinating book, the photos are incredible--I'm sure the first edition will sell out quickly. (Photos courtesy of Mike Brodie.)

Tuesday, March 19, 2013

For Spring: A Poem by Pamela Starland

Winter holds on
With claws tight 
Around rooted trees
Flakes fall to remind us

Spring is gaining strength
As migrations ride
The southern wind's
Warm currents

They chase the chill
Of bitter cold 
Off the clouds
To fall into the ocean

Father sun and Mother Earth
Grow closer
As their union melts
The frozen terrain

Their tears of happiness
fall in the freezing breeze
Seasons transition
As crocus emerge

A bittersweet visit
Each year - winter and Spring
Competing
To win the season


              --Pamela Starland

Tuesday, March 12, 2013

Simple Photoshop Softening Technique

We had a warm day in Connecticut today, it reached the mid 50s and I'm not sure how they know how warm it is outside, but the kitties requested that I let them out to the porch first thing. Later I took a break from a retouching assignment to go and check on them and found them in this sweet pose. I had to run and grab a camera, change lenses and hope they were still cuddled up when I got back. Thankfully they were.

The porch had plenty of light, but I wanted to use flash to brighten it up a bit more. I put the flash of my D90 into the "slow sync" mode so as to catch some of the daylight around them but the flash was still a bit too harsh. Normally I might just toss a Gaussian blur on to soften the look a bit, but lately I've been experimenting with the median filter (Filters>Noise>Median) and that's what I used for this shot. Prior to playing with the median, I did my basic adjustments: crop, a curves correction and some minor color corrections (using hue/saturation mainly). Then I applied the median filter, as follows:

  1. Duplicate the background layer (Command J on a Mac).
  2. Apply the Median filter (again, Filters>Noise>Median) and choose an amount. In this case it was arbitrary, but I used a pretty heavy setting of around 25. At this setting the image is barely recognizable but don't worry about that. You're going to use the opacity setting to bring back detail from the original background layer.
  3. I then adjusted the opacity of background copy to about 40%.
  4. I made some tweaks to color balance and saturation and that's it.
 I think this would be a nice technique to use for portraits, too. The effect kind of reminds me of some more complex softening methods, but this is so fast you can do it in a few seconds.

Thursday, February 28, 2013

The World's Biggest Panoramic

If you're a panoramic-photo lover like me, you'll find this story from American Photography's Pro Photo Daily very interesting. If printed out the pano would be 322 feet across and 79 feet high! The photo takes a few minutes to load but it's pretty cool.

World Records: 320 Gigapixel Shot Is the Biggest Panorama Ever

PetaPixel   Tuesday February 26, 2013
An image of London made by stitching together 48,640 exposures taken with seven Canon EOS 7D DSLRs is the hugest panoramic photo ever, reports PetaPixel. The big picture, taken from the top of London’s BT Tower, offers a detailed, browsable 360-degree view of the city. (Go here to start your browsing.) Each of the 7Ds was equipped with an EF 400mm f/2.8L IS II USM lens and Extender EF 2x III teleconverter, and then attached to a Rodeon VR Head ST robotic panorama head. It took three weeks to stitch the images together.   Read the full Story >>

American Photography's Pro Photo Daily is a free newsletter about what's happening in the photo world and you can subscribe for free by visiting their site.

Monday, February 25, 2013

The Glory of Melting Snow

I shot this photo years ago with one of my first digital cameras, an Olympus C5050 (still one of my favorite cameras of all time) and it's been published in a few of my books. The flower is called Glory of the Snow and it's one of the very first flowers that blooms here in New England and often comes up when there is still snow on the ground. My garden is still buried in up to two feet of snow but this week is supposed to be very warm and I'm hoping by week's end the snow has pretty much disappeared--and that the flowers begin to make their valiant return. With the exception of one giant blizzard the winter wasn't that bad (at least in terms of snow), but I'm thrilled that spring is only 24 days away.

The time is now to begin to gather up and organize your close-up gear. My favorite tool the past few years has been a set of close-up extension tubes that I bought (Kenko) for around $200. Close up tubes have no glass elements so they don't degrade image quality at all; they simply reduce the close-focus distance of your lenses. The tubes are sold as kits of three different-sized extensions that can be used individually or together in any combination. There are cheaper versions out there on Ebay but be sure they fit your camera and lenses and that they retain all auto functions in terms of exposure and autofocus.

Monday, February 11, 2013

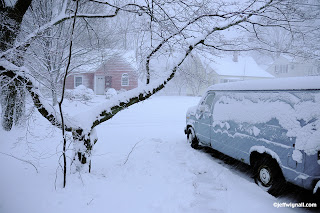
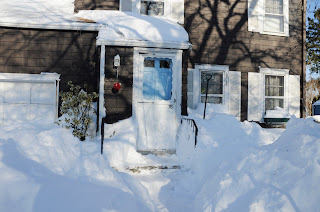
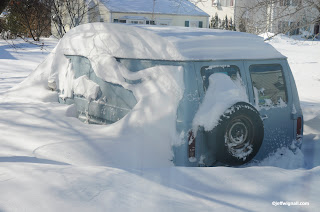
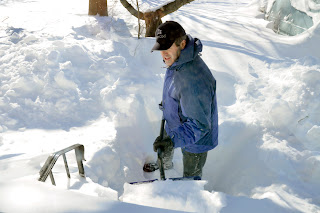
Some Scenes of My House in the Blizzard


Well, you've no doubt heard about the Blizzard of 2013 in Connecticut--here's what it looked like in my front yard. Official totals say we got about 33" in my town, but I'd say it was closer to 40" based on looking at the level areas (which were hard to find). In the top photo you can see the view from my front door during the start of the storm (on Friday) and in the next photo, you can see the view on Saturday morning. My poor van is buried for a while--I have no intention of digging it out just yet. The bottom photo is my great neighbor Rich who, seeing that I couldn't push my door open with a five-foot drift against it, climbed over a mountain of snow to dig out my front door! Thanks Rich! The next day Rich dug out the entire sidewalk for our 85 year old neighbor who lives alone. I am guessing she'll bake Rich a cake pretty soon. It's been quite a storm so far--and as of this writing, not a single plow has come down our street--and the storm ended on Saturday, it's now Monday morning.

Thankfully we all kept electricity in the neighborhood and it's been kind of fun hanging out with neighbors in the street and shoveling and talking, meeting neighbors some of us didn't know, etc. And a lot of my neighbors, like me, are second generation (some even more) homeowners, so we have childhood tales to tell of the igloos we built in storms long ago. Everyone seemed in really nice spirits and several families were walking a mile into town to buy pizza, etc. (Thankfully, too, the great people at Paradise Pizza stayed open.) Of course, those who braved the walk (not me!) had to walk in the single traffic lane of Main Street since you can't even find the sidewalks, let alone walk on them. Drifts everywhere are up to six feet everywhere. It's pretty incredible. Normally at this time of year, though, we'd all be huddled inside hiding from nature, but this blizzard pulled everyone outside, which was nice.

I wasn't at all prepared for this storm--had no food in the house, very little heating oil, etc., but it's been just fine. And the cats have been enjoying that when I come in from shoveling, I immediately take a nap. They just love to nap on snowy days, and so do I!

And best of all, we'll all have tales to tell about the Blizzard of 2013.

Tuesday, February 5, 2013

Straight vs Artsy, Take Your Pick


Today was a "phone day" for some reason--I had several long conversations in a row and it was a nice way to kill a Tuesday afternoon (let's hope none of my writing editors are reading this). But not being one who likes to waste time (or who can keep his paws off of Photoshop for very long) while I was talking I started doodling with a shot I took last week (of a marine repair boat on the Housatonic River near my home in Connecticut) and came up with a few variations of the original. I started both as I usually do with a quick crop and a quick curves correction (to get the tonalities close to the correct range), and then I started dipping into a few things like gradient mapping, posterization and some basic drawing filters. I really wasn't too thrilled with the original because it was a tad too warm (I shot it very late in the day) and also, parts of the boat sort of merged into a dark strip of marsh in the background.) The two variations are pretty predictable, but as I always say, the more you play in Photoshop the more avenues you explore and you can always put what you learn to work on important shots that need some creative tweaking.

Before I make any changes to a shot, I always dupe the background layer (Command J on a Mac, Control J on Windows) and then do the rest of the work on that duplicate layer. There are two reasons for this: one is so that if I don't like where I'm going with something, I can just drag the background-copy layer (and any additional layer that I don't want) to the trash but leave the original background layer alone. Then I don't have to bother re-opening the original image--it's still sitting there as the background-layer original. The other reason is that once I've got some creative work done to the dupe layer, I can experiment with layer blending modes, changing the relationship between the background layer and it's duplicate layer(s). I can also adjust the opacity between layers, further changing the relationship between the two. In fact, I often create multiple dupes of layers so that I can use blending modes and opacity adjustments between each layer.

This is all  much simpler than it sounds and if you've never experimented with adjustment layers (and opacity changes), try it. Just duplicate the background layer and then, at the top of the layers palette, use the pull-down menu to try different blending modes. It's kind of hard to explain what each blend mode does, it's much simpler to just experiment and see what happens. I learned a lot about the blending modes from a workshop I took with the legendary Ben Willmore--one of my Photoshop heroes. Ben doesn't seem to write books any more, but his older books are a treasure trove of great info and advice. Ben is a really interesting guy who lives (I kid you not) in a big classic old tour bus and travels the country shooting and teaching Photoshop. Do check out his site & blog.

In the meantime, you can't hurt your computer or your software by messing around with Photoshop and while a lot of what I come up with might be kind of artsy or trite, I find that for me, playing is the absolute best way to learn.