This weekend I had the great pleasure to see the new film Julie & Julia that is based on two true stories--one is the life story of Julia Child (based on her book My Life in France) and the other is based on writer Julie Powell's book Julie and Julia. Without giving away much of the plot, Powell's half of the story is about her attempt to cook every recipe in Child's Mastering the Art of French Cooking and then blog each day about her successes and failures. Since there were more than 500 recipes in Child's book, it meant that she had to cook more than a recipe a day for a full year. It's a wonderful movie and both Meryl Streep (Child) and Amy Adams (Powell) are fantastic.
The idea of Powell cooking a new recipe (or more) every day got me thinking about how important it is to push your creative photographic boundaries every single day by forcing yourself to take new pictures each day. The incredible thing about having a goal like that and having the discipline to follow through is that you never know where it will lead. Powell could hardly have dreamed when she started her cooking project and blog (as a way to give meaning to her life and create an emotional release from her job) that one day it would not only turn into a major motion picture, but also that it would forever bind her life to Julia Child's. Amazing.
Creating a daily chore for yourself (especially doing it in public) is not easy--as I can tell you firsthand, since I've tried as best I could to create this blog on a daily basis for nearly 10 months now. I've allowed myself gaps of a week here and there partly because I've got to take assignments to feed myself (and the cats) but also partly because I'm not Julie Powell. In light of what I've been trying to do here every day (and giving myself the luxury of days off when I need them), her accomplishment seems all the more staggering to me.
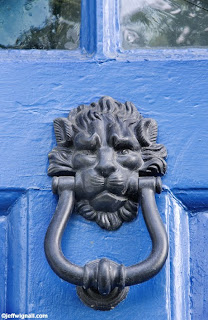
I have tried shooting new pictures for this blog at least several days a week and even that's not easy. Inspired by the movie, however, I decided to try to increase my daily photo output--and I started today. As I headed out to run some errands I decided to bring my cameras with me and not come home without a new photo. The picture above is the result of my effort today--a door knocker I found on the front door of the local historical society (a building I've driven by a thousand times and never noticed the lion's head before). It was an interesting little game of inner psychology because I actually did find a photo subject that I really liked--and had I not pushed myself to find a new photo, I never would have found it.
A lot of people have beat me to this "picture-a-day" idea and, in fact, one of the more interesting ideas that is showing up in photo blogs these days is that very concept--taking a new picture every single day. And what a great idea. Your imagination is like a muscle, and as they say in the muscle-building world (a world with which, happily, I have no contact), "...use it or lose it." From a creativity standpoint, forcing yourself to come up with new photo ideas generates more ideas and those ideas create a self-perpetuating energy that feeds on itself. It also forces you, at least once a day, to think (if only for a moment) about photography. Check out Kate's Picture a Day if you want to see a great example of a daily picture blog.
Do you think you have the right stuff to pull this idea off? Try it. The photos don't have to be museum quality works of art--just a new picture of a new subject shot each and every day. And if you want to try to do it with the world watching, you can get a Google blog for free and share your daily photos with the world. And maybe one day they'll make a movie out of your blog!
Monday, August 31, 2009
Friday, August 28, 2009
Use Your Camera's Neck Strap...On Your Neck
OK, I know this sounds like an obvious tip, but based on my experience watching literally thousands of people shoot pictures last week at the Statue of Liberty, it bears repeating: Use your camera's neck strap. And if you really want to save your camera, you actually have to put it around your neck. While I was at the Statue I was astounded at how many beautiful digital cameras I saw being held by hot sweaty hands (it was nearly 100-degrees during midday) with the camera strap dangling freely in the breeze. The guy in this shot has a camera strap (and it looks like he's carrying a nice EOS DSLR judging from the strap), but I'm not sure his arm is the safest place to wear it.
It kind of infuriates me that most point-and-shoot cameras don't come with (or even have a way to attach) a regular neck strap. The manufacturers assume (probably correctly) that most people won't use one anyway, so they include a tiny wrist strap. Wrists straps work, but again, they only work if you put them on your wrist. I could count one one hand the number of people I saw that were actually using their wrist straps--yet most of the cameras did have one attached!
Speaking of straps, if you're buying a new DSLR, spend the extra money for a very comfortable strap--even if it costs $50 or so. If you are carrying a DSLR with a long zoom for more than a few minutes you'll be thrilled that you spent the extra money. I'm partial to the neoprene straps (made from the stuff that wetsuits are made from) with a wide neck band because they're soft and flexible and last forever. But go look at your local camera shop (or stop at B&H if you're in New York) and look the straps over and see which feels most comfortable to you. And bring your longest lens when you're shopping so you know how comfortable it is when you're carrying real weight.
And once you buy the strap, use it--duh! There's nothing that will ruin a fun day of shooting like the thud of a thousand bucks worth of camera hitting a hard surface (or a wet one).
Thursday, August 27, 2009
Photo-Editing Tip: Fix Your Crooked Horizons
One of the things that used to drive me nuts back in the film days was going out and shooting a bunch of nice landscape photos only to find that I hadn't been careful enough about keeping the horizon level. And nothing will make you queasy (photographically speaking, at least) faster than a horizon that slants down at one end.
The truth is that in the old days when all you had to compose with was a peephole viewfinder, getting a crooked horizon was common--most of those viewfinders (except in the most expensive SLR bodies) were not at all accurate. Things are quite a bit better with digital cameras since you can either compose using the LCD (which is far more accurate in terms of composition) or, if your DSLR doesn't have a live LCD viewing feature, you can check your composition immediately and make the necessary corrections.
Even with the LCD feature, it's not always easy to get a perfectly level horizon. I shot the image here from the deck of a ferry boat in New York harbor and the sailboats came into frame from around the sides of the ferry, so I had absolutely no warning. I fired off three or four quick shots and in a matter of seconds they were too far away to continue shooting. As you can see in the top photo not only is the horizon sloping downhill, but the buildings are way off kilter (if you had to walk down the halls in the buildings like that you'd think you were on a boat.)
Fortunately, fixing a crooked horizon (or crooked vertical lines) in most editing programs is a snap. Most programs have an easy-t0-use tool designed to do this. In my RAW editor in the full version of Photoshop, for example, all that I have to do is trace the offending horizon line (or a vertical line that is on tilt) using the tool and the program straightens things up automatically. There are similar automatic tools in most editing programs. But in Photoshop and Photoshop Elements (and I assume most other editing programs) it's just as easy to do it manually. Under the Edit menu you'll find a Transform mode and under that option you'll find a "rotate" option. To use the tool, just select the entire image area (Command A in a Mac; Alt A in PC-land) then navigate to the rotate tool (Edit>Transform>Rotate) and a little bent arrow appears. Click on that arrow and turn the image until it looks level.
There is a grid overlay tool in most editing programs that guides you in aligning horizontal and vertical lines but I find that it's just as easy to eyeball things if you have a strong line. Once you're satisfied with your correction either double click (Mac) in the image or click on the cropping tool once to accept the changes. Once you've got the image level you will have to crop the image to get rid of the dead space created by the rotation. Now simply save the file (giving it a new name, just to be safe) and you're done.
Wednesday, August 26, 2009
Weather & Photography: Abandon Your Preconceptions
Preconceptions in photography can be a dangerous thing creatively. They can make you so focused on looking for the images that you see in your mind's eye that you ignore even better possibilities that are right in front of you and, even worse, they can cause you to get discouraged if you're not finding the types of images you wanted to find.
Preconceptions are especially problematic when it comes to weather because you simply can't predict (or change) it. As I mentioned in my last posting, last week I went to the Statue of Liberty to shoot pictures for several book projects. Lady Liberty is something I've always wanted to spend a day or two photographing and I had to make some pretty elaborate (and expensive) arrangements to make the weekend happen--car rental (simpler than driving my 20-year-old van in NY traffic!), hotel, ferry tickets, etc. The one thing I hoped for was a nice crisp blue sky on the days I'd be shooting. I'd done a lot of picture research leading up to the weekend and I knew exactly what I wanted: Liberty's green copper face against a rich blue August sky.
Naturally as the weekend drew closer, the weather reports were anything but encouraging (this is a perpetual pattern in my life) and, in fact, the weather people were calling for possibly the worst of all weather options: rain, thunderstorms and heavy cloud cover. Yuk. No blue skies were forecast. Surprisingly though, when we got out to Liberty Island the weather morons were wrong once again--the sky was perfectly blue with occasional puffy clouds giving relief from the intense sunshine. Yes, sunshine--and lots of it. In fact, the sun was so intense that after an hour of shooting around noon, I had to seek out the shade of a beautiful wooded grove.
As I was shooting though, I realized that the statue didn't look as great against a blue sky as I had thought it would--and the sunshine was creating really contrasty and unattractive shadows on her face. Then clouds started gathering and I lost the blue sky. As the cloud cover thickened I found myself losing the desire to keep shooting--and I nearly stopped. But determined to find good shots, I kept looking for new angles--low, sideways, from behind, etc. I was even able to shoot some silhouettes against the sun at one point. Sun and clouds began to mix and the sun started to hide more often than not (one point to the weather people). Then it became very apparent that a big storm was headed our way and the skies darkened and thunder and lightning began to scatter the crowds.
Suddenly though, with the sky getting darker and darker, Liberty's face began to take on a strange luminescent glow. Her face seemed to posses a far more soulful expression with the sunlight gone. It became clear to me that the beautiful sunny day shot I had envisioned wasn't the only great shot--and perhaps not even the best one. With rain and hail starting to pelt me, I kept shooting until the sky behind her crown was nearly black. These were far more dramatic shots that I had been looking for. Finally the skies opened up and I had to pull on a poncho and stop shooting, but I'd managed to get several shots that I liked a great deal.
Don't let bad weather stop your shooting and don't let your preconceptions of what "good" weather and good lighting is close your imagination to even better opportunities. You can't control the weather, but you can alter your creative vision to match the weather--and you certainly should.
Tuesday, August 25, 2009
Illuminate Night Shots with a Twilight Sky
Apologies once again for being away from the blog for a week, but I've been on the road (in New York and New Jersey) shooting for the revision of The Joy of Digital Photography and for another brand new book. I much prefer shooting pictures to sitting at a computer writing (though I like both) but photography is incredibly demanding, both physically and mentally. The reward, of course, is coming home with fun new pictures.
One of the things I wanted to photograph on this trip was the Manhattan skyline at twilight. I've always wanted to shoot it from the New Jersey shore along the edge of the Hudson River and as you can see, the view from Jersey City is quite an amazing view. (There is a beautiful boardwalk that runs along the entire waterfront in Jersey City that makes a perfect shooting location--it's a devastatingly beautiful vantage point.)
The trick to getting a good photo of the night skyline is not to shoot it at night, but rather at twilight. Depending on which direction the skyline faces (and where you're shooting it from) you can often get a beautiful mix of sunset colors, twilight sky and city lights all mixed together. It's incredible. Probably the very best time to shoot is just after the sunset and during a very brief magic window of opportunity when the twilight sky glows an almost turquoise blue and the city lights are beginning to come alive. The shot here was made a few minutes past the peak of the sunset and honestly I should have begun shooting about 10 minutes before, but even as the sun was setting there was a driving rain falling--it was a wild mixture of light and weather. In fact, ten minutes before I shot this the rain was pounding so hard that I almost abandoned the shot!
Even on the best weather days, this beautiful twilight/sunset light only lasts about 15-25 minutes, so you really have to be in place with your tripod set up and your camera all ready to shoot. Once the sun starts to set the buildings (at least with west-facing buildings like these) take on some spectacular colors and as the sky darkens a bit the city lights get brighter and brighter. If you can capture the exact moment when all of the lighting conditions are peaking, you'll get some fantastic shots.
You'll need to use a tripod to get shots like this because you're going to need a relatively small aperture and a correspondingly long shutter speed (this shot was made at f/10 at 2.5 seconds). At such long shutter speeds, I also suggest using either a remote control (wireless) or the self timer, and possibly also locking up the mirror. Even though this shot is pretty sharp, I'm not totally satisfied with the sharpness and I'm not sure if the softness came from the lens I was using (a Nikkor 24-120mm lens, which is not a particularly sharp lens unfortunately) or lack of depth of field. I'm going to go back and re-shoot this with a different lens and I'll probably begin shooting a bit earlier and also using a smaller aperture (probably f/22) to get even more depth.
You can, of course, continue to shoot after the blue has faded from the sky, but somehow skylines just aren't as pretty with a black sky as they are with that nice blue glow. Also, if you shoot much after dark you'll be using much longer exposures which causes the lights in scene to blur together and create pockets of bright glare.
Twilight is the primo time, so just get to your location well before sunset, choose your shots and then be ready when the worlds of sunset, twilight and city lights begin to collide--it's an absolutely stunning mix!
Monday, August 17, 2009
Search for the Curious at Home
Sorry for the lack of postings for the past week, but I've been busy researching and preparing for several upcoming shooting trips and haven't had time to shoot as much as I'd like. One of the interesting things about traveling to take photos (and I'll blog about this shortly) is that you spend about three days doing research for every day that you're on the road. And among the things that I tend to look for when I research a place are its oddities--the strange and twisted places that the locals know about, but that may never make it to the tour books.
The funny thing is that regardless of where we live, we all have these fascinating and curious places right in our own midst. Chances are, in fact, that you drive by a couple of them every week without ever noticing or stopping to see if there is anything fun to photograph. I live about 20 minutes away from Yale University, for example, and unless you were familiar with the campus, you'd never know that there are some incredible gargoyles and relief sculptures decorating the faces of the buildings. Once you get out and start walking around they peak over your shoulder and surprise you as if to ask, "What took you so long to notice us?"
And then, of course, there are the places that are just totally off the wall--and they are the best places in the world to find strange and unique photo ops. This past weekend, for instance, I paid a visit to a legendary local antiques store called United House Wrecking that is billed as the largest antiques and decor store in Connecticut--and it surely must be that. In addition to an interior showroom that is probably several city blocks long (you need a 20' mantel for your fireplace perhaps?), there is a huge outdoor display area that features an eccentric and eclectic (you might even say bizarre) display of yard sculptures, urns, statues and metal work. This company started out largely as a salvage company that saved and sold interesting salvage materials from homes and commercial buildings and has now become a bit of an antique-shop version of the Twilight Zone. You have to see it to believe it.
So while I've been busy this past week searching for the strange and unusual in far off places around the country, it was good for me to take a trip to this familiar haunt to remind myself that there are cool places to shoot close to home. In fact, in the two hours or so that I wandered around the outside yard, I probably shot 150 photos--and I got lots of great keepers that will surely show up in future book projects. So before you pull out the maps and tour books for your next far-off trip, pull out your local phone book and see if there aren't some great shooting venues right in your own back yard.
Tuesday, August 11, 2009
Discover Watercolor Paintings on Your Windshield
Whether you're at home or on vacation, one of the things that you can never avoid (especially if you travel with me) are rainy days. I seem to attract rainy days to my travels like a magnet and the moment I decide to go somewhere and start checking the forecasts, it's rain, rain, rain. (The week after I return, of course, it's sunshine all the way.)
Since you can't avoid the rain, sooner or later you're going to get frustrated enough to go out and try to find pictures anyway. And you can find good pictures in the rain (though I hate to admit it) if you're willing to get yourself and your camera a bit wet (a zipper bag is a good place to keep your camera until you're ready to shoot): kids splashing in puddles, colorful umbrellas at the bus stop and neon signs reflecting in puddles are all nice subjects.
Another fun way to get photos of the rain (and to stay a bit dryer) is to photograph through rain-covered glass, whether it's the windshield of your car or the front window at the local Starbucks. By focusing on the glass and using a wide aperture (to limit depth of field) you can create some very pretty impressionistic pictures--which is how I made this shot. After several hours of driving around Amish farms outside of Lancaster, Pennsylvania on a nice sunny day, a storm came up suddenly and it rained so hard we literally had to pull off into a driveway to wait things out. The wipers were in a very slow-motion mode and I noticed that just before the arm swung over to clear the window again, the barn ahead of us took on a watercolor-like charm, so I focused on the glass and let the barn go completely out of focus.
The trick to these kind of windshield shots (and the same goes for shooting from a house or coffee shop window) is to focus manually on the windshield and not the background. If you focus on the background you'll simply put the scene out of focus. But by focusing on the glass surface, you can get some really interesting patterns of raindrops framing your scene. And again, by using a wide aperture, the depth of field will be shallow and your subject will be totally out of focus. If you're using a point-and-shoot camera that won't let you focus manually, just try to place the camera close enough to the glass so that the lens focuses on the window and not the background; it takes a few tries sometimes, but I've done it with point-and-shoot cameras.
Of course, you could also fake this effect on a perfectly clear day by spraying a sheet of window glass with a spray bottle and focusing on the glass--a great way to shoot an Monet-like image of a garden or vase of flowers. Just ask a friend to hold the glass steady or use a pair of old light stands and some cheap clamps to hold the glass in place.
I hate rain as much as any photographer but there are some fun photos out there to be found even during the most miserable of days. And I'll try to keep this upbeat thought in my head next time it's pouring and I'm stuck in a $75-a-day rent-a-car cruising through the countryside.
Monday, August 10, 2009
Get Positive Impact with Negative Space
I'm a firm believer that every tiny bit of the frame should be working toward the benefit of the whole. If there is something in a frame that isn't working--try to get rid of it, either by cropping with your zoom lens or by changing your vantage point. But there are times when using empty areas, what artists call negative space can be a useful and provocative part of your compositions.
There are actually three elements in any design: the positive space (that area where your subjects lives), the negative space (any substantial blank area in the frame) and the border. Your job is to create a pleasing interaction of these three elements.
Negative space can be used in a number of ways to help build a powerful composition. One way that negative space works is to simply create emphasis for the positive space (again, your subject). By photographing a horse on a hill with lots of sky behind it, for example, the eye naturally lands on the horse because it's the most interesting thing in the frame. Very importantly, blank areas in the frame can also be used to create a sense of balance. If you're photographing a tall ship in silhouette at sunset, for instance, you can balance the dark mass of the ship with a large bright area of sunset sky.
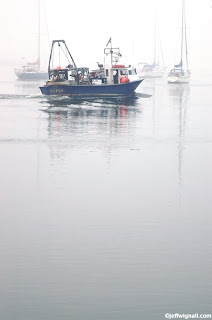
Yet another way that negative space can be exploited is to create a sense of distance and space. In the shot of the fishing boat, by using the negative space of the blank water so strongly at the bottom of the frame, it exaggerates the space between where I was standing and the boats. The eye can't help but travel up through the path of blank canvas and arrive at the boats. And by giving the eye such a long area to travel across, the brain has a better handle on the distances involved. You get a much better sense that I'm standing on the shore observing the boats.
Whenever you find an interesting object or subject to photograph, see if you can't find an area of relatively blank space--water, a lawn, sky, a big shadow--to help create a more interesting composition. Nothing can be a very powerful creative tool.
Labels:
composition,
negative space,
space,
white balance
Sunday, August 9, 2009
Photographing Architecture: Let Extreme Angles Work for You
One of the problems of photographing buildings, especially tall buildings, is that very often the only place to shoot them from is standing right in front of them. Being so close means that you're only left with one angle: looking straight up. But looking up at a tall building with a camera creates something called the keystone effect that causes the building to look like it's falling over backwards, or at least leaning pretty severely. You can even get the same effect by laying on the ground and shooting up at a tall person with a wide-angle lens.
In most photo books (including the ones I've written) you're told that the solution is either to back father away from the building (the simplest solution) or to drop several hundred dollars on what's called a perspective control or "PC" lens (the more exotic solution). If you happen to love photographing tall buildings, a PC lens is actually not that bad of an investment (that is, if you own a DSLR), but it's really a specialty item and only a handful of pros that I know actually own one.
But there is another very creative way to handle tall buildings and that's just to go with the flow--exploit the wildness of the extreme angle and exaggerate the lean. In the shot of the old New England clock tower shown here, I made the lean even more extreme by letting the tower run diagonally through the frame. Instead of looking like a mistake, the shot now looks more like a dramatic magazine cover (or maybe a still frame from Hitchcock's Vertigo). The great thing about working with buildings like this is that you can do it with even the simplest of point-and-shoot cameras. The closer you get and the more extreme the angle, the more dynamic your composition will be.
Also, set your camera to the aperture-priority exposure mode if you can so that you can select a small f/stop (large number) and get maximum depth of field to keep the entire tower or building in sharp focus.
Saturday, August 8, 2009
Night Photo Techniques: Take a Swim in the River of Night
There are a few different ways to approach photographing the city at night. One is to adhere to our obsession with reality and set the camera up on a a tripod, frame an interesting scene and get a nice sharp, well-exposed photo. That's a completely legitimate approach; it's nice to know how to take a good night shot and it's a kick to have really professional-looking night photos.
But I've always felt that some night scenes--particularly New York's Times Square--are just too exciting and too flamboyant to be captured in a traditional way. Yet many photographers (myself included at times) are fearful of leaving reality behind because they're afraid that if their photos are different people will think they goofed. But the city at night is not about doing things correctly or trying not to make mistakes, it's about diving in and taking a swim in the river of light and color that's surging all around you. Forget reality! The reality of Times Square at midnight is that reality has been suspended in favor of free-flowing imagination and an electric energy that is so thick you can almost taste it. Trying to ignore that torrent of inspiration is like swimming upstream with an elephant on your back--you have to just go with the flow and find new techniques, new visions that match that energy.
One way to photograph city lights at night is to use a technique called zooming where you rack your zoom lens from one focal-length extreme to the other during a time exposure to turn bright lights into long colorful streaks. The more color and light that you cram into the frame when you zoom the lens, the more intense and vibrant your shots will be, so look for vantage points where you are just engulfed in light. And don't worry about keeping the camera steady during the zoom because a small amount of camera shake (try turning off the image-stabilization and see if that makes things better or worse) usually just enhances the effect.
While places like Times Square or the Las Vegas Strip are obviously perfect for streaking night lights, you can even do it with the neon sign in the local pizza restaurant window. In fact, I almost always take zooming shots of my Christmas tree because it can create wild patterns from the fairy lights.
I really believe in letting the passion of a place soak into your imagination and your ideas, whether it's the reality of a desert landscape or the chaos and intensity of Times Square. Don't be a bystander--jump into the river of imagination and leave reality on the shore! OK, enough water analogies, I'm done.
Friday, August 7, 2009
Follow Graceful Curves in Nature
In the same way that a gently curving path through a forest or field is more interesting to explore than a straight rigid one, a graceful curving line in a photograph is more interesting for the eye to explore. Rather than delivering the eye from one point to another with great efficiency (railroad tracks pointing to the horizon, for example), curved lines entice your eye to wander, to study details along the way at a more leisurely pace and, as Glen Cambell once sang (does anyone remember Glen Cambell?), they are simply more gentle on your mind (actually Glen sang "Gentle on My Mind" but I think we can invoke some poetic license here). Curves invoke feelings of softness, slowness, gracefulness and even safety--you're less likely to fall off a gently curving rock, for example, than a sheer straight cliff.
Nature is a particularly rich source of soft curving lines and you can find them in everything from the human form (some have more curving lines that others, granted) to streams meandering through a meadow to the curve of an ocean beach. Interestingly, curves tend to work best in a photograph when you show only a section of them--as I did with this snippet of a bleeding heart branch. By cropping in on the line a bit you can isolate the most interesting part of the curve and, as with the old show biz adage, you leave the eye wanting more. Rather than photographing the entire curving limb of a saguaro cactus, for example, you might just close in on the elbow and reveal the interesting contrast between the rough texture of the plant and the softness of its shape.
Thursday, August 6, 2009
Avoid the Need for a Model Release
One of the issues that all photographers have to confront when photographing other people is getting a model release. If you're thinking of selling, or even just displaying, photos of other people you really should have a valid release. The actual legal need for a model release (especially for purely editorial, noncommercial usage) is frequently debated (and often misunderstood), but from my personal point of view: if you have recognizable people (or property) in your images, it's worth getting a signed release.
The key word here, I think, is recognizable. I'm certainly not an expert on model releases, but it's generally accepted that if a person isn't readily recognizable, then you don't need a release. The subjects in this photo may recognize themselves, of course, because they remember being at the beach or they may recognize their beach pails or their clothes, but without their faces showing, it's unlikely anyone could ever prove it was them in this photo.
That's why, when I'm out shooting in public places (like beaches) and I am too far away (as I was in this case) to get to the subjects in time to have them sign a release, or when I'm working where it's almost impossible to get a release signed (a busy city street in Manhattan), I consciously look for moments when the subjects' faces are turned away from me. Does it rob me of some of the best shots? Yes, I think it does. But does it simplify life and provide good photos in situations where getting a release would be a major hassle or impossible? Yes. I watched this interesting father and daughter gathering (I think) periwinkle shells at the beach for about 20 minutes or so, but I was a few hundred feet up on a rocky overlook and getting down to them with my tripod and cameras would have been pretty dangerous. So as I watched them, I tried to wait until they were just generic humans on the shore. Again, it's a trade-off that probably isn't even legally necessary, especially for editorial usage, but it makes my life easier.
By the way, the other downside of not making contact with your subjects is that you can't offer to send them prints of your photos. I would love to have shared a print with this father/daughter since they seemed to be having such a nice time together, but by the time I had finished shooting they had moved on and I lost track of them down the beach.
There are some good books available on model releases, of which my friend Dan Heller's A Digital Photographer's Guide to Model Releases: Making the Best Business Decisions with Your Photos of People, Places and Things is certainly one of the most exhaustive and broad views of the subject. Dan isn't a lawyer, but you'd be hard pressed to find someone who knows more about the business of photography.
The best advice in my view is to carry releases with you, get them signed when you can (and get a phone number and address for your subjects) and consider consulting a lawyer about this subject if you begin to sell or display your photos.
Wednesday, August 5, 2009
Photographing Dragonflies, Part II
In yesterday's post I talked about giving yourself a personal photographic challenge and my desire to get a really killer shot of a dragonfly. I haven't been back over to the pond yet to put my new found bits of dragonfly-photo knowledge to work, but today I'll share with you the many things I learned about photographing these beautiful and mysterious creatures.
Photographing dragonflies kind of reminds me of photographing the Blue Angels because, as I wrote a few weeks ago about shooting those ultra-fast jets, you need to plan a strategy if you want to get sharp photos. Here are some of the things I observed in my first day of shooting that may help you if you try to photograph them:
In future postings I'll talk about using flash with dragonflies and also flash accessories (I'm going to try some this weekend, I hope). If you have any questions or comments, feel free to post them.
By the way, when I was a kid we used to call these "sewing needles" and the myth was that if one caught you, he'd sew your mouth shut. So far none of them has tried to sew anything up!
Photographing dragonflies kind of reminds me of photographing the Blue Angels because, as I wrote a few weeks ago about shooting those ultra-fast jets, you need to plan a strategy if you want to get sharp photos. Here are some of the things I observed in my first day of shooting that may help you if you try to photograph them:
- You'll need to find a location with a lot of dragonflies in order to photograph them, of course, and the best place to look is along the edges of a pond or stream. I found hundreds of them zipping along the edges of the small neighborhood pond where I was shooting. Interestingly, since I grew up near this pond, I have always known it was a favorite spot for dragonflies, so finding them was easy.
- Observe them for a while before you begin shooting. While they are indeed incredibly fast creatures, they tend to come back to rest on the same favorite spots time and time again. If you see a dragonfly land on a particular leaf once, odds are they will return to that same exact spot.
- Shoot them at rest. While my ultimate goal is to get a good in-flight shot, I'm trying to build up my skills and confidence a bit by shooting them at rest. Of course, I won't pass up any attempts to get a good in-flight shot, but for now I'll be happy to get a great resting shot.
- Use a long lens and extension tubes if you have them. The more distance you can put between yourself and your quarry, the better the odds that they'll ignore you. I have been shooting with a 70-300mm Nikkor zoom with a Kenko 20mm extension tube.
- Use a small aperture. Considering the magnification I'm using with the 70-300mm lens (usually at 300mm, which is 450mm in 35mm terms on my Nikon D90 body) and the fact that I'm using extension tubes, depth of field (near-to-far sharpness) is almost nonexistent. You must shoot at a small aperture (I tried shooting between f/13 and f/22) to have any hope of a sharp photo.
- Keep your subject parallel to your sensor plane. Because there is so little depth of field you have to try to keep as much of the dragonfly as possible parallel to your camera body so that you're minimizing the depth (width or length, depending on your perspective) of the dragonfly body and wings. In the shot above, for example, the head and wings are pretty sharp, but the long extension of the body is not. Had I been off to the side more, I might have been able to make that body section sharper.
- Use a plain background. The thing I don't like about this shot is the mix of black and green in the background--a mix of leaves and dark water. Try to shoot with a totally plain (and out-of-focus) background. I will pay much more attention to that in the future since most of the shots I took on the first day were pretty much ruined by a busy background. Can I save them in Photoshop? Yes, some of them. Better to start with a plain background.
In future postings I'll talk about using flash with dragonflies and also flash accessories (I'm going to try some this weekend, I hope). If you have any questions or comments, feel free to post them.
By the way, when I was a kid we used to call these "sewing needles" and the myth was that if one caught you, he'd sew your mouth shut. So far none of them has tried to sew anything up!
Tuesday, August 4, 2009
Give Yourself a Creative (and Technical) Challenge
To grow in photography, to enhance your skills and your vision, requires that you continually push yourself beyond your comfort zone and work with subjects that are challenging. If all you ever photograph are the things that you're already good at shooting, you'll be living in a kind of technical and creative limbo--an artistic plateau. This happens to every artist in every medium, but it's important that you push through this invisible wall and experience the fun (and danger) of bigger and more demanding subjects.
Easier said than done and as I learned yesterday, it takes a lot of work to get good at something new. While out doing errands, I stopped by a small pond near my home to take a few practice panoramic shots so that I could get a bit more experienced with stitching images into panoramas before I take off on a few shooting trips this fall. After I finished shooting the sample pans, I took a walk to the edge of the pond just to see what was living there. I spent most of my childhood hanging out at this small park and it hasn't changed much since I was a kid. There is still a lot of pickerel weed growing along the edges and, as I discovered (and remembered from my childhood), dragonflies love pickerel weed.
There were dozens, if not hundreds, of beautiful dragonflies buzzing in and out of the weeds and among the wildflowers that grew at the edge of the pond. And as I was watching them, I had a bit of a photographic epiphany--I had never taken a really great photograph of a dragonfly and I've always wanted to do that. So I went back to the car, got out my close-up gear and decided to spend a few minutes to see if I could get any good shots. Well, of course, a few minutes turned into a few hours and by the end of the session I was getting incredibly excited about the subject--as well as incredibly frustrated.
Getting photos of these quick (very quick) little buggers is not easy! To call it a challenge is a huge understatement--it was like learning a whole new language. But I decided right then and there that I was going to make this my August goal: I was going to challenge myself to get some world-class dragonfly photos by the end of the month (or until they disappeared, anyway). I just absolutely loved photographing these beautiful creatures even though I knew that what I was getting was pretty lame photographically.
The shot above is probably the best of the lot and it is nice, but still has some (to my eyes, at least) technical flaws. I learned a lot about photographing insects in those few hours though and since the pond is only a short walk from my house, I'm going to spend as much free time as I can trying to improve my game. Tomorrow I'll tell you more about some of the very specific things I learned about shooting dragonflies--the frustrations, the techniques, the tools, etc. And we'll see if, by the end of the month or so, I can come up with a few really satisfying images.
In the meantime, think about a subject you've always wanted to master and see if you can't create a challenge for yourself. One you start to go after the subject seriously, I'm sure you'll find your pictures will grow much faster than you thought they would. And remember, growth and learning are always exponential things; once you get to the next level, you climb ever faster and ever higher to the next levels and pretty soon you'll be soaring around your new subjects like a dragonfly skimming along the surface of a pond.
Subscribe to:
Posts (Atom)