Welcome to (The Occasional) Photo Tip of the Day! Please also visit my main site jeffwignall.com. Text and photographs Copyright 2016 Jeff Wignall.


“The best way out is always through.”


Showing posts with label close-ups. Show all posts

Sunday, May 22, 2011

Admiring the Surprise Gift of the Poppies

If you had never seen one open before, who would think that this hairy little pod would open up to become such a cheerful orange flower? But that's one of the things I like about poppies: they start out as an almost alien-looking plant form pushing up through the ground in April, then continue their mysterious appearance by growing these strange buds on graceful--but equally hairy--stems that seem right out of Little Shop of Horrors. Then you come out one sunny morning in May and the garden is full beautiful orange or red blossoms. It's almost as if nature is testing your patience to see if you will be curious enough to wait for the May surprise. I photographed this one last year (on May 31st) and just noticed yesterday that this year's buds are beginning to look very similar. It pays to scout around the garden this time of year to see if you can find interesting shapes and forms before the flowers actually blossom. I shot this with a Nikon D90 (now discontinued, see yesterday's posting) with a 70-300mm Nikkor zoom and a close-up extension tube (not sure which size, probably 20mm) with existing light coming from behind the bud.

Exposure notes: Shot at ISO200, f/5.6 at 1/100 second in Shutter Priority mode, on a tripod. Capture in RAW.

Wednesday, August 25, 2010

Frame Flowers Against Black for Drama

One of the problems of photographing close-ups of flowers is that there is usually a lot of clutter around them. You can use sticks and tripod legs and things to try to keep some of this scrub out of the frame, or limit your depth of field to just your subject (use a wide aperture to limit depth of field) so that the background is out of focus, but it's still there. One way to get a nice clean and dramatic look in flower photos is to use a black background. I carry around a big piece of black fabric and also some pieces of black poster board (about a buck a sheet at craft stores). Then when I find a flower I want to isolate, I slip the background in a foot or two behind the flowers (to keep it totally out of focus and with no reflections or bits of white lint showing up).

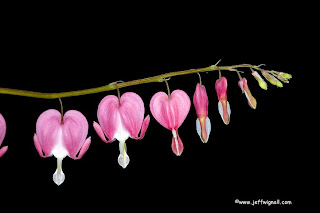
I used a sheet of back fabric (slung over a lawn chair a few feet behind the flowers) to photograph these bleeding heart flowers in my garden and, just by good fortune, the fabric was in shadow while the flowers were in sunlight. The added contract of sun against shade helps too. I did, however, also use a small amount of fill-in flash because I wanted more depth of field than I was getting and turning on the flash helped me shoot at a smaller aperture (I was working, as always, in the aperture-priority mode) of f/22. Again, because the flash was several feet away from the black fabric (the flash was only about a foot from the flowers), there was no chance of light picking up folds in the fabric, etc. Later in Photoshop I also used the selective color tool to make sure the black was very black.

Tuesday, May 11, 2010

Photograph Flowers on Cloudy Days

Although we tend to think of gardens and sunshine and photography as going well together, in fact, the best time to photograph most gardens and most flower close-ups is on cloudy--even rainy-days. The problem with shooting on bright sunny days is that, as cheerful as they are, that bright sunlight tends to burn out the highlights of light-colored blossoms and it also creates a lot of contrast. Contrast is one of the toughest things to control in terms of exposure, so the more you can avoid it, the easier your life will be. I photographed this peony blossom in one of my side gardens and it was just starting to rain when I made the photo. A few things pushed me into making the photo at this particular moment: one was that I knew that the blossom was at its peak and that a heavy rain would probably destroy the flower (it did). But also, I'd been watching this plant for days hoping for a great shot, but the light was always so bright that I couldn't hold any detail in the petals. The heavily overcast sky of a rainy day was just what I'd been waiting for and it gave the peony a beautiful rich pink color with a minimal amount of contrast--just perfect conditions.

There are some tricks I could have used if I'd really needed to shoot on a sunny day (like putting a diffusion screen between the flower and the direct sun to soften the light), but I really just wanted a "straight" shot made with no extra gear. That decision was part laziness but also, I was using the picture to illustrate a book for beginning photographers--and they weren't likely to own diffusion screens (or the light stands to hold one), so it seemed more honest to shoot the photo in the simplest way possible. Anyway, even though it was raining when I spotted the blossom, I knew that it was a "now or never" shot and so I hauled out the tripod, set up the camera and shot. Good thing I did--the next morning the blossom was completely misshapen by the pounding rain that came during the night and I would never have gotten the shot. The thing I like most about the picture, ironically, is the soft light of the very heavy overcast skies.

So next time you get a cloudy day, head out to the garden and do some close-up work--you'll be pleasantly surprised at how uniformly nice all of your exposures are and just how much color saturation you get in the flowers.

Monday, April 19, 2010

If You Grow it, Bugs Will Come: Four Lessons

Last summer I had a client that wanted me to take some photographs that included bugs in them. That's a nice request and a fun challenge--but they needed the photos the next day. I thought their request was a bit nuts and never expected to be able to actually find and photograph a bug on command, but I actually completed the assignment--and was even able to give them a choice of bugs--including this green-looking bee (I have no idea what it is). The trick was just sitting in my garden, camera on tripod, and waiting. Low and behold, within about 10 minutes of sitting there staring at some black-eyed Susans, a small moth showed up. Then some bees. Then this green thing.

Even though I've spent most of my life gardening, I guess I never realized just how many bugs hang around gardens--because in the past I either ignored them or was annoyed by them. But suddenly, with an assignment on the line, bugs became my friends. I was able to spend almost an hour photographing this little guy because (lesson number one) he kept coming back to the same flowers over and over. And also, once I set up the camera next to a particular blossom (lesson number two), he (or she) pretty much ignored me.

Later I got even more hip (I'm slow on the uptake sometimes) because once the light fell off of the flowers I was shooting, I picked some flowers, put them in a vase and put the vase on a picnic table in the sun--and, amazingly enough, the bugs followed me. While not as many came to the flowers in the vase, apparently they like the sunlight (lesson number three) because they were ignoring the flowers in the shade in my garden and hanging out with me in the sunlight.

The last lesson for the day was that you should always take on a challenge even if you think you might fail. What's the worst I could have told this client? Sorry, no bugs today? That's not my fault! But as it was they were pleased, I made some cash and the bugs are now famous.

The bugs are waiting for you--so if you're looking for something fun to shoot, go sit out in the garden. By the way, I used a 105mm Micro Nikkor lens and a 20mm extension tube for this shot and I used a small aperture to get some depth of field.

Tuesday, August 4, 2009

Give Yourself a Creative (and Technical) Challenge

To grow in photography, to enhance your skills and your vision, requires that you continually push yourself beyond your comfort zone and work with subjects that are challenging. If all you ever photograph are the things that you're already good at shooting, you'll be living in a kind of technical and creative limbo--an artistic plateau. This happens to every artist in every medium, but it's important that you push through this invisible wall and experience the fun (and danger) of bigger and more demanding subjects.

Easier said than done and as I learned yesterday, it takes a lot of work to get good at something new. While out doing errands, I stopped by a small pond near my home to take a few practice panoramic shots so that I could get a bit more experienced with stitching images into panoramas before I take off on a few shooting trips this fall. After I finished shooting the sample pans, I took a walk to the edge of the pond just to see what was living there. I spent most of my childhood hanging out at this small park and it hasn't changed much since I was a kid. There is still a lot of pickerel weed growing along the edges and, as I discovered (and remembered from my childhood), dragonflies love pickerel weed.

There were dozens, if not hundreds, of beautiful dragonflies buzzing in and out of the weeds and among the wildflowers that grew at the edge of the pond. And as I was watching them, I had a bit of a photographic epiphany--I had never taken a really great photograph of a dragonfly and I've always wanted to do that. So I went back to the car, got out my close-up gear and decided to spend a few minutes to see if I could get any good shots. Well, of course, a few minutes turned into a few hours and by the end of the session I was getting incredibly excited about the subject--as well as incredibly frustrated.

Getting photos of these quick (very quick) little buggers is not easy! To call it a challenge is a huge understatement--it was like learning a whole new language. But I decided right then and there that I was going to make this my August goal: I was going to challenge myself to get some world-class dragonfly photos by the end of the month (or until they disappeared, anyway). I just absolutely loved photographing these beautiful creatures even though I knew that what I was getting was pretty lame photographically.

The shot above is probably the best of the lot and it is nice, but still has some (to my eyes, at least) technical flaws. I learned a lot about photographing insects in those few hours though and since the pond is only a short walk from my house, I'm going to spend as much free time as I can trying to improve my game. Tomorrow I'll tell you more about some of the very specific things I learned about shooting dragonflies--the frustrations, the techniques, the tools, etc. And we'll see if, by the end of the month or so, I can come up with a few really satisfying images.

In the meantime, think about a subject you've always wanted to master and see if you can't create a challenge for yourself. One you start to go after the subject seriously, I'm sure you'll find your pictures will grow much faster than you thought they would. And remember, growth and learning are always exponential things; once you get to the next level, you climb ever faster and ever higher to the next levels and pretty soon you'll be soaring around your new subjects like a dragonfly skimming along the surface of a pond.

Friday, July 17, 2009

Keep a Spray Bottle Handy for Flower Close-ups

You probably don't think of a gardener's spray bottle as a standard photo accessory when you're photographing flowers, but I always have one nearby--even on (especially on) bright sunny days. Nothing is as pretty in the garden as a mist covered rose in bloom, but the problem is that when the sun comes out natural mist burns off quickly. Besides, I'm not that much of a morning person (an understatement) and so I rarely see the morning mist on anything.

You'll also find mist on flowers and plants if you shoot after a gentle rain, of course, but often the skies are still gray and the lighting is kind of bland. Hard rains also tend to damage delicate flowers and if you want until they pop back into shape, again, the mist will have vanished.

The solution is simple: carry a small misting bottle that you can buy in any garden center. After you compose your shot and have your exposure set, give the flower a few quick sprays and you'll get a wonderful mist-covered blossom. I've found that different misting heads create different size beads of water, so experiment different bottles or different spray settings (most bottles have an adjustable spray head). Also, if you continue to spray several times the water tends to bead up in larger drops and that can look interesting too.

By the way, if the roses (or other flowers) in your garden are looking kind of tattered and you still want to do some close-up work, consider visiting your local florist. I bought this rose (with several others) to shoot for an ad assignment because the roses in my area are all past. Long-stemmed roses are only a few dollars each and if you're careful buying them, you'll find perfect specimens in all different colors, shapes and patterns. Then just pop them into a vase with some bloom extender and they'll last for days. When you're done shooting them, give them to your sweetie and she (or he) will look much more kindly on the time you spend taking all of those pictures.

Monday, July 6, 2009

Get Closer to Butterflies

Photographing butterflies is always a challenge because they seem to be very capricious in their movement. You'd think that once the found one good blossom with nectar, they'd settle in for a nice long drink, but that's rarely the case. Usually they flit from blossom to blossom and often even plant to plant in one feeding session. It can be really frustrating to try and get just one good close-up shot.

There are, however, some things you can do to improve your odds. The first, of course, is to plant a butterfly-friendly garden with plants like tithonia (shown here), butterfly weed, bee balm, etc. Once you've got them in your garden though, try these tips to get more good close-ups:

  • Shoot early in the morning. All insects feed heavily early in the day, so there will be more of them to shoot. Also, their metabolism is slower when it's cool out or when the air is heavy with morning dew, so they'll be moving slower. The hotter the day is the more buoyant they become.
  • Don't chase--wait. Set up your tripod near a nice blossom with a plain background and wait. You'll have a far better chance of getting a good shot if you sit-and-wait rather than chase. If you move around your motion will scare them off more than anything, but if you stay in one place, they will get used to your presence and they'll often land inches from your lens and ignore you.
  • Use a longer focal-length macro or macro zoom. I shot this photo with 105mm Micro Nikkor lensn and had about 18-inches between the lens and the butterfly. I've shot with a 55mm Micro Nikkor, as well, but I was less than 10-inches away and it was much harder to get them to sit still. Also, with a long lens you're less likely to block the sunlight.
  • Use flash if you need to stop their motion. I actually don't mind a bit of motion in a butterfly photo because that's what butterflies do--they flutter. But I also like nice crisp shots and if the light is a bit low you can either rasie the ISO or flip on the built-in flash. If your camera allows you to compensate or adjust flash power, try using minus-one-stop of compensation (on the flash output, not the camera's exposure) and you'll get a nice natural balance of flash to daylight. Read your camera or flash manual.
  • Work on calm days. Easy to say, I know, but if you can work or calm days the butterflies will be more still and also less likely to drift around on the breeze.
  • Put a flower in a vase. OK, yes, this is manipulating nature a bit, but so what? Clip an attractive blossom and place it in a water bottle on your picnic table and you can lure the butterflies to your set. It works, I've done it many times.
  • Be patient. Don't give up too soon. Many times just when I've packed up the tripod because the butterflies weren't landing anywhere near the plant that was in the best light, they suddenly get interested. They're not mocking you, they're just being themselves. Be patient, wait, you can get some good flower close-ups while you wait.
  • Read about butterflies. There is a lot about them on the web and there are some nice field guides at your library--the more you know, the more shots you'll get.
Butterfly photos look terrific on homemade greeting cards and they will absolutely draw attention to your Flickr Photostream (don't forget to tag them with the kind of butterfly), so it's worth spending a few hours a week trying to get a great shot. By the way, yes, I blurred the background of this shot in Photoshop with the Gaussian blur tool. Simple to do: I just used the magic wand selection tool to isolate the background (and then reversed the selection to protect the butterfly and flower) and then applied a Gaussian blur to the unprotected areas. It takes some practice to get good at selections, but like any other skill the more you do it the better you'll get.

Wednesday, April 29, 2009

Consider the Beauty of the Lowly Dandelion

It's a good thing that I don't take better care of my lawn because if I did I would probably lose all the interesting weeds and wildflowers that grow there. Among my favorite "weeds" are the dandelions that I have by the hundreds in the back lawn. Dandelions may be the scourge of lawn fanatics, but to me they're cheerful and bright and the bunny rabbits love to eat them. And if you've never laid down in the lawn and looked face-to-face with a dandelion, try it--they're amazingly intriticate flowers. Amid the many layers of delicate yellow petals are dozens (if not hundreds) of little curly florets, or tiny flowers. Most people, unfortunately, poison or weed whack them into oblivion before really appreciating them.

Photographing a dandelion is mostly a matter of laying on your face on the lawn and having a camera that lets you focus very closely. I took this shot yesterday while continuing to do test shots with the Nikon D90. I was using a 105mm Micro Nikkor which is an incredibly sharp lens and a great focal length and lets you get very close to small subjects. I realized while shooting this photo, however, how much I wished I was working with a zoom lens. When you're limited to one focal length you have to physically move closer or farther away to change the image (subject) size. While using a prime lens (a single-focal-length lens) is a lot more restrictive because you can't change the composition by simply twisting the lens barrel, it does force you to try to find subjects and compositions that match the focal length. It's an interesting challenge.

I've also photographed dandelions with point-and-shoot digital cameras have have gotten some great photos. Unfortunately some point-and-shoots set the lens to a single focal length once you put it in the macro mode so you have exactly the same issue as with a prime lens: you can't zoom. Still, some point-and-shoots, like my old Olympus C5050 (and I love that camera) let you focus extremely close and there's almost no flower too small to shoot.

Next time you're thinking of killing off the dandelions, grab the camera and take a few mintues to photography it first. I'll write more about close-up photography in the future because it's one of my favorite topics. Taking good close-up photos is really tough work but I do have some good tips to share. By the way, my friend Bryan Peterson has a wonderful new book out called Understanding Close-Up Photography and it's well worth owning. Bryan is one of the world's best photo instructors and writers and I learn something every time I open one of his books.

Friday, February 13, 2009

Black Out the Background with Flower Close-ups

You can probably tell by the number of flower and garden related postings lately that my mind is set on spring. I'm so sick of winter! But winter, at least if you live in the northern half of the country, is a good time to cozy up with your monitor and examine last summer's close-up shots to see what you can do to make this year's photos even better.

Among the most common flaws I find in my own close-ups shots are messy backgrounds--backgrounds that are either just too filled with clutter or where lighter objects in the background (grasses, stems, other flower blossoms) are competing too aggressively with the main subject. One way to tame backgrounds, of course, is to use a really selective focus and limited depth of field (near to far focus). Shallow depth of field is an inherent quality of close-ups, but sometimes if the depth is too shallow, your subject is out of focus too. So there are a lot of times when I end up using a small aperture to keep the subject in good focus, but that also brings stuff into focus from the background. A real problem!

The solution? The best solution I've found so far is to use a black background behind my primary subject. You can use a piece of black fabric (try to avoid a shiny fabric) or a piece of black Foam Core board (I spray it with a matte spray to kill any glare spots). Even if you use flash (as I often do) for close-ups and keep the background a few feet behind the subject, the backdrop will still remain jet black. To get this shot of bleeding heart blossoms (isn't it neat they way that you can see the progress of the blossoms opening on just one stem?) I placed a piece of black fabric over a lawn chair and placed the chair about four feet behind the plant. Because I wanted the colors richer and didn't care how "black" the background went, I ended up using a -1 stop exposure compensation setting to saturate the flower a bit.

Speaking of exposure, though, it's important to set your exposure for the flowers and don't let the meter get fooled by all that blackness in the background. If you're shooting by existing light, just meter before you put the backdrop in place. But if you're using flash, and matrix metering (in the Auto or Program modes, for example), the camera will base its exposure on the flash and you will probably get very good exposures automatically.

Sunday, January 11, 2009

Plan Your Spring Photography Garden

As I write this, my gardens are covered in snow, the temps are in the low 20s (and expected to go below zero by the end of the week) and spring seems a million miles away. But in reality, the first day of spring is only about 10 weeks away and already my mailbox is filling up with garden catalogs--and they save my life every winter!

I spend a lot of winter nights just daydreaming about what plants I'd like to grow and which would be the most interesting to photograph. The bleeding heart shown here, for example, is an incredibly easy-to-grow shade plant but provides one of the most photogenic flowers you'll ever see. And seedlings of this plant are really cheap (under $5) online. Most seed catalogs list literally thousands of flower (and veggie) seeds and it warms my photographer's soul just to look at all of those interesting colors and shapes.

Now is the time to think about some of the plants you'd like to photograph in the coming spring and summer months and to start hunting down good seed and plant catalogs. You can save a lot of money growing your own plants from seeds (or small seedlings bought online) and during the dead of winter many (if not all) online nurseries have substantial sales. The other benefit of starting from seeds is that you'll have a huge variety of potential plants compared to what you'll find in local garden centers.

To get you started, here are a few of my favorite online nurseries.

Plant Delights (biggest hosta seller in the world, lots of tropicals)

Park Seed Company (very high quality seed)

Burpee (the traditional company, many types of seeds)

Johnny's Seeds (that's a direct link to their free catalog)