Welcome to (The Occasional) Photo Tip of the Day! Please also visit my main site jeffwignall.com. Text and photographs Copyright 2016 Jeff Wignall.


“The best way out is always through.”


Thursday, April 30, 2009

Don't Be Afraid to Use Flash on Flowers

As long as we're on the subject of flowers and gardens (obviously a major subject with me), let me talk about flash for a minute. A lot of times I shoot either very early (usually when I've been up all night writing!) or very late in the day. I love the light in my front garden late in the day because that part of the yard gets the setting sun, so the light is soft and warm.

The problem with shooting late in the day though is that the light is disappearing fast (as opposed to early morning when the light just keeps getting brighter) and so sooner rather than later you run out of good light. The light is often prettiest just before it disappears but because it's so dim I have to shoot wide open and often at very slow shutter speeds that I'd prefer not to use. Since I use a tripod most (not all) of the time, the slow speeds aren't a problem in terms of camera shake, but if there's the slightest breeze the flowers just wave back and forth continually--a real problem if you want sharp photos.

The solution for me is to turn on the built-in flash. The flash fires at such a brief duration that it's like using a much faster shutter speed--it freezes the motion and, if I am shooting handheld, usually eliminates any camera shake. In addition, because your camera will pump out more flash if you set smaller apertures, you can use a smaller f/stop to get a bit more depth of field (and usually you need all the DOF you can get in close-ups). Because most digital cameras are very good at balancing flash in daylight, you'll get suprisingly good results that don't look artificial at all. I used my Nikon D90 here (with a 105mm Micro Nikkor) and I had to look at the EXIF data to see if the flash had fired or not (it had).

So if you're out in the garden or in a park and the light starts to fade, try popping on the flash and keep shooting a while longer. I think you'll find the results are surprisingly nice.

Wednesday, April 29, 2009

Consider the Beauty of the Lowly Dandelion

It's a good thing that I don't take better care of my lawn because if I did I would probably lose all the interesting weeds and wildflowers that grow there. Among my favorite "weeds" are the dandelions that I have by the hundreds in the back lawn. Dandelions may be the scourge of lawn fanatics, but to me they're cheerful and bright and the bunny rabbits love to eat them. And if you've never laid down in the lawn and looked face-to-face with a dandelion, try it--they're amazingly intriticate flowers. Amid the many layers of delicate yellow petals are dozens (if not hundreds) of little curly florets, or tiny flowers. Most people, unfortunately, poison or weed whack them into oblivion before really appreciating them.

Photographing a dandelion is mostly a matter of laying on your face on the lawn and having a camera that lets you focus very closely. I took this shot yesterday while continuing to do test shots with the Nikon D90. I was using a 105mm Micro Nikkor which is an incredibly sharp lens and a great focal length and lets you get very close to small subjects. I realized while shooting this photo, however, how much I wished I was working with a zoom lens. When you're limited to one focal length you have to physically move closer or farther away to change the image (subject) size. While using a prime lens (a single-focal-length lens) is a lot more restrictive because you can't change the composition by simply twisting the lens barrel, it does force you to try to find subjects and compositions that match the focal length. It's an interesting challenge.

I've also photographed dandelions with point-and-shoot digital cameras have have gotten some great photos. Unfortunately some point-and-shoots set the lens to a single focal length once you put it in the macro mode so you have exactly the same issue as with a prime lens: you can't zoom. Still, some point-and-shoots, like my old Olympus C5050 (and I love that camera) let you focus extremely close and there's almost no flower too small to shoot.

Next time you're thinking of killing off the dandelions, grab the camera and take a few mintues to photography it first. I'll write more about close-up photography in the future because it's one of my favorite topics. Taking good close-up photos is really tough work but I do have some good tips to share. By the way, my friend Bryan Peterson has a wonderful new book out called Understanding Close-Up Photography and it's well worth owning. Bryan is one of the world's best photo instructors and writers and I learn something every time I open one of his books.

Tuesday, April 28, 2009

Make Subjects Glow with Backlighting

Yesterday I was playing around in the front yard with the new D90 and trying to get some good close-ups of dandelions (I didn't) and just generally trying to get to know the camera. After I'd crawled around on the front lawn for an hour or so, I took a break and happened to look up and saw the late afternoon sunlight coming from behind my Japanese maple. I'd been out in the yard for about an hour and really paid much attention to the tree, but when the sun got low enough, the leaves and tiny buds just began to catch fire and it was very striking.

Strong backlighting and translucent subjects like leaves or flower petals are a great combination because the light makes them appear to glow from within. Exposure is straightforward as long as you keep the light source (the sun) out of the frame, but you can experiment with using exposure compensation if the shots look a bit too dark--try adding a stop to a stop and a third of additional exposure. The background was somewhat dark behind these leaves so I didn't have to use compensation because the darker background fooled the meter into thinking the subject needed more light. Had the background been brighter (a bright grassy lawn, for example), then I might have had to use compensation. Just experiment or bracket your shots and you'll find out what works.

Speaking of the D90, by the way, the one feature I don't like so far is the LCD--which seems far too bright to me. I dimmed it down to the -2 position (you can adjust the brightness of the LCD on this camera) and still it seems a bit light too me. I love the size of the LCD (about 3") because it's like looking at a projected image the size of a small print--very impressive. But I'm not happy with the brightness issue and I'm goign to ask around to see if anyone else has the same complaint. Let me know if you've noticed it. I never had the problem with my D70 cameras, so I'm surprised. I'm going to do more testing this week. Other than that though, so far I love the camera.

Monday, April 27, 2009

Read About GE's Micro-Holographic Technology

Wow! Talk about a cool new storage solution. Today GE introduced a new disc technology that is capable of storing up to 500 gigabytes of information on a single disc. By comparison, the largest capacity Blue-ray discs can only hold 50 gigabytes of information. And while the technology is aimed mainly at the archiving industry for now, GE says it will also be introduced to the consumer market. The breakthrough is the result of GE finding ways to get more reflectance from the surface of micro-holographic surfaces which enables storage of a larger capacity of data (and don't hold your breath waiting for me to explain that, because I can't). According to a GE spokesman: "The day when you can store your entire high definition movie collection on one disc and support high resolution formats like 3D television is closer than you think.'' Fantastic! That means I can get rid of all the DVD boxes and have my bookcases back again. And think about your digital photo collections: you can store years (maybe a lifetime's) worth of photos on a single disc. Read about the breakthrough, eventually it will change all of our lives.

Thursday, April 23, 2009

Fade Photoshop Filters for Artistic Control

Here's a really quick and easy tip that provides a simple way to control the intensity of Photoshop filters. Any time that you apply a Photoshop filter to an image and you think it's too strong (or just want to see how it would look if you had use less of the filter), simply go to the edit menu and you'll see an option to fade that filter (it will say "Fade...." with the name of the filter next to it). If you click on that option you'll get a slider that lets you adjust the strength of the filter from 100% (maximum) to 0% (no effect). The option is only available immediately after you apply the filter, however, so you must go immediately to the edit menu after you apply the filter. If you do anything else after you apply the filter, the fade option won't appear.

This technique is a great way to tweak filter strength without having to start over again. In photo here, for example, I used a diffuse glow filter (to be honest I'm not really sure what the point of that filter is, but it's worth trying them all, so I do) and then reduced the strenth to about 70%. I use the fade filter option all the time and it's a great time saver.

Wednesday, April 22, 2009

Add Digital Noise to Create a Film Look

Digital cameras have come a long way in a very fast time and while photographers once wondered whether digital would ever equal the quality of film, now it's clear that digital images are far superior in many ways. Let's face it, you could never walk into a dimly lit concert setting and "push" your film to ISO 6400 and get the same quality you can get from some professional digital cameras at that ISO speed. Whenever you pushed your film to a higher ISO speed you paid a price with much more obvious film grain--that sandy looking surface pattern that speckled the image.

But interestingly, the lack of that grain in some digital images tends to make digital images look very fake and "too good." Digital sensors have gotten so good at recording low light scenes, in fact, that some of the authenticity of them seems to be gone. Cheaper (and older) cameras typically have more obvious grain than more advanced DSLR cameras but it really depends on the quality of the sensor.

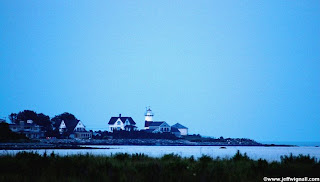
Fortunately, you can easily add noise back into your images to recreate a film look--which is something I do only rarely, but it's still a useful option with certain kinds of images. Low light and twilight scenes, for example, look more real when you add a touch of grain. When I shot this scene of a lighthouse on the Connecticut shore, for example, I was shooting at ISO 1600. On downloading, I was surprised to see that there was virtually no image noise and the image look too clean. Where was the grain I was used to seeing in twilight scenes? Though the image was technically better than a film image, it seemed like it was missing something.

Photoshop to the rescue. By selecting the "Add Noise" filter from the filter menu (Fitlers>Noise>Add Noise) I was able to add noise (or grain if you prefer) back into the shot. The tool is incredibly easy to use--you simply push the slider until you see the degree of grain that you want. Remember though that grain gets bigger in prints as you blow things up, so always add grain with the image at 100% size and make a test print before you finalize the image. And like adding salt to a meal, it's best if you add a little and then increase it if you need more; if you add too much salt (or too much grain) that's all you'll notice.

Who would have thought we'd have to add flaws back into digital images to make them look real?

Sunday, April 19, 2009

Use Treetops to Give Clouds Scale

I love photographing clouds; they're beautiful and come in endless varieties and, like snowflakes, you'll never see two exactly alike. In fact, I've often thought of putting together a book of nothing but cloud photos. (But who would buy the book when all you have to do is look up and see the show for free?)

Shooting clouds is pretty easy and all you really have to do is expose for the sky (not the clouds) and you'll usually get a good exposure. When you're shooting clouds though, you have a lot of visual references around you that reveal the true scale and drama of the clouds--trees, telephone poles, rooftops. If you take away those references and shoot just the clouds, they begin to lose their drama. As I've talked about with landscapes and other subjects, without including an object of known size, it's kind of hard to judge the size of clouds and so they lose a lot of their impact.

When I was photographing these clouds I shot a ton of pictures of the clouds alone but there was something missing. In reviewing the photos on the LCD I realized that without some "earth reference" of some kind the clouds lacked all of the drama and impact that I was seeing in person. In one of the early shots though I had included some nearby treetops and that was the frame that really stood out and revealed the real power of the clouds. So I shot several more frames (including this one) with the trees and they are by far the strongest images.

By the way, clouds (like sunsets) always get more intense just before and after a storm, so when the rain starts to let up and the clouds start to break up, start looking up. The cool thing about shooting clouds is that you can do it almost anywhere--it doesn't matter if you're on a beautiful island or in a mall parking lot, clouds are clouds and they're all pretty.

Saturday, April 18, 2009

Visit Your Sewage Treament Plant

OK, I'm kidding. But that's exactly where I shot this photo--at a stream near a local sewage treatment plant. And I had no idea this pretty stream was there.

I was out last week on my second day of testing my new D90 and decided to drive down to a small park on the shore of the Housatonic River, just a few miles from home. The river was pretty boring but there were some nice tall phragmites (river grasses) growing near the edge of the parking lot and so I drove over to take a look. Much to my surprise I found this pretty stream behind the tall grasses. The light was fading fast, but I was able to pop off a few dozen different exposures hoping to get a nice flow of water over the rocks. I shot this frame at 1/15 second at f/10 with a 70-300mm Nikkor lens.

Here's the weird thing: I couldn't see the stream clearly from on foot, but from the high window of my Ford van I had a clear view--so the best shots were all made from inside my car. I just rolled up a sweater and laid it across the door frame and was able to shoot fairly long exposures without any camera jiggle.

Anyway, the most interesting part of the shots for me was that I had no idea this stream was there and I go to this park a lot. I never saw the stream before. The stream is, I think, where water (hopefully clean and treated) flows from the sewage treatment plant into the Housatonic River (a fairly big river--probably a half-mile wide in some places). So, you never know where you'll find a good stream to shoot--just don't look too carefully for the source of the stream.

Friday, April 17, 2009

Test Drive Your New Cameras

While I was finishing the new book, I knew I would have no time to play with a new camera (plus, it was freezing out and I hate cold weather), but I wanted a Nikon D90 and so I got impatient and ordered it anyway. Other than taking out the manual and reading it (always read your manual!), it mostly sat in the corner of my office taunting me. Or maybe it was just reminding me that there was a reward at the end of a hellish winter of writing.

Last weekend I got my reward. I took the D90 out into the field for the first time to get to know it better. In the coming weeks and months I'll probably talk a lot about the camera because it takes time to get to know a new body and this one seems to have a ton of really fun features. So far my favorite feature is the three-inch LCD. It's huge and the most fun LCD I've ever looked at. For the first day though I was dismayed that it seemed way too bright--I could hardly see detail in the highlights. So I went back to the manual and, duh, I found the menu item that lets you adjust the brightness of the LCD (up to three steps darker or three steps lighter) and dimmed it down by two settings. Now it looks pretty normal, but it's still tough getting used to seeing such a huge image looking back at you.

The first shots I took with the camera were of some kite sailors on Long Island Sound (a few miles from where I live) at sunset. It was a tough subject to throw at a camera the first time out--bright sunset, dark clouds, an action subject, contrasty water, etc. And I think the camera did pretty well. I only made some minor adjustments to this image and those were for color, not exposure. I am seeing more noise than I'd like to see (at ISO 200 where it should be noise free) but it might just be that I was shooting in a very dim setting. We'll see. All the reviews I've read say that noise is just not an issue with this camera. So hopefully this week as it warms up, I'll go shooting in "normal" daylight and see how the camera handles.

I'm pretty psyched to have a new toy to play with and hope this camera lives up to its expectations and to the great reviews I've read. I will say that using the camera is a dream--the menus are totally simple to follow and they are beautifully designed. Also, the camera has "Live View" a feature that lets you compose on the LCD--something a lot of DSLR cameras can't do. I'll write more about that feature soon.

So, my advice to you if you're getting a new camera this summer is don't wait until you're going to shoot something important like a graduation or a vacation: get the camera out of the box, read the manual and do some heavy-duty test shooting. Hey, it's all free. I shot 100 photos in the first two days.

Thursday, April 16, 2009

View the Coolest Panoramas Ever

OK, you probably noticed that I've been away for a week again--catching up on a lot of my "real" life that I abandoned while writing the new book. You'd be surprised how many dirty dishes and laundry baskets pile up while you're writing a book. The official name of the new book is "Winning Digital Photo Contests" and as I said earlier, it should be released in early October by Lark Books. This is the most in-depth look ever at photo contests and what it takes to win one (or many) and it is entirely illustrated (over 150 photos) by amateur photographers--photos that we chose from contests all over the world. I'll tell you more about this book later this week.

In the meantime, while just relaxing at the computer, I've been looking at other sites and blogs. One really interesting and fun site that I found is called www.popgive.com and it's got some of the coolest photography that I've ever seen. One particularly entry that just blew me away was a set of photographic panoramas that you simply won't believe. You'll need Quicktime to view them (everyone has that, don't they?) but they load very quickly and you can control the speed/direction/up/down, etc. Wow, will these panos blow you away.

I didn't want to rip off someone's photo to use here, so the shot here is just a pretty shot that I took in central France (it feels weird to post something on a blog without any photo). Oh, by the way, I started shooting with the Nikon D90 and will post some of my first photos this week, too. So far I love this new camera--the large LCD and very easy-to-follow menus are great.

Tuesday, April 7, 2009

Photograph Pets with a Long Lens

If you've been reading this blog for a while you know that my cat is one of my favorite things to photograph. (She sleeps next to me while I write, so she's an easy target.) The problem I have in photographing her is that the minute I see her in a cute pose and then I lift up a camera or walk toward her, she thinks it's time to eat or play and so, of course, she walks over to me. End of shooting session!

I've learned that the best way to get candids of her is to keep a long zoom on my camera and photograph her from across the room. In fact, I keep a 75-300mm Nikkor zoom on one of my older D70 bodies all the time and I can shoot full face shots like this one from at least 10-feet away. She barely even notices that I'm photographing her. If she's in front of a window (which is one of the places she sleeps) or is on the screened porch, I also use the flash to provide a little fill and to keep the pictures very sharp. Photographing pets with a long lens is a great way to get candid close-up shots without having to follow them around for hours--and the shots are usually very relaxed and natural looking.

Monday, April 6, 2009

Exploit Lighting Contrast for Drama

One of the most difficult issues in getting a good exposure is contrast. The problem is that both digital sensors and film have a limited dynamic range--the range between brightest and darkest tones. When you go beyond that range you start to lose detail in either the highlights or the shadows (depending on which exposure decisions you make). If you expose for the bright areas you end up with shadows that are pure black with no detail, and if you expose for the highlights, you get whites that look very washed out.

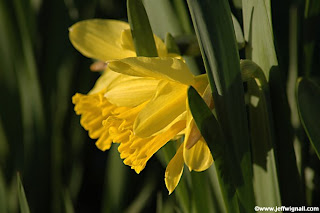
Does this mean you can't shoot in very contrasty situations? No! You can actually exploit those contrast limits to create very dramatic images. Since there's usually not that much visual information in shadows anyway (there are exceptions to that), what I tend to do is to expose for the brightest areas where I want detail and let the shadows go dark. That's exactly what I did in this shot of daffodils: I took a reading (in matrix mode) with the flowers in the center of the frame and then shot at that exposure. I knew that the flower stalks and the greenery around the blossoms was going to go dark, but I like the way the lighting spotlighted the bright yellow daffodils.

I shot this photo in the late afternoon, by the way, just before the sun disappeared behind a hill. That late sun is very low angle, of course, so it helped with the spotlighting effect. The light, while it was fairly intense, was also very warm, so that helped too. By exposing just for that highlights though, it saturated the warm lighting and the colors in the flowers.

Next time you're faced with a contrasty situation that seems impossible to expose for, try taking a reading from the brightest object where you want detail and let the shadows go dark--it's a contrasty look, to be sure, but sometimes also very dramatic.

Sunday, April 5, 2009

Compare Sizes to Show Scale

I've written at least one earlier posting about using objects of a known size (like a person) in a landscape photograph to reveal the true scale of a landscape. Without a sense of scale it's impossible to tell the true vastness of certain kinds of landscapes--mountains, deserts, etc. But you can also use objects of known size as comparisons to help reveal the scale of other kinds of scenes.

In this shot of the Costa Allegra cruise ship that I shot near Fort Lauderdale, Florida, for example, I used the two smaller boats to help reveal the size of the ship. You don't have to know the precise size of the smaller boats to appreciate just how big the cruise ship is because we're all fairly familiar with the approximate size of a fishing boat or small yacht.
If I had included a rowboat or kayak in the shot, however, you would have had an even better idea of all the sizes of all the boats (and if you look closely at the small boat on the left, you can see people sitting up in the bridge and they provide yet another level of scale). Still, just seeing the two smaller boats helps to give you a handle on the scale of the scene. The funny thing is that this is a relatively small cruise ship and if you saw it next to an aircraft carrier, for example, it would look as small as the yachts look in this shot. All sizes are relative! And that's the point of including objects of familiar size--they help you to make quick visual size comparisons.

Saturday, April 4, 2009

Let a Window Frame the View

I'm back! Well, at long last, I've finished my latest book. The book, which should be in stores in September is called "Winning Digital Photo Contests" and is being published by Lark Books. I've been working on the book for several months and, typically, I get manic about working on books and I've been writing 18 hours a day--which explains why this blog has been ignored pretty much for a few weeks. I will go back and fill in the blank dates though, since I want the blog to have an entry for every day of the year. And now that the book is done, I have free time to go out and play with my new D90 and a few lenses that I recently bought. And I can't wait!

OK, back to photography. I love to travel and I love getting a room with a view and when I do I always try to take at least one shot from the hotel/motel room just so that I can remember what the view looked like. I shot the photo here from a tiny motel on top of a hill overlooking Moosehead Lake in Greenville, Maine. Whatever the room lacked in luxury, it sure made up for with this picture-window view. All that I did to take this shot was use the window itself as the frame-within-a-frame and then expose for the scene. The inside of the window frame went black (I didn't even have to darken it in editing) and the colors were nicely saturated. Not a contest-winning photo, to be sure, but a nice memory of waking up to this incredible view each day!

More on my book and some new photos in the days ahead!