 Learning to use Photoshop or Photoshop Elements, or any other photo-editing program for that matter, takes time--there is a relatively long learning curve, especially if you're new to editing. Many photographers who have worked in traditional darkrooms in the past pick up editing skills faster that those who have never worked in a darkroom, but still, there is a lot to learn. But that doesn't mean that you can't have some great creative fun along the learning path--you can.
One fun way to get to know what things do in an editing program and to get some cool illustration effects as you learn is to just experiment--let your imagination run wild. You really can't hurt your computer (or yourself!) by playing with editing controls and all programs have a "reset" button that lets you go instantly back to all default settings. So no matter what sticky corner you back yourself into, you can undo it very quickly. Remember too, in Photoshop you can always get rid of the last step just by going to Edit>Undo or unravel many steps by using the Edit>Step Backward command. If you are going to experiment with an important image, however, you should "duplicate" (in Photoshop it's just Image>duplicate) the image first and work on a copy. That way no matter what creative rabbit hole you plunge down, your original image is safe.
Among the most fun (and easy) controls to play with in Photoshop (and other programs have these or similar tools) are the color control tools. With just a quick push on a slider or a click on a palette option, you can transform the most mundane of images into very colorful and imaginative new images. Sometimes what you'll create will be wild 1960's Peter Max-looking "art" and other times it will be utter garbage, but no matter what the end result, you'll begin to understand just what each different tool does--and you'll begin to see how, in specific situations, those tools that you're using in your creative sandbox can also be very useful to correct and enhance photographs. You can manipulate the hue/saturation control, for example, to turn any photo into a total abstraction in seconds, but in time you will find yourself using it to fine-tune colors and hues on almost all of your images.
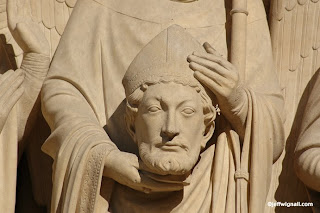
To create the blue version of Saint Denis (from the facade of Notre Dame Cathedral in Paris), I used just three simple tools: First I used the "Posterize" tool to reduce the image to just five distinct tones (you can choose the number of tones or colors that you want); then I used the "Gradient Mapping" tool to shift the entire image into a blue palette (in that tool you simply click on a color swatch to see the effect instantly on your image); and then finally I used the "Hue/Saturation" control to saturate the blues even more. That's it. Three clicks to take it from the straight image below to the colorful one above.
Don't be afraid to experiment with any controls in your editing program. The sooner you get past the fear that you might "ruin" something, the more fun you'll start to have. And if you love color like I do, you're going to have a great time surprising yourself by just clicking and dragging and sliding those color controls.


No comments:
Post a Comment