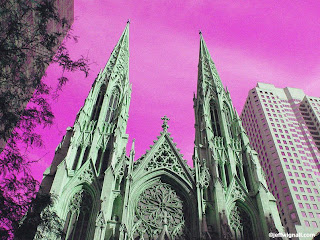
 Way back in the pre-Photoshop days, photographers who wanted to get experimental with color had to get somewhat inventive in their technqiues. And since many of us grew up in the 1960's and were influenced by artists like Peter Max, we went to some pretty great extremes to intentionally scramble colors. The simplest method was to put colored filters over the lenses, but some photographers got more extreme and tried methods like duplicating negatives and slides (often through many generations) and filtering them during duplication, cross-processing film (developing slides films in chemistry meant for color negative films) or just messing around with colors in the darkroom.
One other option that a lot of us experimented with was a film called Kodak Ektachrome Infrared Film. This film was called a "false color" film because it included a layer that was sensitive to the infrared portion of the spectrum (invisible to humans) and so the way that the film responded and the colors it produced could never be predicted. By using filters over the lens you could further mix up the already off-beat color palette. The colors were wild too: foliage often took on a magenta color, greens became bright yellow and the skies would range from magenta to brilliant pink or yellow/green, depending on what filters you used and what the atmosphere was doing that day. It was a blast. Unfortunately, Kodak stopped making the film a few years ago and unless you have some stored in your freezer, the film is history.
There's a simple way to recreate the false-color look in Photoshop (I'm sure you can do it with other editing programs, too), however, and it's a lot of fun to play with. All that you have to do is open an image and then call up the hue/saturation tool. By sliding the hue to extreme positions, you'll see the colors go through all sorts of wild combinations. That's exactly how I created this shot of St Patrick's Cathedral in New York. Once I had a color shift that I liked, I used the saturation tool to pump up the colors a bit more and then went into the selective color tool and adjusted individual colors (in this case I adjusted the magenta layer to add even more magenta to the sky). As a final step I used the noise filter (Filter>Noise>Add Noise) to add some noise to give the shot a slightly more realistic film look.
For some reason the hue shifting that you can create in Photoshop resembles the Infrared look a great deal and playing with it is kind of like a flashback to the basement darkroom I had during high school. If you'd like to see how pictures shot with the film really looked, take a look at the Flickr Color Infrared Pool. The great thing about experimenting with ideas like this is that there is no right or wrong so you can't make any mistakes and the results are always unexpected and fun.


No comments:
Post a Comment