 You can probably tell by the number of flower and garden related postings lately that my mind is set on spring. I'm so sick of winter! But winter, at least if you live in the northern half of the country, is a good time to cozy up with your monitor and examine last summer's close-up shots to see what you can do to make this year's photos even better.
Among the most common flaws I find in my own close-ups shots are messy backgrounds--backgrounds that are either just too filled with clutter or where lighter objects in the background (grasses, stems, other flower blossoms) are competing too aggressively with the main subject. One way to tame backgrounds, of course, is to use a really selective focus and limited depth of field (near to far focus). Shallow depth of field is an inherent quality of close-ups, but sometimes if the depth is too shallow, your subject is out of focus too. So there are a lot of times when I end up using a small aperture to keep the subject in good focus, but that also brings stuff into focus from the background. A real problem!
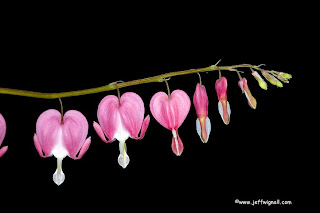
The solution? The best solution I've found so far is to use a black background behind my primary subject. You can use a piece of black fabric (try to avoid a shiny fabric) or a piece of black Foam Core board (I spray it with a matte spray to kill any glare spots). Even if you use flash (as I often do) for close-ups and keep the background a few feet behind the subject, the backdrop will still remain jet black. To get this shot of bleeding heart blossoms (isn't it neat they way that you can see the progress of the blossoms opening on just one stem?) I placed a piece of black fabric over a lawn chair and placed the chair about four feet behind the plant. Because I wanted the colors richer and didn't care how "black" the background went, I ended up using a -1 stop exposure compensation setting to saturate the flower a bit.
Speaking of exposure, though, it's important to set your exposure for the flowers and don't let the meter get fooled by all that blackness in the background. If you're shooting by existing light, just meter before you put the backdrop in place. But if you're using flash, and matrix metering (in the Auto or Program modes, for example), the camera will base its exposure on the flash and you will probably get very good exposures automatically.


3 comments:
Thank you so much for the tips on garden flower shots. The sun is especially strong here and the tip on the black background is great for me. I can't wait to try it out with my Knock-out roses.
DJ
You should have posted this photo one day later to celebrate Valentine's Day (but I still love it!)
You have posted an excellent tutorial for the topic. I often get this request to share my skill about `how to achieve black background'. I agree with you, it makes any flower stand out of that cluttered background.I have also written something basic on the subject. HOW TO GET BLACK BACKGROUND Though, will need some improvement. I have passed your article to those enthusiasts who are keen on the subject. I am very new to it. Your photograph posted with this article is superb. PHOTOS WITH BLACK BACKGROUND
Post a Comment