Welcome to (The Occasional) Photo Tip of the Day! Please also visit my main site jeffwignall.com. Text and photographs Copyright 2016 Jeff Wignall.


“The best way out is always through.”


Saturday, February 28, 2009

Lay Down, Look Up

When I first got into digital photography I bought an Olympus C5050 camera that I still own and dearly love. It's a great 5 megapixel camera. One of the things I like about it is that the LCD is partially articulated--in other words, you can pull it away from the back of the camera body and angle it up. One of the many things that this makes it possible to do is to lay the camera on the ground and shoot up at low-lying subjects.

The first summer I had that camera I crawled around on my back lawn and in my gardens looking for things I could shoot up at from ground level. The neighbors must have thought I was nuts (who cares!). One of my favorite subjects for shooting like this are the thousands of grape hyacinths that grow in my yard (I have more flowers than grass in my lawn, trust me). By just laying down with the camera and aiming it up slightly I was able to shoot these tiny flowers (about 4 inches tall) as if they were towering trees. I love the look of them. The articulated LCD isn't necessary, but in this case it just made it a bit easier to see the composition without pushing my face into the lawn.

I have since bought a Canon A650 that has a fully articulated LCD (you can even turn it backwards to you can shoot photos of yourself!) and I still really enjoy that feature. If you're thinking of buying a new point-and-shoot, consider that feature (especially if you're deciding between one camera that has it and one that doesn't). The ability to pull/twist/turn the LCD really has some nice benefits (like shooting over your head and still being able to see the image). But regardless of the camera, next time you're shooting flowers (soon I hope--we're supposed to get 14" of snow this weekend) try laying the camera on the ground and shooting up.

Friday, February 27, 2009

Enhance Textures in Landscapes with Backlight

Yesterday in my posting about using sidelighting to bring out textures I mentioned that you can often use backlighting to exaggerate textures in landscape photos. I was going through my files and found this shot and it demonstrated that point, so I thought I'd share it.

The scene is in a cemetary in Historic Deerfield, Massachusetts (New England, if you've never been here, is just full of historic old cemeteries) was shot one very cold winter day as the sun was sinking in the west. I was shooting directly into the sun (though the sun was a bit higher than the top edge of the frame.) You can see the shadows of the headstones pretty obviously, but it's the smaller shadows on the surface of the snow that are bringing out the snow's texture. Look at the areas in the foreground and you'll see a lot of texture in the snow and icy surfaces, but look toward the back where the sun has burned out a bit (overexposed) on the snow and you really can't see the textures as well.

Lighting direction is a really fun thing to play with, both in close-up subjects and in landscapes. But the most important thing is just to be aware of it so that you can either exaggerate or subdue textures at will.

Thursday, February 26, 2009

Draw Textures Out with Sidelighting

Whether it's the smooth glossy surface of a bowling ball or the coarseness of a piece of sand paper, all objects have a texture. Finding ways to translate that texture in a photograph so people can "feel" the surfaces you're photographing is one of the things that makes photographs seem more real. Remember, the world is a three-dimensional place (height, width, depth) but a photograph only has two of those dimensions--you can't reach in and grab anything or feel it in a photograph (though I'm sure someone is working on that!).

The best way to accent textures in a photograph is by paying attention to the direction of the light as it strikes the surfaces of your subjects and the best light for drawing out textures is sidelight. Light coming from the side casts myriad tiny shadows across the surface of the object and gives it a three-dimensional look. I photographed this old door handle with really extreme sidelight (look at how long the shadow on the left is) and the lighting really brought out the rough-hewn surfaces of the wood and the hand-hammered metal.

Sidelight also works to bring out the textures of things like a sandy beach or a gravel parking lot in a landscape. Backlighting will do the same thing, to some degree, especially if it's late in the day and the light is scraping off the landscape from a low angle. In some situations you won't see as much texture with backlighting because some of those tiny shadows (like the ones cast by sidelighting) are hidden from the camera by other objects.

You can experiment with lighting direction and its effect on texture without much effort. Try photographing a rough-surfaced rock with the light falling on the front of it sometime and then move around the rock and shoot it so that the light coming from the side and you'll see the difference immediately.

Wednesday, February 25, 2009

Time Sunsets Carefully

When it comes to creating a really great sunset photo, timing is everything. While sunsets are always pretty to watch and photograph, often being really careful with your timing will turn a good photograph into a really nice one. I prefer to shoot the sun just a few seconds before it hits the horizon because there is this added element of the sun about to disappear. So, while I will usually shoot the sunset once it begins to color the sky, I reserve a few frames for the moment when the sun is about to hit, or is just hitting, the horizon.

The funny thing is that the closer the sun gets to the horizon, the faster it appears to be setting--like all of a sudden it's in a hurry to hide. It's really important then to be sure you and your camera are ready for those last few seconds. Also, sometimes there are other objects in your composition that you have to time along with the sun. In this shot of a sailboat moving past the sunset, I wanted the sun at the horizon but, of course, wanted to catch the boat in the frame too. I kept hoping the boat would slow down because it was moving pretty quickly and the sun wasn't yet in position! Fortunately I got off this one frame with both exactly where I wanted them. If that boat had been moving a tiny bit faster though, it would have left the frame too soon.

By the way, I also look for what artists and photographers call "points of tension" in situations like this. The little gap between the hill and the horizon is a point of tension because the mind knows that something is about to happen there, even though this is just a still photo. The gap between the bow of the boat and the edge of the frame is a larger, more subtle point of tension.

Tuesday, February 24, 2009

Isolate Patterns in Architecture

I've written before about finding interesting patterns in nature (one of my favorite pastimes), but there are also a lot of very interesting patterns in man-made objects, and in particular in architecture. In fact, most modern buildings are crafted using a series of patterns--beams, supports, rafters, etc.

You can find a lot of patterns in the exteriors of buildings (in the brickwork or tiles, for instance) but often the most interesting patterns are found on the inside, both in the construction details and in the decoration. I've found great decorative patterns in stairways, domes, doorways, carvings, etc. But sometimes the building itself is like one huge pattern--a good example is the Javits Convention Center in New York, shown here. This building is basically just a giant glass and steel skeleton and everywhere you look there are amazing patterns. I shot this picture while I was having lunch in the lobby during a photo convention; I couldn't help but be mesmerized by the complex patterns of steel beams and windows. The architects meant to dazzle the imagination when they built this structure and they were very successful!

Architectural patterns work best when they are entirely isolated. For the shot here I was lucky, there wasn't much in the way (other than some banners hanging from the lower ceilings) so all that I had to do was point the camera up and shoot. Usually though you can isolate a pattern just by zooming the lens out a bit and getting rid of clutter.

By the way, churches and temples, as well as important public buildings like state capitols are very rich with ornamental patterns, so those are other nice places to look. If you're looking for likely subjects in your area, just do a Flickr search on say, "Iowa State Capitol Interior" and you'll see what other photographers have shot there. (And I use that particular example because Iowa's Capitol building is wild with great patterns inside!)

Monday, February 23, 2009

Soften Portrait Backgrounds

As long as we're on the topic of portraits, here's a quick exposure tip that will soften backgrounds nicely: use the portrait exposure mode. This mode, usually indicated by a silhouette of a head on the exposure-mode dial, automatically selects both shutter speed and aperture for you, but it gives preference to selecting a large aperture. Because large apertures create less depth of field (near-to-far sharpness) your portrait subject will be sharp but the background will be naturally soft.

Other things that contribute to a shallow depth of field are the focal length of the lens you're using (longer lenses and zoom settings have less inherent depth of field) and subject distance (the closer you are, the less depth of field there will be). So if you want to help the mode along at creating a soft and pleasing background, shoot portraits with a medium telephoto lens or zoom setting and work close enough to fill the frame with your subject.

And don't forget to read yesterday's post about using flash with outdoor portraits!

Sunday, February 22, 2009

Use Fill Flash for Outdoor Portraits

Though most of us tend to think of flash as something to be used indoors in dim lighting, in fact, one of the best times to use flash is when you're taking informal portraits outdoors. Outdoor portraits are nice because there's a lot of available light and also, it's easier to find a simple and attractive background. The problem with shooting in portraits in sunlight is that the sunlight often creates a lot of dark shadows in eye sockets and under chins and noses.

The solution is very simple: just turn on the flash. Most digital cameras will automatically adjust the exposure between the flash and the existing light and create a very pleasing balance. This "fill flash" provides just enough flash to prevent dark shadows while still exposing for the ambient (daylight) correctly. And I have to tell you that automatic fill-flash is a genuine miracle of simplicity compared to the calculations and math that I had to perfom with the manual accessory flash units that I used when I was learning photography.

By comparison built-in flash is totally simple to use. I shot the portrait here using my Nikon D70s's built-in flash and didn't even look at the exposure settings! I trusted the camera to create a good balance between flash and daylight and it did. I also intentionally placed the light behind the two young woman so that they wouldn't be squinting into the light. I knew that because I was working within the distance limitations of the flash, the flash would provide enough light to correctly fill the shadows.

If you are using a DSLR with an accessory flash you'll have even more control over the balance between the flash and ambient exposures. Most flash units will let you set the exact flash-to-daylight ratio, increasing or decreasing flash power as needed. If the skin tones are coming out a tad too light at -1 stop flash exposure, for example, you could switch to -1.5 stops of flash exposure and just tone down the flash a bit. Your flash manual will explain the use of fill-flash in greater detail.

Next time you're taking portraits outdoors, turn the flash on and see if you don't like the exposures much more. Your subjects will be a lot happier without all of those dark shadows and because they'll no longer have to squint into the sunlight.

Saturday, February 21, 2009

Build Your Compositions Like a Story

A good landscape photograph tells a tale of the place it describes. And like all good tales, your landscapes should have a catchy beginning (the foreground), an interesting center (the middle area) and a memorable ending (the background). Not every landscape lends itself to this somewhat formulaic treatment, of course, but until you are very confident of your design skills, applying it will save you a lot of time and provide you with a solid starting point from which you can improvise.

Also, by using these classic building blocks you not only provide yourself with a handy framework for organization, but you demonstrate that you are in charge of your compositions. Rather than just tossing together a random smattering of elements—a barn here, a silo there, some trees over there—carefully arranging your images in layers demonstrates that you knew precisely what you were doing. In other words, it shows that you had a plan, Stan.

Just how much emphasis you give to each of the three regions of a particular design is a decision you’ll have to make for each scene—and honestly, that’s one of the toughest concepts to master in landscape photography (you thought this was going to be easy?). In this garden shot, taken at the Vanderbilt Mansion in Hyde Park in New York, creating three levels of design was easy since I just borrowed three elements from the garden design: the foreground bed of wax begonias, the taller cannas in the middle and that interesting tree at the top of the frame. I used a tripod to compose the scene and it was worth the effort of carrying it; when you start to compose landscapes carefully, it's nice to have a tripod to help you frame things.

Eventually concepts like this become second nature and you’ll use them more by instinct than by forethought, but again, knowing they exist and consciously practicing them will help you compose scenes faster and with more confidence.

Friday, February 20, 2009

Give Kids Something to Do

One of the tough parts of photographing kids is that they get bored with it pretty quickly. You can ask most kids to "smile" about three times before they decide that they'd rather be chasing the dog or digging for worms in the garden. But most kids are really good at taking instructions (most adults should be so good!) and they also love a creative challenge. If you give them something interesting to do they will pretty much ignore your camera.

The trick is to find an activity that keeps them relatively calm and in one place, yet is also something they like to do and that also makes an interesting photo. You obviously can't ask an eight-year-old boy to climb a tree or you'll have to climb up after him to get a close picture. But there are lots of fun passive activities that work nicely--drawing with chalk in the driveway, coloring Easter eggs or even just reading a book out loud to you. Just be sure to set the shot up in an attractive area with good natural lighting so that you don't have to rearrange things once you start shooting.

You also have to put a time limit on the photography part of the session, even if they want to continue on with the activity--otherwise they'll start to get tired (of your camera mostly) and withdraw. My friend Alice was only four when I photographed her blowing this huge bubble and she'd never done it before! I was amazed (really amazed) at how good and patient she was a blowing bubbles and at how huge they were. After about 20 minutes though she let me know that photography was over and so we put the cameras away and just blew bubbles. There's a time for pictures and a time for bubbles and let's face it, bubbles are a lot more fun.

Tech Notes: By the way, you might want to know that the way I got the background out of focus was by using a combination of a moderately long lens (the equivalent of about 105mm in 35mm terms) and a small aperture (the lens was almost, but not quite, wide open at f/5.6). The combination of the long focal length and relatively wide aperture created a limited depth of field (near-to-far sharpness) and restricted sharpness to just her face and the bubble. When you do limit the depth of field though, be very careful to focus on what you want sharp. In this case I focused on the area around her nose and the bubble. I also worked close to her and that helped keep the background out-of-focus, too. And I chose a location where the light was fairly bright on the shrubs behind her so that the scene would have a light, airy feeling. I did do a bit of careful softening of contrast in Photoshop and I warmed up the colors a tiny bit. The scene is pretty much how it came out of the camera, however.

Thursday, February 19, 2009

Improvise When All Else Fails

A few weeks ago I was photographing a friend of mine, the great blues guitarist Jim Weider in concert. As is typical of most nightclub settings, the stage lighting was very dim and overly saturated with red lighting. It's a frustration I've been dealing with since I first started photographing concerts back in the 1960s. (Wow, is he old!)

Anyway, I spent the first hour or so of the concert trying to get sharp, well-exposed photos but I could tell that Jim was moving too fast and my shutter speeds were too low--even with the ISO cranked up to 1600 (the top speed of the Nikon D70s that I was using--but my new D90 goes much higher, thankfully). I decided to throw caution to the wind and instead of trying to get sharp photos (since I wasn't getting them anyway) to experiment with long shutter speeds and letting the action become a part of the shots. So I switched to the shutter-priority exposure mode and reduced my shutter speed to 1/2 second. Then I improvised and experimented with all sorts of camera-induced motion--I jiggled the camera, twisted it, zoomed the 70-300mm lens in and out, etc.

The shot here was made by zooming the lens from it's longest focal length to it's shortest during a half-second exposure. (See the tutorial on the night-photo techniques on my main site for detailed info on zooming.) I really love the way the lights create a wired-up atmosphere that echoes Jim's very electric blues music.

So next time the environment isn't cooperating with your photography, just blow-off your plans (and reality) and improvise--you'll be surprised how much you like the results.

Wednesday, February 18, 2009

Anticipate Action and Pre-Focus

Trying to focus on moving targets (like this little duckling photographed at the New York Botanical Garden) is tough. The minute you think you have them in focus, wham, they're gone before you can trip the shutter. Instead, try putting your camera in manual focus and focus on a spot where the action is repeating itself--home plate in a baseball game or the top of a piling where a seagull keeps landing and taking off, for example.

That's just what I did for this shot. I tried (and failed) about a dozen times as this duckling kept hopping up on the lily leaf and then--just as quickly--slipped back into the water. But once I put the lens in manual focus and focused on the center of the lily pad, all I had to do was wait for the duckling and fire when she came into the frame. I had the camera on a tripod and locked down tightly, so I didn't even have to watch through the viewfinder. I just kept my eye on the lily pad and then fired whenever she hopped up there. I also used a very fast shutter speed (1/1000 second) which was easy since the sun was very bright. Not only did the shutter speed stop the baby duck, but look how it froze the water on the leaf and the crop coming out off of the beak!

By the way, even if you are shooting with a camera that doesn't have a manual-focus mode, you can still use this technique. Just frame the spot where you want to focus and press the shutter release button halfway down (and hold it halfway down); that locks the focus (and exposure) and then when your subject comes into the frame, press the shutter release the rest of the way.

Interestingly, many of the forms of action we photograph do repeat themselves in some predictable way and predicting where and when that action will occur is the key to photographing it sharply. If you just pause for a few moments and study the scene before you start to shoot you'll have a good idea of where you need to focus and how often the subjects will come into the frame.

Tuesday, February 17, 2009

Read All 100 Postings!

Wow, time flies. This is my 100th posting since I started this blog in October of 2008. I really just started it as an experiment to see if anyone would read it and also to see if I could continue to come up with new ideas every day. I can happily say that quite a few people now follow the blog and I haven't had to repeat a single topic!

More importantly for me, if you were to go back and read all 100 postings I think you'd have the equivalent of a fair-sized how-to book. Considering that each posting averages (I'm just guessing) about 300 words long, that's 30,000+ words of free photo advice. And there's lots more to come. I just bought a new Nikon D90 and a fisheye lens, for instance, and I can't wait to start writing about them.

If you have any topics you'd like me to cover, just write or post a comment and I'll be happy to try to cover them. Speaking of which, I owe one follower a posting on group photos and I'll try to get to that this week!

Thanks for reading the blog and please tell your friends about it. One hundred down and a few thousand more to go!

Monday, February 16, 2009

Collect Photos of Weird Things

Almost everyone collects something, whether it's books, baseball cards, old 45rpms or (heaven forbid) pieces of burned toast with Elvis' face on them. The trouble with collecting actual things of course, is that things take lots of room. I collect photography books, for example, and trust me, pretty soon either some of the books are going to have to go or I'm going to have to add on another room.

But one way to collect things without actually storing them is just to photograph them. Then you can have a collection of something and it won't take up any room at all. Also, by just collecting pictures of neat stuff it's much cheaper and you can also collect stuff that you can't necessarily run into a store and buy. I started collecting photos of unusual manhole covers, for instance (like this one that I found in Paris near the Eiffel Tower) and I've discovered that there are some really interesting and unusual manhole covers out there. I even found that the ones on my street have the town name and the year they were installed engraved on them. Cool! But even if there was someone selling them, I'm not about to start hauling them home.

As with all collections, the stranger or more esoteric the object is, the more fun it is to collect (and the more eccentric your friends will think you are). Then once you have an interesting collection going you can print pictures of your prize possessions and the only room it will take up is a photo album or two.

By the way, you won't be the only person collecting whatever sorts of odd stuff you collect photos of because I guarantee someone else is collecting it too! How do I know? A few days after I posted this shot of the manhole cover on my Flickr photostream someone invited me to add it to their group of...you guessed it, manhole cover photos.

Sunday, February 15, 2009

Experiment with the Direction of Lines

Whenever you have a strong existing line (like fence cutting through a landscape, for example) or a definite row of objects (like the flower pots shown here) running through the frame, the way that you arrange those lines in relationship to the edges of the frame can have a powerful influence in our interpretation of that scene.

Strong horizontal lines, for example, impart a feeling of stability and strength and they provide a sense of equilibrium. You know that when you have a crooked horizon in a sunset photo, for instance, that it's very unsettling--it makes it feel like the earth is sitting sideways. And strong vertical lines (trees, telephone poles, people standing) make the scene seem taller and provide a feeling of strength or even energy. Think how different it is when a waterfall is framed so that the flow of water runs from the top to the bottom of the frame rather than from side to side. The vertical framing shows force and power while the horizontal frame is much more peaceful and harmonious.

In between the two, of course, are diagonal lines. A strong diagonal line, whether it's a road going through the frame or just a row of objects (like the row of flower pots here), create a more dynamic flow to an image. Most importantly, diagonals provide a very real sense of motion and, even in a quiet still life like this one, provide the feeling that something is happening, that the composition has rhythm and flow. Try it sometime. Photograph a row of flower pots or perhaps some colored bottles on your front step from three different angles: so that they run vertically, horizontally and diagonally across the frame and see which you like best. There's no right or wrong, just a different feeling for each choice.

Saturday, February 14, 2009

Time Candid Group Shots Carefully

One of the followers of this blog wrote and asked for some tips about shooting group photos. In the next few days I'll go through my files and see if I can come up with a good "posed" group portrait to write about, but in the meantime I came across this candid (obviously!) shot taken at Mystic Aquarium and thought it illustrated a good point about candid group shots: choose your moments carefully.

I had been watching this small group of people interacting with a Beluga whale and thought it would make a great shot provided I could get everyone--including the whale--to look attractive and do something interesting at the exact same moment. Considering that I didn't know any of the people and the whale probably wasn't going to pose for me, it was a tough situation. Every time that I had the whale in place, one of the people would step in front of someone else or just make an awkward gesture, etc. And when the people were looking good, the whale was no where to be found.

I finally decided that the best thing to do was just be patient and wait for the shot with the exposure and focus set in the manual modes. I had the lens in the manual-focus mode so that I could prefocus on the whale during a trial exposure since he kept surfacing (at the commands of the trainer--the woman on the left) in the precise same spot. I set the camera down on a flat rock surface (at the edge of the pool) with the people pre-framed where I wanted them and I tried to look at the scene through my viewfinder as little as possible and just watch the scene with my naked eye and fire when the shot moment looked good. If I could have the camera on a tripod (not allowed there) I would have.

There are a few reasons for using your naked eye instead of constantly peering through the viewfinder (it was too bright to use an LCD, even if my DSLR had had Live View and it didn't). For one, you can see things that you can't see through the viewfinder--like the whale underwater, about to break through the surface. And also, you're more in touch with the moment when you're not stuck behind the camera. I tried to watch the scene like a cinematographer, just waiting for the best moment and it worked.

This technique can work at home or family picnics, too. Even if you're photographing your kids on the swings in the backyard, for example, if you set the camera on a tripod and pre-frame the scene, you can just talk to your kids face to face and use a cable release or a remote (I was using a cordless remote--$15 from Nikon) to fire the camera. With the focus and exposure on automatic (I often use the Program mode for shots like this), all you have to do is watch, wait and shoot.

Friday, February 13, 2009

Black Out the Background with Flower Close-ups

You can probably tell by the number of flower and garden related postings lately that my mind is set on spring. I'm so sick of winter! But winter, at least if you live in the northern half of the country, is a good time to cozy up with your monitor and examine last summer's close-up shots to see what you can do to make this year's photos even better.

Among the most common flaws I find in my own close-ups shots are messy backgrounds--backgrounds that are either just too filled with clutter or where lighter objects in the background (grasses, stems, other flower blossoms) are competing too aggressively with the main subject. One way to tame backgrounds, of course, is to use a really selective focus and limited depth of field (near to far focus). Shallow depth of field is an inherent quality of close-ups, but sometimes if the depth is too shallow, your subject is out of focus too. So there are a lot of times when I end up using a small aperture to keep the subject in good focus, but that also brings stuff into focus from the background. A real problem!

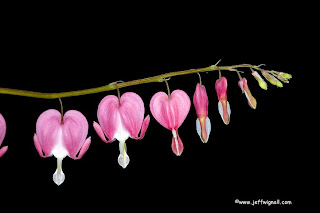
The solution? The best solution I've found so far is to use a black background behind my primary subject. You can use a piece of black fabric (try to avoid a shiny fabric) or a piece of black Foam Core board (I spray it with a matte spray to kill any glare spots). Even if you use flash (as I often do) for close-ups and keep the background a few feet behind the subject, the backdrop will still remain jet black. To get this shot of bleeding heart blossoms (isn't it neat they way that you can see the progress of the blossoms opening on just one stem?) I placed a piece of black fabric over a lawn chair and placed the chair about four feet behind the plant. Because I wanted the colors richer and didn't care how "black" the background went, I ended up using a -1 stop exposure compensation setting to saturate the flower a bit.

Speaking of exposure, though, it's important to set your exposure for the flowers and don't let the meter get fooled by all that blackness in the background. If you're shooting by existing light, just meter before you put the backdrop in place. But if you're using flash, and matrix metering (in the Auto or Program modes, for example), the camera will base its exposure on the flash and you will probably get very good exposures automatically.

Thursday, February 12, 2009

Pump up the Colors with Hue and Saturation

One of the first tools that people gravitate toward when they first use Photoshop or Photoshop Elements is the Hue and Saturation tool. It's a very simple tool to use (you just play with sliders to adjust both hue and color saturation) and you can create some dazzling effects. The availability of a saturation tool has created a world of over-saturated photos in online galleries and photo-sharing sites and while they're fun to look at you should be aware those colors don't always print quite so vividly.

Still, there are times when you might want to oversaturate colors just for the heck of it--especially for online use--and that's exactly what I did with this shot of an oil slick (photographed in a motel parking lot on a rainy day). The image came out of the camera far more dull than I had hoped (or than it looked in real life) so I started to pump up the saturation--a little at first and then a lot! The version here is actually only a moderately saturated version, I also have what I call a Peter Max version that is even more intense.

Most image-editing programs have a saturation control and, as I said, all that you have to do is call up the image, open the tool and then start saturating. You can also saturate invidual colors (or parts of an image) and I'll talk about doing both of those things in future postings. For now, call up and image that you think is too dull and pump up the volume!

Wednesday, February 11, 2009

Shoot Delicate Colors on Cloudy Days

I love to photograph flowers and I have a yard full of gardens so that I don't have to go far to find good subjects. But one of the problems that I often face in photographing flowers (especially light-colored flowers) and that you've probably encountered, is that bright sun tends to burn out the highlights and wash out the colors.

The solution to this problem is one that most professional garden photographers use all the time: work on cloudy days. On overcast days the gentle light quality tends to saturate colors and lowers contrast enough so that you can good a good exposure without the risk of blowing away the highlights and very light tones.

I actually photographed this peony (I wish you could smell it!) blossom just as it started to rain (if you look very close you'll see some raindrops). I had come home from errands and saw the blossom fully opened and knew that once the hard rain started the blossom would fall apart. So, tired as I was, I hauled out the tripod and camera and shot this close-up. I was very pleased with the saturation of the pink tones and the way the soft light quality held detail in even the most delicate tones.

Cloudy days are great for all kinds of subjects, including outdoor portraits, so don't despair if the sun doesn't come out or if clouds pass by, the lighting is just beautiful!

Tuesday, February 10, 2009

Rename Files Before Saving New Versions

Unless you're really a whiz at Photoshop, chances are that you'll go through several edited versions of a photograph before you arrive at just the version you're after. I often spend hours (even days) on a really important image and create a dozen or more different interpretations.

One thing you have to be careful of though is not saving the new versions with the same file name as the old one; if you do, of course, you erase the previous version. While that might not seem to matter if you like the new version more, the fact is that in the cold light of day, you may actually prefer earlier versions. All it takes is a little bit of organization (and some hard drive space) to save each different version until you're sure you have the one you want.

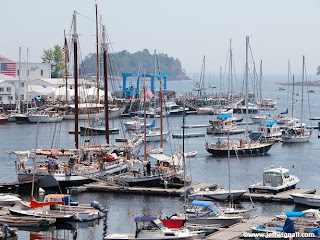
I've played with this shot of the Camden, Maine harbor many times (the shot is simply too crowded, but I keep playing with exposure and color balance to try and improve it--silly, I know) and each time I do I change the file name slightly: "Camden_Harbor 1" "Camden_Harbor 2," etc. That way I can always go back and look at earlier takes. I also keep the layers open when I save "working" images because that way I can trace exactly what I did and also turn various layers on or off at will. Finally, when I'm sure I have a file I like, I flatten the image, choose a final name and save it to a "finals" folder.

One other reason to change file names slightly is that if you open and re-save jpeg files (and only jpegs--it's OK to save TIFF or PSD files with the same name--though you will, of course, still delete the earlier version if you do) using the same exact file name, you degrade the file! Yes, you are actually harming the file each time you open and resave it under the same name--so don't do it!

Organization is an important thing in image editing, especially when, as I do, you have tens of thousands of digital files. So come up with a good naming scheme early and stick with it--you'll be glad you did.

Monday, February 9, 2009

Break the Composition Rules

As I mentioned in an earlier posting, there are a lot of "rules" when it comes to composing images and often those rules are useful in creating strong photographs. But those rules are better described as guidelines and there's no need for slavish devotion to them. In fact, often breaking the rules and putting convention aside is the right thing to do. The tricky bit is knowing when to do it.

How do you know when it's right? When it feels right. In shooting this photograph of my girlfriend in Monument Valley, for example, I decided to break one of the cardinal rules of composition that says your main subject should never be dead center in the frame. The reasoning behind this is that centering a subject creates a very stagnant design. At the moment I shot this frame, however, she was engulfed by this incredible environment and it seemed putting her in the middle of the frame--both horizontally (the center of the frame runs right through her waist) and vertically (she divides the frame in half side-to-side)--was exactly the right thing to do. It felt not only natural but symbolic to have her in the center. This has always been one of my favorite shots of her and of Monument Valley.

If you've read a lot of composition rules in photo books (even mine!) and you're feeling restricted, feel free to toss the rules away. Soon enough you'll find out that the only design rules that matter are the ones that work.

Sunday, February 8, 2009

Emphasize the Sky with a Low Horizon

A few days ago I talked about placing the horizon high in the frame to emphasize foregrounds and make your main subject seem farther away. Before I get away from that concept, I wanted to show you how the balance of an image changes when you place the horizon extremely low in the frame.

With the horizon low you give emphasis to the sky or whatever else dominates the upper portion of your composition. I'll often do this with sunsets, for example, because the sky is generally the most colorful and interesting part of the scenes. But there are other times when I'll use a low horizon: if I'm photographing a lone tree on a hillside, for example, I'll keep the horizon low because I want to dramatize the isolation of the tree and it's small size compared to the sky or the hillside.

Horizon placement usually becomes instinctive after a while and I don't really think about it beforehand that much, but often I will shoot scenes both ways and then compare them later. It's free anyway, so why not make the extra effort. The one place most books will tell you not to place a horizon is directly through the horizontal center of the frame--and usually that's good advice--but rules are meant to be broken and sometimes it leads to startling visual discoveries. More about this in the days to come.

Saturday, February 7, 2009

Shoot During the Golden Hours

Although I am on the prowl almost constantly for pictures, especially when I'm traveling, I would have to guess that I do 70-percent or so of my shooting during what photographers call the "golden hours." The golden hours are the first hour or so after sunrise and the last hour before sunset. During these times the sun is much lower to the horizon, making the light softer and more golden in color.

There are a number of benefits to shooting at these times. The sun is lower to the horizon during the golden hours and the warm color of the light is, of course, an obvious draw. I had been shooting this bridge late one afternoon and the light was very blue, very common and I was pretty frustrated. I had actually begun to pack up the camera and was going to look for another subject and then as I was loading up the car, looked back and saw the bridge transformed by this golden glow. I should have known better and waited longer! I had to quickly grab the tripod and head back out onto the dock I was shooting from and reframe the scene. It was worth it because the shot suddenly came to life and I've sold this shot several times to book publishers.

Light quality is another nice benefit of the golden hours. There is a softer quality to the light, which means that contrast is gentler, shadows are more open and highlights are less likely to be burned out. Also, because the light is raking across the land at such an oblique angle, there are a lot more textures brought out in landscapes. And if you're doing a portrait, you can place the low sun behind your subject and get a nice warm glow around the hair (turn on your flash in this situation to open up the faces a bit).

Friday, February 6, 2009

Raise Your Subject Up to Create Depth

As long as we're on the topic of creating the illusion of distance in landscapes, here's another useful tip: place your main subject higher in the frame if you want to make it seem farther away. By placing the subject higher (or placing the horizon higher) in the frame, you exaggerate the foreground, reinforcing the sense of distance from the camera to the subject and/or the horizon. It gives the viewer the sensation that they would have to walk farther into the scene to get to the subject.

It helps when you're trying to exaggerate space if, as I mentioned in the last post, you use a wide-angle lens and also if you use a small aperture to create a lot of depth of field (near-to-far sharpness). Having sharpness throughout the frame adds to the depth illusion. Creating the illusion of distance in a landscape is very important because in a photograph you're only working with two dimensions--it's up to you to create a feeling of depth. By the way, when you want to accent the sky rather than the foreground, just drop the horizon lower in the frame.

There's a more complete two-part tutorial on creating the depth illusion on my main site. It's a favorite subject of mine so you'll find me writing about it often.

Thursday, February 5, 2009

Exaggerate Space with a Wide-Angle Lens

Yesterday I closed my posting with a question. Did you get the answer? I'm sure you did! Yes, of course, wide-angle lenses exaggerate or expand apparent space in a photograph. Wide-angle lenses have a wider field of view which creates the illusion of greater distance because they make everything in the frame appear smaller. The farther something is from the lens, the smaller it appears. Also, the wider the lens the more exaggerated space becomes.

Wide-angle lenses are particularly useful when you want to expand space in a landscape photograph. In this street scene taken in the wonderful little town of Prairie City, Iowa, for example, I used an 18mm lens (27mm on my Nikon D70s with the cropping factor) to exaggerate the feeling of distance of this small road. I also used a small aperture (f/22) to keep everything in sharp focus from near to far--which adds to the illusion of distance. One more trick I used to heighten the depth illusion in this photo was to use the power of one-point perspective--letting the road converge to a vanishing point.

What constitutes a wide-angle lens? In basic terms anything wider than a "normal" lens (roughly 50mm in 35mm format, for example) is considered wide angle. The most useful lenses are those that have a 35mm equivalent focal length of between 21mm and 28mm (again, we have to talk in 35mm equivalents because different sensor sizes make the actual focal lengths irrelevant in general terms). There are wider lenses--up to about 10mm--but these begin to fall into the range of "fisheye" lenses, or extremely wide-angle lenses used only for special effects. (And since I have a fisheye lens on order, I'll write more about them very soon!)

Get to know how all of your zoom lens settings or different DSLR lenses transform various scenes and you'll always know which lens to turn to for a specific effect.

Wednesday, February 4, 2009

Compress Space with Telephoto Lenses

One of the interesting qualities that telephoto lenses have is that they compress space--and the longer the focal length is, the more the compressed space appears. We've all seen shots of a football player who is catching a pass and appears to be almost in the stands with the crowd. The reason they appear so close together is because the photographer used a very long lens and the space between the player and the spectators just evaporated.

In landscape photography compressing space can be a fun tool because it brings together distant elements in a very believable way. I photographed the sunset here outside of Tucson, Arizona using a 300mm lens (equivalent of 450mm on my Nikon D70s body because of the 1.5x cropping factor) and it appears that the saguaro cacti and the mountain range are relatively close. In reality the brushy hillside and the saguaro are about 100' from me but the mountain is probably 20 miles away (and the sun is millions of miles away!). But by using the power of the telephoto lens to shrink spaces, the three layers of the photo (hillside/mountains/sun) all appear incredibly compressed.

Next time you're out shooting landscapes, shoot a few frames of a scene with a normal lens and then either zoom in (using a built-in zoom lens) or, if you have a DSLR, switch to a long telephoto and compare the resulting images. It's great fun to see space compressed like this and the illusion is very convincing.

So if telephoto lenses compress space, what do wide-angle lenses do? Next time.

Tuesday, February 3, 2009

Shoot Rock Steady with the Groofwin Pod

Yesterday I talked about the benefits of shooting birds and wildlife from inside your car. The only problem with shooting from a car window is keeping a long lens very steady. Yes, you can probably roll up a sweater or use an impromptu beanbag to keep the camera steady, but if you're using a very long lens, 300mm or longer, you need a serious camera support.

The best window tripod that exists is called the Groofwin Pod (ground-roof-window) and it was designed and manufactured by the legendary wildlife shooter Leonard Lee Rue. This uniquely named and odd-looking camera support has multiple uses: it can be used as a low-level tripod for macro or wildlife work by just laying it on the ground, it can be used on the roof of your car, or it can be used as a window pod. These pods are extremely popular among safari shooters in Africa because they can be used on the roof of a Land Rover while the photographer stands up through the sunroof.

When used in a car window, the pod uses a 9" x 1" lip that can either be slipped into the window groove when the window is down, or catch onto the window itself if the window is partially raised. I've been using my Groofwin for several years (usually in a rented Ford Explorer in Florida) and it's a joy to use. There is a sliding bolt (it sits in a slot so that you can adjust the forward/back position of the camera) that accepts a standard ballhead and you can adjust the height of the camera platform. When used with my heavy duty Canon ballhead I've used lenses up to 600mm and they are held rock solid. As I said yesterday, this is one of the best camera accessories I've ever owned.

I go way out of my way to never endorse or appear to endorse any photo products, but I'm always happy to find one that I can just recommend without hesitation. The pod sells for $259 directly from Leonard Rue Enterprises. If you're a wildlife or macro shooter, you will never regret owning this unique camera support. (Photo courtesy of Leonard Rue Enterprises)

Monday, February 2, 2009

Use Your Car as a Blind

Getting close to birds and animals is probably the toughest part of getting good wildlife shots. Most animals see us as predators and so at the first sign of a human being, they're gone.

But most animals, interestingly enough, don't see automobiles as a threat and so you can get much closer to animals if you shoot from inside your car. Fortunatley too, many wildlife sanctuaries have wildlife drives that traverse wildlife areas. The photo here, for example, was shot on the Blackpoint Drive at the Merritt Island National Wildlife Refuge in Titusville, Florida. Using a 400mm lens (on a Nikon body) I was able to approach within about 20 feet of this egret hunting. More importantly I was able to photograph the bird for more than an hour from the front seat of my car.

The key to using your car as I blind is to find an active area and then shut the car off and settle in while the wildlife comes to you. The longer your car sits and the less movement there is near the windows, the more comfortable the birds or animals will become. I often mount my camera in a rear window and then when I get to likely location, I sit still for a few minutes, then quietly get into the back seat. Shore birds like egrets and herons tend to return over and over to a small feeding area (what might look like a small tidal puddle to you or I) where they can confine their food. If you park next to one of these areas you'll find the birds returning there over and over again.

In tomorrow's entry I'll tell you about the world's best "window pod"--a camera support designed specifically for photographing birds and wildlife from inside your car. It's one of the best photo products I've ever owned.

Sunday, February 1, 2009

Isolate Color Contrasts

Bright, contrasting colors are very effective at getting people's attention in a photograph because the eye is naturally curious about the interaction of colors. Nature is full of color contrasts and all you have to do is flip through a flower seed catalog to see some of the wild combinations that exist. But you can also find a lot of strong contrasting colors in man-made objects. I spotted this yellow and blue color contrast on a dock on Cape Cod from a few hundred feet away and was so curious about what the colors were that I walked out to see what the subject was--and I was glad I did. I thought the hose and the sprayer were such an interesting combination that I spent about 20 minutes shooting various compositions.

The key to capturing strong color contrasts is to isolate them from their surroundings: all that you want to show is the contrast in colors. It really doesn't matter if the subject is "real" (like this one) or more abstract, like drips of paint on a Caribbean wall, the interaction of the colors will carry the photo if you compose tightly enough. Finding color contrasts is a good self assignment, so if you're bored some Saturday afternoon, take a walk around and see what you can find.