Welcome to (The Occasional) Photo Tip of the Day! Please also visit my main site jeffwignall.com. Text and photographs Copyright 2016 Jeff Wignall.


“The best way out is always through.”


Friday, March 27, 2009

Underexpose Sunsets for Drama

In the last posting I talked about how I took a sunset shot and turned into into a moonlight effect using the hue slider. Here is the original sunset with almost nothing done to it in Photoshop (just a very slight warming). The reason the sky looks so dramatic is that I took a reading from the bright area of sky (where the sun was poking through a bit at the bottom) and then used that exposure. Normally I wouldn't include such a bright area when metering because it would underexpose the scene too much, but that's just what I wanted to happen in this case. By making the clouds and sky darker, the rays of sunlight at the bottom show up better.

You have a lot of leeway when it comes to exposing sunset shots, it's almost hard to make a bad exposure. And you can always fix or exaggerate the exposure later in editing. The more important thing to me is just being at the beach when the sunset starts to flare up--which is why when time allows, I take a cup of tea and drive to the beach at the end of the day! It's good for the soul and good for your photo collection.

Thursday, March 26, 2009

Turn a Sunset into a Moonlit Night

A few postings ago (the peacock shot) I talked about using the hue and saturation tool to create striking abstract colors. Last night I was trying to keep myself awake at the computer (that happens a lot at the end of a book project) and I started playing with a sunset image that I shot in Connecticut over Long Island Sound. I decided to see how the scene would look as a moonlit night and so I slid the hue slider all the way to the right which shifts the hues to blue. That's all I did to turn the sunset into a moonscape. I had already made some very minor corrections to brightness in Photoshop, but to create the moonlight look, it just took one quick push of the hue slider. Try it sometime with a sunset if you have Photoshop or Photoshop Elements (and probably any other editing program). I don't think it will fool too many photographers into thinking it was really shot by moonlight, but it still looks kind of cool. I'll post the sunset next so you can see what the original looked like.

By the way, the new book I'm writing is almost done and it's on how to win photo contests, so stay tuned and I'll tell you more about it. I'm hoping it will hit the bookstores by September. It's being published by Lark Books.

Wednesday, March 25, 2009

Look for Graphic Elements

Once again I've fallen behind a few days in postings because I'm trying to get a book finished (by this weekend!) so that it can get to the printing plant in China on time. The hardest part about writing books, for me at least, is that I have very little time to shoot new photos while I'm writing. A typical day for me includes at least 12-15 hours at the computer--and I spend every minute wishing I was off in some pretty place shooting.

While procrastinating a bit from writing yesterday I was looking through some old folders and came across this shot that I made in Galilee, Rhode Island--a beautiful little fishing port that is worth visiting with your cameras. When I go to Galilee though, I'm often so overwhelmed by how pretty the place is that I have a hard time focusing on one type of subject. One trick I've used though is to force myself to look for a specific graphic element--textures, lines, reflections, shapes, etc., instead of a specific object or subject. I find that I create much more creative pictures that way than by saying, for example, "today I'm going to photograph a fishing boat." The reason is that while you're busy looking for a great fishing boat to shoot you walk right past a lot of more creative and intereting shots.

On my most recent trip to Galilee I decided to look for colorful subjects with an interesting shape to photograph. I was only on the fishing docks for a few minutes when I spotted these floats hanging off the side of a huge commercial fishing boat. I spent about a half hour photographing them from various angles and with different lenses and I had a lot of fun--and I got several good images.

This doesn't mean, of course, that if I find a great tuna boat or an interesting fisherman to photograph that I won't shoot them, but zeroing in on one particular idea gives me a target, something specific to look for and I find the challenge is very helpful. So, if you're out shooting this weekend, try and give yourself a self-assignment to shoot a particular graphic element and see if it doesn't make you probe your subjects more deeply and on a more graphic level.

Thursday, March 19, 2009

Visit the Greatest American Landscape

If you're making travel plans for the coming summer and you'd like to see the American Southwest, there is one place that should be at the top of your list: Monument Valley in southern Utah (just over the Arizona border). There is no other place in America that symbolizes the beauty and mystery of the American West like this extraordinary place. Monument Valley is actually a Navajo Tribal Park and is administered (and lived in) by the Navajo. The Navajo name for the valley is: Tse'Bii'Ndzisgaii.

Monument Valley presents some of the best landscape photo opportunities in the world and features "monuments" or rock buttes that rise up between 400 and 1000' high. By the way, the photo here was shot from the rim of the valley, near the visitor's center--and while that's a beautiful viewpoint, you have to get down into the valley to see just how spectacular it really is.There is a 17-mile self-driving tour through the valley (entry is just $5/person) and the Navajos also offer guided tours. I've spent several days there at a time and there is always something new to see, always another view to photograph. It's mind boggling, to be honest.

Interestingly, quite a number of Navajo live in the Valley and so when you're there you're not just in a park, but in their living room, so you also get a sense of the history of the Navajo people. Considering the way that Native Americans have been abused in every conceivable way in this country, it's amazing that they even let us on their land, yet they are incredibly welcoming to strangers.

There is only one hotel (now) that is close to the park and that is Goulding's Lodge (a great place to stay, you can see the valley in the distance from virtually very room), but I'm told that the Navajo are building their own hotel where the visitor center is. I really hope this doesn't commercialize the park too much since its remote location has always kept it somewhat of a secret. Just getting to the valley is a challenge, by the way, it's a four-hour drive from Flagstaff and it's 25 miles from the nearest town (Kayenta, Arizona). Still, it's a beautiful drive and worth every effort it takes to see this extraodrinary landscape.

Wednesday, March 18, 2009

Alter Colors and Leave Reality Behind

I have a friend that is a DJ at the FM station where I do a monthly music and interview show (WPKN 89.5 FM) who is always quick to remind me that, in art at least (and lots of other things), reality is far overrated. And when it comes to playing around in Photoshop, he's certainly right. While I use image editing largely to enhance reality and make my images appear more like they appeared to me in person (but even that is a bit of an abstraction since the way your eyes/brain see a scene and the way the camera sees them are two different things), but sometimes leaving reality far behind is a lot more fun.

The simplest way to alter reality in a photograph is just to turn the colors inside out. Changing the colors of familiar objects is fun because while people recognize what your subject used to be, they have to view it in a brand new light. And in Photoshop (and most editing programs) altering color is a piece of cake. In fact, I only used two tools to turn this normally blue and green peacock in a shocking mix of red and blue. The first thing that I did was to simply play wiht the "hue" slider in the hue-saturation tool. As you move that slider left or right all of the color relationships change. Once I had a color combination I liked, I used the "saturation" slider in that tool to really intensify the colors. Next I used the curves tool to heighten the contrast (by making the darks darker and the bright areas brighter) and further saturate the colors.

While I played with the image for 20 mintues or so, the actual work only took about five minutes. Remember that there is no right or wrong when it comes to mixing up colors in an image--whatever looks good to you works.

By the way, the friend I mentioned is Terry Hopper and his program (1st and 3rd Thursdays, 2-6 p.m. ET) is The Quest. You can listen live via WPKN.org.

Tuesday, March 17, 2009

Compensate Flash in Bright Surroundings

OK, first I have to tell you how this photo came to be. My cat is always finding new and interesting places to sleep and it takes me a while to discover them. But recently she would disappear inside the house for a few hours and then come back with her butt and tail all wet. Then, by chance, I found out where she'd been hanging out: she had started sleeping in the bathroom sink, which had a slow drip, which explained the wetness. Turns out she likes the hot water dripping on her!

I was originally going to call this posting "Keep Your Sinks Clean" because after I had shot a few frames of her (she's a very cooperative cat when it comes to photography) I noticed that the sink needed cleaning! So I had to use Photoshop to "clone away" a few dirt spots. But she still sleeps there and I want more photos of her in the sink, so now I keep the sink spotless.

But let's return to photography tips! Because the bathroom is white and there is a big mirror behind the cat, the on-camera flash was getting fooled into underexposing the shots. The camera saw all of that bright light bouncing back and thought (rightfully so) that there was more light than there really was (especially on the cat) and so it as shutting off the flash before it had enough light. The way that TTL (though-the-lens) flash works is that when you take a flash picture, the camera measures the amount of flash actually passing through the lens and hitting the sensor. If the subject is very bright, it shuts it off before the camera actually does have enough light. In this case it was causing the sink to come out gray, not white, and the cat was far too dark.

Remember, all cameras are programmed to produce subjects of a medium gray. So even if you're photographing a white sink, the camera wants to make it gray. Normally, with average-colored subjects, the camera creates a good exposure. But with subjects like a bright beach or white snow--or a white sink--the camera gets fooled.

The solution? If you're using a flash around a very bright background, use your exposure-compensation feature to add an extra stop or stop-and-a-half (experiment to see which works better) of light. I added 1.3 stops of compensation to this shot and it kept the sink white and the cat was almost perfectly exposed. I did have to lighten the cat a bit during editing, but no where near as much as I would have without the compensation.

So, today's lesson: use exposure compensation with flash in bright surroundings--and keep the sink clean!

Monday, March 16, 2009

Create Ribbons of Water

First of all, sorry that I've been away from the blog for a week. I have a book deadline at the end of this month and just haven't had any free time. The book is on the subject of how to win photo contests though and I'll write more about it later this week. But right now, onward to one of my favorite tricks: turning waterfalls and streams into a flowing ribbon of water.

I'm sure you've seen a lot of waterfall photos done this way and creating the effect is very simple: To turn flowing water into those pretty white ribbons of motion, just set your camera to the shutter-priority exposure mode and select a longish exposure. The actual length of the exposure depends on how fast the water (or any other subject, for that matter) is moving and how much you want it to blur. I find that most moderately-fast moving streams and waterfalls blur nicely between 1/2 and one full second. Any longer than that and you run into a situation of diminishing returns: a blur is a blur is a blur once it's maxed out. In other words, the blur doesn't get any better or more dramatic and, in fact, can get too soft looking.

I think it's better if you actually cut back on the length of the exposure a bit once you reach that point because then you also get some detail in slower moving areas (like after the water hits the pool at the bottom in this case--you can actually see some detail in the foam, etc.). I exposed this shot for 1/2 second at f/20, for example, but also shot some at 2 seconds and 4 seconds and I thought the water was too soft and blurry, so I sped up the shutter speed to 1/2 second. Again, it really depends on the speed of the motion and just how much of a blur you want.

By the way, you may get frustrated when working in bright light that you simply can't select a shutter speed that slow without the photo overexposing. That's because your camera doesn't have an aperture small enough to balance out the long exposure. One solution for that is to use a neutral-density filter over the lens. These filters reduce the light hitting the sensor without changing its color. Cokin sells some that I think are reasonably priced. I'll write more about them in a future posting. For now, just do a Google search on "neutral density filters" and you'll find plent of info.

Sunday, March 8, 2009

Silhouette Shapes in Nature

Nature creates some pretty wild shapes and if you can isolate and focus on those shapes in some clever way, they make great photos. The simplest way to reveal a shape is by silhouetting it against a bright background. Most of us think of creating silhouettes against a bright sky, but it's just as easy to create a shape silhouette against any other bright background--like this field of bright grass on an Iowa farm.

The secret to creating strong silhouettes is to expose for the background and just let the shape go completely black. To shoot this scene I simply metered the bright background, used the exposure lock feature of my Nikon D70s, recomposed and shot. On most digital cameras just holding the shutter release halfway down will lock both exposure and focus--and some let you lock each of those things separately. It's far better if you can lock the exposure and not the focus since that lets you take a reading from the bright area, but still use your autofocus when you recompose the scene.

Saturday, March 7, 2009

Document Your Garden's Progress

It's not quite gardening season here in Connecticut yet, but the days are getting warmer and I am just chomping at the bit to get out and plant some things. But this year I vow to remember to do something I always think of after the fact: document my gardens (especially my container gardens) as they grow.

Once the pots are overflowing with flowers it's easy to forget how much progress your plants have made and how empty they looked in spring. Having shots of how the pots looked when I first planted them really makes me feel like all the hard work was worthwhile. Some years I've had as many as 40 or 50 pots, so it's nice if I can look back and see just how much work I really did. So take time after you plant your garden beds and containers to do before-and-after shots.

Friday, March 6, 2009

Learn Portrait Lighting from a Master

If you'd like to learn some of the secrets of professional portrait lighting, there are a few ways--most of them somewhat time consuming and a bit labor intensive. One way, of course, is to take lighting workshops or take a lighting course (if you can find a good one) at a community college or continuing education program. Or you could get a job at a studio--you'll learn a lot there! But a simpler and far more convenient way is to study one of the fine training DVDs that are on the market. These DVDs provide a great learning experience that you can study over and over again--when you have the time.

One of the best instructional lighting DVDs I've seen is Tony Corbell's Portrait Lighting on Location (Software Cinema). Rather than complicating location lighting, Corbell's DVD teaches great methods for simplifying lighting. And the results of his lighting techniques (you get to see a gallery of the shots from each segment) are brilliantly and creatively lit portraits. I am as impressed by the beautiful quality of his images as I am by his simple, straightforward method of teaching.

The DVD is divided into five distinct lighting lessons, including in-depth tutorials on: Controlling the Sun, The Daylight Studio, Portrait of a Physician, Amber & Abbey (photographing a mother and daughter at home) and Ambience and Flash Together Outdoors. There is also an excellent tutorial on image enhancing where Corbell shows you how he puts the finishing touches on his portraits (much of which involves Nik Software, for whom Corbell consults).

Each of these tutorial situations is a real shoot and you get to accompany Corbell on location and watch as he works with his models and creates his lighting set ups. His method of teaching is very one-on-one and feels very much like a personal workshop. Some of the tutorials are shot indoors using either flash and daylight or just flash (both portable and studio systems are demonstrated) and several of the outdoor shoots are created using just the sun and diffusion screens. In addition, Corbell demonstrates the incredible usefulness of acrylic mirrors in creating highlights and hair lights--something I've been trying to encourage students to use for years. (continued)

In the Controlling the Sun segment, for example, Corbell takes a model to a beach in San Diego where the ambient light is harsh, direct overhead sunlight--not the kind of lighting you'd use for any portrait. But by adding a single diffusion screen (I wish he'd mentioned what brand it was) and an inexpensive scrap of acrylic mirror, he manages to create a soft, dreamy quality of light that is absolutely beautiful. Using just two assistants (and you could use friends for this work, it's not complicated since there is no lighting gear) to hold the diffusion screen and mirrors, Corbell is able to exploit the brightness of the sun and yet control its intensity. The images you'll see him create are fantastic.

In the segment called the Daylight Studio he uses a similar set up to take portraits of a musician but also includes a painted backdrop--I love the idea of taking a painted background to a beach location. By using a huge diffusion panel Corbell is able to gently light both model and background and then uses the mirrors to add interesting highlights.

Corbell is a born teacher and throughout the lessons he comes across as a patient, very knowledgeable teacher who really wants to share his creative and technical skills. If you're looking for a very approachable series of lessons in portrait lighting you can do no better than this great DVD. It costs just $99 and it can be ordered directly from Software Cinema.

Thursday, March 5, 2009

Intensify Reflections

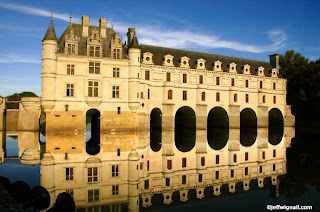
I love to photograph reflections, whether it's a neon sign in a puddle at night or a landscape reflecting in a pond or river. The problem that you run into with reflections, however, is that they are usually somewhat darker than the scene and don't look as vibrant as the main subject does. Sometimes that's fine, you want the reflection to be a bit subdued compared to the actual subject or scene. But sometimes it's nice to pump up the reflection a bit, just to add some snap to the scene.

One really quick and easy way to build up or intensify a reflection in editing (I work in Photoshop, but this will work in almost any editing program) is to "select" the reflection area and then increase either the saturation or the contrast and brightness until it more closely matches the subject. That's exactly what I did with this photo of the beautiful Chateau de Chenonceau in the Loire Valley of France, which is built over a river and so always has a nice reflection. But while the reflection was pretty, it just didn't have the vibrance of the building in the late-afternoon sun.

So, to pump things up a bit, I simply used the polygonal lasso tool to select the reflection area of the scene. I just started at the left edge of the frame then worked the tool through the "horizon" of the reflection (where the building met the water) from left to right, then followed along the bottom half of the image (just tracing the edge of the frame)--rejoining the selection where I began. Then I used the hue/saturation tool to saturate the yellows and reds (I selected each color separately) to increase the color. I then used the curves tool in the selected area to enhance the contrast until it more closely matched the top half of the frame. It's totally simple to do and it's harder to describe than to do. By the way, you can fudge the selection edges (at the point of reflection) by using the "feather selection" tool (select>modify>feather) to feather the edge by a few pixels--which I also did here. Then I closed the selection.

As a last step I used the color balance tool to make the entire image a bit warmer (yellow) and also used the contrast tool to increase the contrast very slightly. The image is very similar to what I "saw" in my mind's eye in reality, I just gave it some help in Photoshop.

Wednesday, March 4, 2009

Create Your Own Photo Bookmarks

If you're like me you probably have about six books that you're reading all at the same time. Usually I'm reading one good Robert B. Parker mystery (the Spencer series are my favorite fun books) and about five or six nonfiction books. Keeping track of where I am in each book would be hopeless without bookmarks, but I can never seem to find a bookmark when I want one! In fact, most of my reading places are marked with everything from (losing) lottery tickets to bits of junk mail.

Then one day I was doodling around on the computer and had this idea to create me own photo bookmarks. It's really simple. All I do is find a pretty photo that looks like it might make a nice bookmark and that will crop well as a tall skinny vertical. In Photoshop (and I assume other programs) you can actually tell it what dimensions you want to crop the image to and so I chose (arbitrarily) 2" wide x 7" tall.

Once you set those parameters in the cropping toolbar, you can just go through several photos and create quick crops. Then I open a "new" document in Photoshop (this step is just to save paper) and copy and paste each new image to the blank sheet. I can fit 4 bookmarks across (with a small space between each) on an 8.5 x 11" sheet of printing paper. I print the bookmarks then slice them up with a paper cutter or scissors. I print them on heavyweight matte paper just because it's cheap paper and it's durable. Glossy paper would probably look nicer.

If you get ambitious you could even use a type function to put your name or a little inspiring quote on the bookmark. And if you get overly ambitious, you can pass these out to friends at school or work or just mail them to a friend that likes to read. Then you're in the bookmark publishing business. It's fun, creative and cheap and you'll always know where you are in your books.

Tuesday, March 3, 2009

Take Photos Through Hotel Room Windows

If you're lucky enough to be traveling (and travel is getting cheaper and cheaper lately because no one is doing it) and get a room with a good view, it's nice to capture a photo of that view. Shooting through hotel room windows is pretty straightforward but there are few things you can do to prevent unwanted reflections of the room. Here are some quick tips:
  • Borrow some Windex from the maid and clean the window (trust me, they'll run into the room and do it for you once you ask!); smudges show up a lot, especially on tinted windows.
  • Shut off the room lights so that they're not reflecting in the glass.
  • Press the lens flat against the window if you can and this will also prevent reflections.
  • If you can't hide room reflections, have a companion hold a black t-shirt or dark towel behind you to block reflections.
  • If you're shooting at night, use a tripod or rest the camera on the back of a chair or on a table and use a self-timer to fire the shutter.
  • Try to avoid shooting through dark-tinted windows.
You'll be surprised what nice shots you can get through a hotel room window if you take some time and keep a close eye on reflections and smudges. I shot the photo here from a window at the Excalibur Hotel in Las Vegas, looking at the New York, New York Hotel/Casino and the Strip beyond that. The shot has already been used in one of my books.

Monday, March 2, 2009

Watch the Quick Bounce Video

As long as we're on the subject of flash photography, my friend Quest Couch who owns a company called Lumiquest has come up with a really interesting flash-softening accessory called the Quick Bounce that will be of interest to anyone who shoots portraits with an accessory flash, but especially to those who shoot events or weddings. I'm trying very hard to keep this blog how-to oriented and not product oriented, but this product seems like such a useful idea I thought I would include it. Not to mention that there is a good video to watch!

Lumiquest really transformed the quality of on-camera flash years ago when they introduced a handy little diffuser called the Pocket Bouncer. That device (still a big seller) attaches to your accessory flash and provides a bounce surface that lets you soften the light falling on your subject. Most professionals prefer to bounce off of a white ceiling since the larger the bounce surface the softer the light, but there's rarely a nice low white celing around when you need one. The Pocket Bouncer works great and I wouldn't think of not carrying one, but if you're a wedding or event shooter and you're in one room that does have a ceiling you have to pull the diffuser off, then re-mount it if you go into a darker room without a good reflective ceiling. No big deal, but one more thing to do.

This new invention, the Quick Bounce, from Lumiquest solves that problem because it has little barn doors in the top of the reflector so that if you don't have a good ceiling, you just leave the doors closed and have all the light you need and a nice soft flash. But if you enter a room with a celing, you just pop the doors open and you can bounce about 80% of the light off the ceiling and use about 20% of the surface of the reflector to bounce the rest. It's really a pretty cool invention. Also, the unit mounts to your accessory flash along the narrow axis (you'll see this in the vide0) so that you can switch from a horizontal camera position to a vertical one without having to change the position of the Quick Bounce. Watch the video (just scroll down on that page), you'll see Quest demonstrate it.

By the way, if you don't own an accessory flash but use built-in flash, LumiQuest has another produce called the Soft Screen that mounts right over your built-in flash--kind of a cool and useful (and inexpensive--under $15) accessory.

Speaking of interesting products, I'm going to add a posting on the new Nikon Coolpix P90 camera in the next few days--it has an amazing 24X (equivalent of 26 to 624mm!) time zoom lens. It's not shipping yet, but I'm wondering if I can resist ordering one.

Sunday, March 1, 2009

Avoid "Green Eye" in Pet Pictures

Everyone knows what "red eye" looks like in pictures of people--that weird red glow in the pupil that is caused by flash reflecting off of the retinal surface in the eye. Flash photos of pets can cause the same thing but I call it "green eye" because with most cats and dogs the result is either a green or blue-green pupil. It looks positively demonic!

You can use your red-eye reduction flash mode to get rid of the effect in both people and pets, but I hate that mode. To eliminate the red eye the flash fires a series of pre-flashes that cause the pupil to contract and thereby avoid reflections from the retina. The trouble is that people and pets can see the pre-flashing and it makes them aware that you're taking their picture--and usually ruins the moment.

With people it's easy enough to just keep the flash in its normal mode and then change your position slightly so that the flash is not firing directly into their eyes. If you shoot from slightly to the side, or above or below your subject, that slight shift in position pretty much solves red eye. With pets, if you start to move, what happens? They think it's time to play or get a cookie and they follow you. I've found with my cat that the better thing to do is to have the camera ready (I shot this photo in my office while sitting at my computer) and then just wait for her to look away naturally. Once her head is turned slightly there's no chance of red eye. If I had put on the red-eye mode or tried to move my position, she would not have that nice natural pose she has here.

So, with pets, just be sure they're not looking directly at you (especially at your eye level) and wait for a natural moment. As long as their head is turned you won't get "green eye."