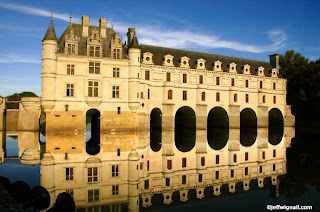
 I love to photograph reflections, whether it's a neon sign in a puddle at night or a landscape reflecting in a pond or river. The problem that you run into with reflections, however, is that they are usually somewhat darker than the scene and don't look as vibrant as the main subject does. Sometimes that's fine, you want the reflection to be a bit subdued compared to the actual subject or scene. But sometimes it's nice to pump up the reflection a bit, just to add some snap to the scene.
One really quick and easy way to build up or intensify a reflection in editing (I work in Photoshop, but this will work in almost any editing program) is to "select" the reflection area and then increase either the saturation or the contrast and brightness until it more closely matches the subject. That's exactly what I did with this photo of the beautiful Chateau de Chenonceau in the Loire Valley of France, which is built over a river and so always has a nice reflection. But while the reflection was pretty, it just didn't have the vibrance of the building in the late-afternoon sun.
So, to pump things up a bit, I simply used the polygonal lasso tool to select the reflection area of the scene. I just started at the left edge of the frame then worked the tool through the "horizon" of the reflection (where the building met the water) from left to right, then followed along the bottom half of the image (just tracing the edge of the frame)--rejoining the selection where I began. Then I used the hue/saturation tool to saturate the yellows and reds (I selected each color separately) to increase the color. I then used the curves tool in the selected area to enhance the contrast until it more closely matched the top half of the frame. It's totally simple to do and it's harder to describe than to do. By the way, you can fudge the selection edges (at the point of reflection) by using the "feather selection" tool (select>modify>feather) to feather the edge by a few pixels--which I also did here. Then I closed the selection.
As a last step I used the color balance tool to make the entire image a bit warmer (yellow) and also used the contrast tool to increase the contrast very slightly. The image is very similar to what I "saw" in my mind's eye in reality, I just gave it some help in Photoshop.


No comments:
Post a Comment