Weeding the garden might not seem to be a particularly photogenic activity, but if you're a gardener it's an important (and all too real) part of life and often we ignore documenting those mundane chores in favor of photographing more glamorous activities. But in terms of building a well-rounded family album, it's those everyday moments that probably create some of the nicest memories. After all, you probably spend more time with your family doing chores around the house and yard than anywhere else.
A few years after my father passed away I was going through some boxes of old photos and I came across one of him cooking dinner and I was just thrilled. There he was, just living life and cooking for the family as he so often did. You can't go back in time and photograph those moments because once they're gone they're gone. But when you unexpectedly discover a shot like that, it's like finding a rare old gold coin that you didn't know you had. Considering the fact that he was also a professional photographer, there is a surprising dearth of snapshots taken around the house, so whenever I find a shot like that I am ecstatic. It's those little moments that fade fastest into history and photos of them really bring the past back sweetly.
These days I keep a camera with me around the house and in the yard almost all of the time. In fact, one of my point and shoots lives on the kitchen counter (and thankfully the cats haven't turned it into a toy yet) and I shoot pictures of the silliest things: the veggies I've just picked in the garden, that cats sitting on the porch watching the birds (so far no litter box photos, but I'm sure they're coming), fading flowers in vases on the kitchen counter and even just the mess of books that clutter up my desk all of the time.
Today there are a lot of people involved in "picture of the day" groups in photo-sharing communities. These folks shoot a photo every single day, without fail, even if they can't think of anything to shoot. They shoot their dinner on the plate, the laundry piled up by the hamper, the kids watching TV and anything else that crosses their path in their daily lives. I think this is a fantastic idea. Photographs of beautiful sunsets and pretty scenics are great (they're partly why I got into photography), but it's the photos you take of your spouse or kids out in the garden, covered with dirt and working with a smile on their face that will warm your spirit those winter nights when you're updating the family album.
Wednesday, July 29, 2009
Tuesday, July 28, 2009
Show the True Size of Objects
I've talked in previous posts about the importance of using objects of known size to show scale in landscape photos. But it's just as important to show the true scale of unusually large or small objects by including other objects that we can use as measuring sticks.
As with landscapes, among the best subjects to use as scale indicators (at least for large subjects) are people. People not only add some human interest to photos, but we're all pretty familiar with the size of another human being.
Getting a person in the shot usually isn't very difficult (especially if you have kids or friends with you), though it's funny how hard it can be to find one when you need them (and how hard it is to get rid of them when you don't). I shot this photo (at the annual Rhode Island Air Show) of a C5 Galaxy Transport plane well after the throngs of people had left and while there had been literally tens of thousands of people surrounding this plane earlier, I actually had to wait several minutes for this man and his kids to walk into the shot. The lone little grouping of people seemed to exaggerate the size of the plane more than a mass of people swirling around it.
I think the real sense of scale in the shot though comes from two other things: the truck that is parked under it's wing (with lots of room above it to spare) and the cluster of tiny human figures under it's wings. The plane is huge (it can carry more people than a 747--or transport 20 helicopters) and the tail section is so tall that I had to use the widest lens I had with me (an 18-70mm Nikkor) to get both the tail section and the nearby people in the same frame--and I still had to stay back quite a bit.
Scale comes in handy with small objects too--like photographing a bug sitting on a thimble or a tiny seashell in the palm of a child's hand. Come to think about it, showing the scale of small objects is a good idea for a future posting!
Monday, July 27, 2009
Turn Around and See What's Behind You
One of the flaws that I am most guilty of in photography (I have flaws?) is getting obsessed with one subject or one area of a location to the exclusion of other interesting possibilities around me. I'll often get so intent on getting a good shot of a particular object or detail, for example, that I forget to lift my head and look around and see what's to the left or right or, more often, behind me--and it's an oversight that has caused me to miss some great shots.
The day I took this photo, for example, I was photographing some old steam locomotives and trying to find an angle that would show the ruggedness of the hulking old engine (and considering that nearly the entire engine was painted jet black, it was a bit of a challenge, too). Typically, I was working at the end of the day and the sun light, which had just pierced through an overcast sky, was shifting and fading quickly, so I kept shooting and refining the shots until the light was no longer sculpting the edges of the engine. I worked one particular shot for about 10 or 15 minutes and barely lifted my head from the viewfinder other than to step forward or back a few feet or to check camera settings. Also, because I was standing on oil-slicked railroad ties and rails while I was shooting, I was also concentrating on keeping my body vertical.
Finally the light was a bit too far gone and I'd run out of ideas and angles and I turned to start walking back to my car. Wham! There right behind me was this extraordinary old water tower up on a hill and silhouetted against an incredibly tumultuous sky. It was the clouds in the sky, in fact, that had been playing havoc with the lighting on the locomotive, but it never occurred to me that the sky itself might hold a great shot. And to be honest, I never even noticed the water tower until I turned around to leave and looked up--and almost simultaneously heard my girlfriend say, "That's a pretty shot." (This thing where she notices great shots that I don't see happens a lot, trust me.)
I had just enough time to pop off exactly three shots before that nice edge of light slipped off the left side of the water tower and the sky returned to the on-again, off-again dismal gray mass that it had been. The moral of this tip, I guess, is to remember to take the time to lift your head and look around even if you have to force yourself to look away from your main subject. Don't get so focused that you fail to look around--especially when the light is changing fast, as it does at the beginning or end of the day. Of course, it doesn't hurt to have a friend along to look out for things that you might be missing. I'm lucky, I travel most of the time with someone has an artistic eye and who is always spotting things that I don't see--and that's not a bad quality to have in a travel companion.
Sunday, July 26, 2009
Photoshop Tip: Go Wild with Color Controls
Learning to use Photoshop or Photoshop Elements, or any other photo-editing program for that matter, takes time--there is a relatively long learning curve, especially if you're new to editing. Many photographers who have worked in traditional darkrooms in the past pick up editing skills faster that those who have never worked in a darkroom, but still, there is a lot to learn. But that doesn't mean that you can't have some great creative fun along the learning path--you can.
One fun way to get to know what things do in an editing program and to get some cool illustration effects as you learn is to just experiment--let your imagination run wild. You really can't hurt your computer (or yourself!) by playing with editing controls and all programs have a "reset" button that lets you go instantly back to all default settings. So no matter what sticky corner you back yourself into, you can undo it very quickly. Remember too, in Photoshop you can always get rid of the last step just by going to Edit>Undo or unravel many steps by using the Edit>Step Backward command. If you are going to experiment with an important image, however, you should "duplicate" (in Photoshop it's just Image>duplicate) the image first and work on a copy. That way no matter what creative rabbit hole you plunge down, your original image is safe.
Among the most fun (and easy) controls to play with in Photoshop (and other programs have these or similar tools) are the color control tools. With just a quick push on a slider or a click on a palette option, you can transform the most mundane of images into very colorful and imaginative new images. Sometimes what you'll create will be wild 1960's Peter Max-looking "art" and other times it will be utter garbage, but no matter what the end result, you'll begin to understand just what each different tool does--and you'll begin to see how, in specific situations, those tools that you're using in your creative sandbox can also be very useful to correct and enhance photographs. You can manipulate the hue/saturation control, for example, to turn any photo into a total abstraction in seconds, but in time you will find yourself using it to fine-tune colors and hues on almost all of your images.
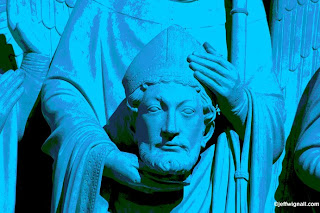
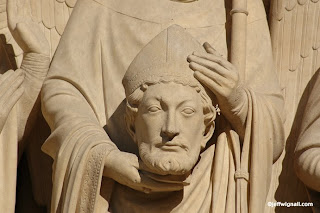
To create the blue version of Saint Denis (from the facade of Notre Dame Cathedral in Paris), I used just three simple tools: First I used the "Posterize" tool to reduce the image to just five distinct tones (you can choose the number of tones or colors that you want); then I used the "Gradient Mapping" tool to shift the entire image into a blue palette (in that tool you simply click on a color swatch to see the effect instantly on your image); and then finally I used the "Hue/Saturation" control to saturate the blues even more. That's it. Three clicks to take it from the straight image below to the colorful one above.
Don't be afraid to experiment with any controls in your editing program. The sooner you get past the fear that you might "ruin" something, the more fun you'll start to have. And if you love color like I do, you're going to have a great time surprising yourself by just clicking and dragging and sliding those color controls.
Labels:
color controls,
notre dame,
paris,
Photoshop
Saturday, July 25, 2009
Recover Your Lost Goodies & Save 15%
Here's a quick note to help you save a few bucks and protect your equipment:
In June I wrote about a company called Trackitback that helps you recover lost items like cell phones, cameras, lenses, luggage, etc. The way the service works is that you pay a small fee for a sticker that goes onto whatever piece of equipment you want to protect and then if you lose that piece of gear and someone spots the sticker, there is a free and very reliable way for them to return your gear to you. I normally don't talk about products or sales in this blog, but this is an inexpensive service that could save you a ton of money and heartache.
I just heard from the company this week that if you use the code word "CAMERAS" when you're checking out, you'll get a 15% discount. The discount is good through the end of August. Check out the Trackitback site for more details on how the service works.
Friday, July 24, 2009
Make More Money on Ebay with Good Photos
Despite the fact that I don't think Ebay is half as fun or profitable for individuals as it once was, it remains one of the best ways to sell old photo gear at a decent price. Over the years I've sold quite a bit of used gear and I've always gotten a fair price for it. But there are some tricks to getting a good price for your used photo equipment (or anything else) on Ebay and one of them is to take a good photo of what you're trying to sell.
With very little investment in equipment you can create "product" shots that will look like they were made in a studio. The only thing I bought to shoot this photo of a spot meter, for example, was a sheet of white poster board at the local craft store and it cost under a dollar. For lighting I just used a living room lamp placed to the right of the products (obviously you can see the shadows from that lamp) and a second piece of white board on the left to bounce light back into the shot.
Here are some quick tips for taking good Ebay photos:
- Use a plain background. Again, a piece of white poster board is really cheap and if you keep it clean it will last for years.
- Include all of the accessories that you're selling with the product but don't include anything you're not selling. In this instance I was selling the spot meter with its original manual (very important to include the manual if you have it), its case and the lens cap. This is everything that came with the meter.
- Include a separate shot of the original box if you have it. Always keep all of the original packaging because it raises the resale price substantially. I have a closet shelf in my office where all of the original packaging is stored forever (or until I sell the gear).
- Don't fret too much about lighting. Again, I used a table lamp with some fill from a white card and that created a clean-enough looking shot. Alternately, you might consider buying a white shooting tent (which, ironically, you can often find for sale on Ebay) so that you can create perfect shadowless shots of your items. I recently bought a tent but haven't used it yet--I'll report back when I do.
- Shoot both overall and close-up shots. It doesn't cost that much more to include several photos in an online ad (Ebay or elsewhere), so take the time to shoot close-up shots of any important details. For this meter I also included a close-up of the LCD panel. If there is any damage, be sure to take a close-up of that so that the potential buyers can see that it's only a superficial scratch, etc.
Thursday, July 23, 2009
Soften Landscapes with Hazy Light
I'm as guilty as anyone of waiting for nice sunny days to go out and shoot pictures. Maybe its my inherent laziness that says if it's a bit too cloudy or hazy, I don't have to bother hauling out the cameras and shooting any pictures. But soft hazy light can be a real blessing, especially in landscape photography and it's far better to embrace it than use it as an excuse not to shoot.
The nice thing about working on very hazy or overcast days is that the contrast is dramatically reduced which makes getting a good overall exposure much simpler. I shot this photo in the aperture-priority mode (using a Nikkor 24-120mm zoom at f/18 to get good depth of field) and while I shot in RAW and could have easily tweaked the exposure in the conversion process, the exposure right out of the camera was fine. Another nice thing about hazy lighting is that you get those lovely muted and saturated colors that so often get blown away in bright direct sunlight. In fact, it was the many different shades of green contrasting with the red barn that caused me to slam on the brakes (literally--unfortunately for my passenger) and hop out to shoot the photo.
I shot this photo toward the end of the day with thunderstorms threatening and the sky turning deep gray behind me and, in fact, a few raindrops fell on me during the 20 minutes or so that I worked the shot. A deep sky might have looked nice in this shot and I would have included it had it fit the composition naturally. But I wanted the barn to dominate the scene and if I had zoomed back at all (to take in sky) it would have diminished its impact. Also, I really like the way the haze on the hill behind the barn provides a hint of depth to the scene.
Embrace the hazy light of cloudy or pre-stormy skies and you'll love the softness it lends to your landscapes and the nice rich colors you'll get in your prints.
Wednesday, July 22, 2009
Design with Contrasting Colors
In yesterday's post I talked about visiting a steam-train depot in a rural part of Connecticut on a scouting trip. I was at the location trying to decide if I might want to put the steam train on my shoot list for an upcoming revision of my book The Joy of Digital Photography.
While I was poking around the depot I spotted a bright red caboose that no photographer could resist. Unfortunately, while the train car itself was very pretty (see photo below), it was sitting in a somewhat mundane setting with a lot of clutter around it and a blah white sky above it. No shot there.
But one thing that really caught my eye, however, was a series of bright yellow handrails (I think they were hand rails, anyway) contrasting against the shiny red paint of the caboose. Color contrasts make great design subjects because they startle the eye--causing our brains to ping back and forth from one color to the other. Often color contrasts work best when you have a hot color (a red rose) against a cool background (green foliage), but as you can see, even colors that are close to each other on the spectrum, such as yellow and red, can be equally exciting.
All that you really have to do to make color contrasts work is to isolate them--crop away (in the viewfinder) anything that detracts from the intensity of the contrast. In this case I was lucky, the yellow handrails were more or less surrounded by bright red paint, but I still cropped the shot in such a way that the yellow line ran the length of the frame, intensifying the contrast. And again, I was lucky that the line had such a nice natural curl and that there was a strong vertical line of rivets alongside it.
Incidentally, I think this is the beauty of informal scouting trips to new places--you never know what you'll find. While I went looking for photos of trains, I came back with a really cool abstract I could never have envisioned before starting out.
While I was poking around the depot I spotted a bright red caboose that no photographer could resist. Unfortunately, while the train car itself was very pretty (see photo below), it was sitting in a somewhat mundane setting with a lot of clutter around it and a blah white sky above it. No shot there.
But one thing that really caught my eye, however, was a series of bright yellow handrails (I think they were hand rails, anyway) contrasting against the shiny red paint of the caboose. Color contrasts make great design subjects because they startle the eye--causing our brains to ping back and forth from one color to the other. Often color contrasts work best when you have a hot color (a red rose) against a cool background (green foliage), but as you can see, even colors that are close to each other on the spectrum, such as yellow and red, can be equally exciting.
All that you really have to do to make color contrasts work is to isolate them--crop away (in the viewfinder) anything that detracts from the intensity of the contrast. In this case I was lucky, the yellow handrails were more or less surrounded by bright red paint, but I still cropped the shot in such a way that the yellow line ran the length of the frame, intensifying the contrast. And again, I was lucky that the line had such a nice natural curl and that there was a strong vertical line of rivets alongside it.
Tuesday, July 21, 2009
Trust Your First Impressions
One of the things that I wrestle with a lot in photography is designing the image: where to put everything in the frame so that the image is as powerful as it can be. And I go through that decision-making process whether the subject is very simple (like the train station here) or a more complex subject. The question that I battle with from shot to shot is just this: Is this the best composition I can come up for this particular subject?
Often I'll spend a considerable amount of time walking around the subject and trying to find just the vantage point, or experiment from several vantage points with a few different lenses. But other times, as with this shot, I really wasn't looking for a prize-winning photo, just a good shot to remember this building. (I was actually there on a scouting trip, making plans for a future shoot.) Also, the late-afternoon light was fading fast, so I didn't have time to ponder the situation for very long--and that's a situation you'll run into a lot, especially when you're traveling and only in a place for a short time.
In this case, I went with the very first impression I had of the building: I took a straightforward shot from almost the first spot where I decided I wanted a shot of it. And while I might normally avoid such an obviously symmetrical design, I kind of like the way the building dominates the shot and divides the frame in half both vertically and horizontally. Also, if you look to the sides, you'll see a building on the left and a train on the right that fade into the distance with almost identical vanishing lines (lines that would lead to a vanishing point if you were able to follow them further). In fact, it was the symmetry of the shot that caught my eye. I did help the symmetry a bit in Photoshop by cropping tighter and rotating the shot a tiny amount to level the base of the building to the bottom line of the frame.
Sometimes going with your first impression is the very best choice. After all, something about that vantage point is what caught your eye. Of course, if I had more control over the situation, I'd prefer that the cigarette butt thing on the left and the a/c unit next to it weren't there, but like I said, this was a very informal shot. Trust me, if they were paying me to shoot this, I would have moved a big pot of flowers in front of that a/c unit!
Monday, July 20, 2009
Be Aware (and Beware!) of Shapes
When I was a sophomore in high school, one of my favorite classes was, surprisingly, geometry. I say surprisingly because most of my friends that were a year ahead of me convinced me that the class would be a nightmare that would lead only to frustration, boredom and ultimately many moments of humiliating failure. They also convinced me that the teacher (Mrs. Pitt) was a cross between the Wicked Witch of the West and a Marine drill sergeant.
In fact, geometry became one of my favorite courses and Mrs. Pitt was one of the best and most fun teachers I've ever had. I think the reason that I liked geometry is partly because I had a great teacher, but also because I really enjoyed learning how shapes were constructed and how they could be combined in interesting ways. I also began to get an insight into how some artists like M C Escher were able to take relatively simple shapes and create extraordinarily complex designs. Once I discovered the fun and power of shapes, I began to find--and photograph--them everywhere in both the manmade and natural world.
I still love looking for and photographing shapes. And as silly as it sounds to say it, shapes come in all kinds of shapes and sizes--some easy to spot, some a bit more difficult. Some shapes, such as circles, squares, diamonds, rectangles, cones, triangles are obvious and predictable. (Take a look around the room you're in right now and you can probably spot a half dozen distinct shapes within a few feet of where you're sitting.) Other shapes--particularly those in the natural world--are also distinct, but are often more freeform: leaves, spider webs, lilypads, frog's eyes and even a big old trout all have recognizable shapes. And some natural shapes even do some wild shape-shifting: clouds, sand dunes, ripples in a sandbar, etc.
Often too, a shape can have significant meaning: how much more threatening is a snake coiled to strike than one stretched out and sunning on a rock? And everyone knows to be wary of electrical danger when a lightning bolt shape is used on a sign.
Whatever the source of the shape, the more you isolate it from distracting surroundings the more powerful and dynamic it becomes as a design element. The key to isolation, of course, is just getting closer: walk closer, use a zoom, or pick up the object (not the snake, I hope) and bring it home to photograph it. Repetition (like the repetition in the Iowa farm buildings shown here) is another way to emphasize shapes. By including three rounded buildings instead of just isolating one, the shape becomes more of a theme than just an individual structure. Another way to isolate shapes, of course, is with by turning the subject into a silhouette. I've blogged about creating silhouettes earlier but I'll talk more about them in a future posting.
Finding shapes is a good self-assignment, so next time you're out looking for something interesting to shoot, forget the specific subject and instead hunt out the shapes from which they're made.
Sunday, July 19, 2009
Pack a Pocket Compass When Traveling
With the advent of GPS systems in cars and even in cell phones (and some cameras), you wouldn't think there would be much need for a compass when you're traveling. And I have to admit, if you already have an iPhone with the mapping & compass widget (lucky you), then you already have a good compass in your pocket. But for those of us who haven't advanced to that level yet, there are still many photographic uses for an inexpensive pocket compass--especially if you're traveling in an unfamiliar area.
The primary use of a compass, of course, is just to know which direction the rest of the world is relative to your direction of travel. And using a compass for this basic concept is extremely simple. Since the needle on a compass always points north, if you turn until the needle until it is overlaying the "N" (or turn the dial on an adjustable face compass) then north, south, east and west will all be very obvious to you.
This is pretty important information, for example, if you are leaving Paris and want to drive to the Loire Valley, which is (roughly) south of the city. It's even more important if you decide to get off the nicely marked French highways and take some scenic back roads. Unless your car does have GPS navigation, without a compass you'll be left to follow the sun or trust the directions of French signs--which, as you can see from the shot here, can be a bit intimidating even in a small town.
But an even more important reason for photographers to have a compass handy is to keep track of where the sun rises and sets. This may be pretty obvious at sunrise or sunset, but at midday, you won't have a clue. If you want to photograph a harbor at sunset, for example, it would be nice if you could scout locations during the day knowing approximately where the sun will set. You could ask a local, of course, but good luck finding one that actually knows where the sun sets or which direction is west! You, on the other hand, with your pocket compass, will know in an instant where the sun will hit the horizon; just locate north and then read west off of the compass face. Sunrise? Just find east.
There are lots of good websites and books on using a compass, just do a search on "orienteering" or "basic compass use" and you'll find one. This page has good basic instructions for using a compass. Remember, even if your car has GPS, unless it's portable and you can take it with you, a compass is still a great thing to have handy. And besides, there is no battery in a simple compass, so it will never go dead.
There are many more fun and practical uses for a compass and I think every photographer should know how to use one and always keep one in their bag. By the way, as a side note, I'm shocked by how many maps that are available online have no compass rose--the indicators of direction that should be on all maps. Be sure when you print out any map from an online source that you choose one that has compass directions included.
Saturday, July 18, 2009
Consider Buying a Photographer's Vest
Unless you're wealthy and can afford to hire a sherpa (can I borrow him?), probably the worst thing about traveling with camera equipment is having to haul it around with you. Shoulder bags are great for carrying your gear on and off planes and trains (and never check gear in a camera bag, always carry it on), but when it comes to actually going out for the day shooting, forget it. Camera bags are a big giant clumsy albatross and trust me, if you go walking through Grand Central Terminal at rush hour with a shoulder bag, some poor old lady it going down.
While I transport my gear in a shoulder bag or backpack, I always bring along a photographer's or journalist's vest and each day I transfer the gear I think I'll need into the vest. (If I'm flying somewhere, I don't have to pack the vest since I wear it on the plane.) My primary vest (I own several) has about 20 different pockets and I can easily carry two extra lenses, a pocket full of memory cards, extra batteries, lens cleaning cloths, filters and a dozen other small accessories. It also has a big rear pocket that's plenty big enough to carry a rain poncho (for me) and a few big black garbage bags to cover my gear quickly if I hit a bit storm while I'm out walking.
Most good vests have a number of inside pockets, too, and in cities or when I'm traveling out of the country, I carry my passport and wallet in a hidden interior pocket. There is also plenty of room for maps, airline tickets and train schedules. I can also carry a sandwich and a bottle of water with me anywhere and if I buy a few postcards or a small souvenir, I can toss them in an extra pocket and keep my hands free.
Because you're wearing the vest, you'll never really notice the weight--especially if you're careful to distribute larger items carefully. I can literally spend 12 hours in my vest and while I'm thrilled to get if off when I get back to the hotel, it's completely comfortable. Yes, it might make you stand out as a photographer and I guess that could make you a target of thieves, but you're a far bigger target if you're carrying around an expensive-looking shoulder bag.
When you're choosing a vest, look at several different brands and designs. The one shown here is from Woolrich and I found it on Amazon but I've never tried one. B&H Photo in New York also has a good selection of both inexpensive and higher-end brands. It's tough to judge one vest from another if you're shopping mail order, so if possible, go to a professional camera store or a big sports store that stocks several vests. You might also consider also going to a hunting of fishing supply store like Cabella's since hunting and fishing vests are essentially the same thing (and some are much better made).
Be prepared for being at the receiving end of jokes when you're out wearing your vest. I took a cruise to Bermuda years ago and without really realizing it, I was looking a bit military in my shooting vest and brown fatigue shorts. As I was getting off the cruise ship in Hamilton, one of the crew looked at me carefully and in his utterly British dry-humored voice said, "Visiting or invading?" OK, so it was a pretty funny remark, I'll give him that.
But do consider the benefits of owning a vest--I promise that if you buy one and use it when you travel (or just around town), you'll write and thank me later!
Friday, July 17, 2009
Keep a Spray Bottle Handy for Flower Close-ups
You probably don't think of a gardener's spray bottle as a standard photo accessory when you're photographing flowers, but I always have one nearby--even on (especially on) bright sunny days. Nothing is as pretty in the garden as a mist covered rose in bloom, but the problem is that when the sun comes out natural mist burns off quickly. Besides, I'm not that much of a morning person (an understatement) and so I rarely see the morning mist on anything.
You'll also find mist on flowers and plants if you shoot after a gentle rain, of course, but often the skies are still gray and the lighting is kind of bland. Hard rains also tend to damage delicate flowers and if you want until they pop back into shape, again, the mist will have vanished.
The solution is simple: carry a small misting bottle that you can buy in any garden center. After you compose your shot and have your exposure set, give the flower a few quick sprays and you'll get a wonderful mist-covered blossom. I've found that different misting heads create different size beads of water, so experiment different bottles or different spray settings (most bottles have an adjustable spray head). Also, if you continue to spray several times the water tends to bead up in larger drops and that can look interesting too.
By the way, if the roses (or other flowers) in your garden are looking kind of tattered and you still want to do some close-up work, consider visiting your local florist. I bought this rose (with several others) to shoot for an ad assignment because the roses in my area are all past. Long-stemmed roses are only a few dollars each and if you're careful buying them, you'll find perfect specimens in all different colors, shapes and patterns. Then just pop them into a vase with some bloom extender and they'll last for days. When you're done shooting them, give them to your sweetie and she (or he) will look much more kindly on the time you spend taking all of those pictures.
Thursday, July 16, 2009
Light Up Your Night Shots with Neon Signs
I've always thought that neon signs are one of the most underrated forms of public art. Sadly, I think it's also something of a dying art because you see fewer and fewer really interesting signs. Not only are the classic old signs disappearing as businesses and neighborhoods change, but fewer new signs are replacing them--most businesses just slap up an uninspired fluorescent sign. That's part of the reason that finding a really great neon sign is so exciting and why it's worth stopping for a few minutes to honor it with a photograph.
Photographing neon is really simple. If the sign is fairly bright and you're close to it, there's probably enough light to shoot at a relatively slow ISO of 100 or 200. I shot the sign here (in Norwalk, Connecticut) at ISO 200 with a Nikon D70s and the exposure was 1/25 second at f/8. If you're using a tripod (and you should), put the camera in aperture-priority mode and select a middle aperture (like f/8) to get the optimum sharpness from your lens. If the sign is big and depth of field is a concern, select a smaller aperture, perhaps f/11 or even f/16. The camera will then select the correct shutter speed for you. If you have image-stabilization you might not even need a tripod (or alternately you can bump up the ISO but you will gain some digital noise if you do).
The size of the aperture has some effect on the bleeding or "halation" of the neon glow, so take a few test exposures and see if you like the glow. As you change apertures you will probably see the spread of the glow change. There's no right or wrong, of course, it's just a matter of taste--just something to be aware of while you're shooting. If you want to take in some of the background of the sign (the metal structure, if there is one), then you can increase the exposure by a stop of so. In the case of this great motel sign I wanted the colors to really pop so I exposed for the tubes and let the sign fixture itself go black. I leave the white balance in auto, by the way, and it seems to do just fine.
As I said, classic neon signs like this one are getting harder and harder to find and shooting a series of photos of them makes a great summer project. Any time that you have a few hours in the evening, just grab your camera and tripod and get a cup of coffee to go and take a ride through the older sections of town. You might even consider putting together a small exhibit at your local library or town hall to show off your neon treasures.
Wednesday, July 15, 2009
Get (Much) Closer with Extension Tubes
There are a lot of ways to get close to small subjects with a DSLR. If you have the money, a dedicated macro lens is great, but don't expect a macro lens to solve all of your problems in terms of getting closer. I own a 105mm Micro Nikkor, for example, and without additional accessories, it can only go to a close-up ratio of 1:2, which means half life sized--that's simply not close enough for insect photography.
There are other ways you can get closer (even if you already own a macro lens) and some of them are very inexpensive. One cheap way is with what they call close-up filters. These are just glass discs that screw to the front of your existing lenses and they reduce the lens-to-subject minimum focusing distance, which in turn makes your subjects look bigger. Their downfall is quality: any time you add an extra glass element to a lens you degrate sharpness and contrast and typically these filters are not great in quality.
A better alternative to consider are relatively inexpensive extension tubes. These tubes come in a variety of lengths (measured in millimeters) and they also decrease the minimum focusing distance. However, because they are only spacers and don't contain any glass, they don't degrade your lens' optical quality in any way. I shot this photo of a wasp (at least I think it's a wasp) on a black-eyed Susan with my 105mm Nikkor and a Kenko 36 mm extension tube and without the tube you wouldn't even see the wasp. Another great thing about extension tubes is that you can combine them to get even greater magnification.
Be aware that there is a light loss with extension tubes, but the exact amount depends on the amount of extension, the focal length of the lens and the maximum aperture. But since most cameras have TTL (through-the-lens metering) the camera will compensate automatically. Also, depending on the exact marriage of electronics between the tubes and your lens and camera body, your flash exposures may require some experimentation.
Be sure that the extension tubes you buy are compatible with your camera body so that you know your auto-exposure and autofocus systems will work properly. I recently tested a set of three Kenko tubes in sizes 12, 22 and 36mm (about $179 street for all three) and they worked beautifully with both my autofocus and auto-exposure systems on my Nikon D90. Of course, the more you extend, the more shallow depth of field becomes, but that's always an issue with close-up subjects. Even at f/11 I had a tough time keeping this fly in sharp focus with a 36mm extension. As long as your camera doens't have a bad noise issue, consider bumping up the ISO by one or two stops to get more depth if you need it--the small amount of additional noise is probably a price worth paying to get very close to tiny subjects.
As I said there are other close-up photography options, some cheap, some not so cheap. But give extension tubes some consideration if you're trying to save some money and still get good results. They're lightweight, simple to use and as I said, they don't degrade optical quality in any way.
Wednesday, July 8, 2009
Capture the Blue Angels: Plan a Shooting Strategy and Try it Out
As I said in my last tip, it's a good idea to have a shooting strategy ready if you're going to be photographing unusual subjects. In my case I was going back for a second chance at photographing the U. S. Navy's Blue Angels at an air show in Rhode Island and I wanted to be sure that I did everything possible to get sharp, well composed photos of the jets. I particularly wanted to get one good shot of all six jets in formation.
As I said earlier, this was a tougher job than I had counted on (even though I'd photographed many air shows in the past), largely because my subjects were buzzing by me at a mere 400mph (or faster). Just getting my D90 to expose and focus for a subject moving that fast was a real challenge. To make matters worse, the sky which had been so radiantly blue on the first day of the show was a miserable bluish-gray on the second day. I knew from the start my photos were going to be largely silhouettes and there wasn't much I could do to prevent that (I don't have a flash that will fill a subject half a mile up in the sky!).
Since exposure was going to be tricky (even accepting that most of my shots would end up looking like silhouettes) I decided that I would shoot the entire afternoon in the RAW format. When you're shooting in RAW it means that you can be off in your exposures by several stops and correct the exposure in editing. You can also adjust the white balance and that was very helpful in this case since I wasn't sure just how blue the sky was going to look. So the first part of my plan was to shoot in RAW.
Next, I knew that I wanted to be able to fire faster than I had been shooting on Saturday. The D90 has a maximum burst rate of 4.5fps (frames-per-second) and so I switched the camera into the continuous shooting mode. This meant also that I had to use the fastest HDSC cards that I had--in this case I was using Transcend 8gb cards that have a Class 6 write speed--the fastest available. Even with these fast cards, because I was shooting in RAW, the camera had to pause periodically to process the huge files. I lost several shots, in fact, because I had to wait for the camera to write images to the card (something to keep in mind if you photograph very fast subjects a lot and are using the maximum burst rate of your camera). The camera would have responded faster had I been shooting in jpeg format--and I might next time.
I also wanted the camera to be focusing continuously so that it would constantly re-focus and refine focus throughout the exposures. So, for the first time since buying the D90, I set the focus to continuous. In this mode the shutter will fire whether the focus is perfect or not, becuase it's continuously trying to focus on the moving target. In the single-frame mode, the camera will only fire if perfect focus is achieved--but that would have meant losing a lot of frames because the camera simply would not have fired when I wanted it to (because it was waiting for perfect focus).
Finally, I brought a monopod with me the second day since I was shooting with a 300mm lens (450mm on the D90) and handholding it was tough since I was shooting up at a 45-degree angle most of the day. Tough on your shoulders. I abandoned the monopod after a few passes by the Angels, however, because I simply couldn't track them across the sky with the camera tethered to the monpod.
Was I successful? Well, the images on Sunday were much sharper and consistently sharper from frame-to-frame. The downside was that I didn't have that beautiful blue sky that I had the day before and so the shots are all kind of bland silhouettes. But overall I learned a lot about shooting very fast subjects and how to manipulate camera controls to give me a fighting chance--and so the weekend was worth it on that level. I'll probably go to another air show by the time the Blue Angels end their touring season this year and shoot again. And hopefull I'll take what I learned from this show and combine it with a blue sky and some nice puffy clouds for some really hot shots!
Tuesday, July 7, 2009
Plan a Shooting Strategy (Especially if Your Subjects are Going 400 mph)
A few weeks ago I heard about a big air show up in Rhode Island and decided to get a hotel room and spend the weekend shooting the show. I grew up near an airport that held air shows almost every summer and I knew how exciting and fun they were to shoot. Unfortunately, though we got a pretty early start, we got stuck in traffic on I95 and didn't get to the show until mid afternoon--just in time to see the U. S. Navy's Blue Angels.
I've seen the Blue Angels fly before and they're just amazing. As you're standing there at the edge of the runway watching the Diamond Formation (shown here) of four jets (there are a total of six jets in the team) blasting past within mere inches of one another, you can't help but be in awe of the extraordinary young pilots that are performing these maneuvers. You also can't help but wonder: How in the heck am I ever going to get a sharp photo of these guys?
I shot probably a hundred of so photos of them on the first day and while I was happy at times that I even managed to get them in the frame (trust me, there are a lot of jets chopped in half in my take from that first day), I was disappointed with both placement in the frame and with the lack of sharpness. Of course, when your subject is going 400 mph, you can be forgiven some errors in framing and even in sharpness--but I don't want to be forgiven, I want good photos!
Luckily we were going back the next day to see them perform again, so I went back to the hotel room that night and decided to read some more of Simon Stafford's extremely useful Nikon D90 Magic Lantern Guide and see if I couldn't concoct a shooting plan that would maximize my chances of getting sharp, well-exposed photos of a very challenging (did I say they were going very fast?) photo subject. While most photographers in this situation are probably shooting with top-end professional DSLRs, the freelance writer in me has trouble parting with $5,000 or more for a camera body, so I force myself to get the same results with much more affordable equipment--in this case the D90.
Tomorrow I'll tell you more about my shooting plan (both technically and mentally) and how I used some of the D90's camera controls to stop the Blue Angels in their tracks (so to speak).
By the way, if you happen to live near an airport that is sponsoring an air show this summer, go and you'll have a fantastic time. And also, thanks to the kind kids at the hamburg stand at the Rhode Island show for giving us the best burgers we've ever had--and for free! I wish I could remember the name of their fine business.
Monday, July 6, 2009
Get Closer to Butterflies
Photographing butterflies is always a challenge because they seem to be very capricious in their movement. You'd think that once the found one good blossom with nectar, they'd settle in for a nice long drink, but that's rarely the case. Usually they flit from blossom to blossom and often even plant to plant in one feeding session. It can be really frustrating to try and get just one good close-up shot.
There are, however, some things you can do to improve your odds. The first, of course, is to plant a butterfly-friendly garden with plants like tithonia (shown here), butterfly weed, bee balm, etc. Once you've got them in your garden though, try these tips to get more good close-ups:
- Shoot early in the morning. All insects feed heavily early in the day, so there will be more of them to shoot. Also, their metabolism is slower when it's cool out or when the air is heavy with morning dew, so they'll be moving slower. The hotter the day is the more buoyant they become.
- Don't chase--wait. Set up your tripod near a nice blossom with a plain background and wait. You'll have a far better chance of getting a good shot if you sit-and-wait rather than chase. If you move around your motion will scare them off more than anything, but if you stay in one place, they will get used to your presence and they'll often land inches from your lens and ignore you.
- Use a longer focal-length macro or macro zoom. I shot this photo with 105mm Micro Nikkor lensn and had about 18-inches between the lens and the butterfly. I've shot with a 55mm Micro Nikkor, as well, but I was less than 10-inches away and it was much harder to get them to sit still. Also, with a long lens you're less likely to block the sunlight.
- Use flash if you need to stop their motion. I actually don't mind a bit of motion in a butterfly photo because that's what butterflies do--they flutter. But I also like nice crisp shots and if the light is a bit low you can either rasie the ISO or flip on the built-in flash. If your camera allows you to compensate or adjust flash power, try using minus-one-stop of compensation (on the flash output, not the camera's exposure) and you'll get a nice natural balance of flash to daylight. Read your camera or flash manual.
- Work on calm days. Easy to say, I know, but if you can work or calm days the butterflies will be more still and also less likely to drift around on the breeze.
- Put a flower in a vase. OK, yes, this is manipulating nature a bit, but so what? Clip an attractive blossom and place it in a water bottle on your picnic table and you can lure the butterflies to your set. It works, I've done it many times.
- Be patient. Don't give up too soon. Many times just when I've packed up the tripod because the butterflies weren't landing anywhere near the plant that was in the best light, they suddenly get interested. They're not mocking you, they're just being themselves. Be patient, wait, you can get some good flower close-ups while you wait.
- Read about butterflies. There is a lot about them on the web and there are some nice field guides at your library--the more you know, the more shots you'll get.
Sunday, July 5, 2009
Look Through Any Window
OK, if you're old enough to remember that song title (a big hit for the Hollies in 1966) then chances are you're as old as I am. The Hollies, of course, were singing about looking out through any window, but what I'm writing about today is shooting in through any window.
A few weeks ago I was wandering around a beach park in Connecticut and found a beautiful old carousel inside a large glassed-in building. The late-afternoon light pouring in through banks of windows was lighting up a few of the carousel horses beautifully from a slight side angle. Because the light was coming from the side, it was creating beautiful textures and shapes in the carved horse.
The only problem with the setting was that the sun was also creating so much glare on the glass (which wasn't particularly clean) that I couldn't get a clean shot of any of the horses without having a lot of reflections of the sky and beach behind me. Since my car was nearby I walked over and switched from my 18-70mm Nikkor zoom to a 70-300mm zoom so that I could get tighter shots and hopefully eliminate the reflections. I also chose a widow that was on a slight angle to the bright areas behind me so that there were fewer reflections. It worked. While there was still some glare (look carefully at the left side of the shot and you'll see some glass highlights--but that is a real out-of-focus window in the far background, not a reflection), it was minimized by using the longer lens and by choosing a different angle.
A polarizing filter is also a great help in these situations (I will blog more about them in an upcoming post) and all you have to do is rotate the filter to eliminate most glass-surface reflections. The only problem with using a polarizer is that they do suck up about a stop-and-a-third of lighting. I would have used one on this shot if it had already been on the lens, but the light was changing so fast I simply didn't have time to find and mount one. I was working at sunset essentially and the light was shifting very fast. In the minute or so it took me to change lenses several of the carousel horses fell out of the light.
I must be a snoop by nature because I love looking in windows and you can find a lot of neat stuff to photograph there. I love finding antique-shop windows after hours, for example, when the sun is lighting up the displays. If you find yourself in the same situation, just be careful to get as close to the glass as you can to block out most of the extraneous reflections and you'll find that you can get some cool shots looking not just out, but in any window.
And if you're old enough, you can hum the Hollies song in your head while you shoot.
Saturday, July 4, 2009
Meet Night Photography Wizard Troy Paiva
A few weeks ago I was poking around the web one evening and I came across a site called Lost America: Night Photography of the Abandoned West that features hundreds of extraordinary night photos by photographer Troy Paiva. Paiva has spent more than 20 years photographing a fascinating assortment of abandoned and forgotten remnants of the American West--junk yards, ghost towns, old signs, forgotten and "immobile" mobile home parks and deserted amusement parks (among other subjects). The photos are simply amazing.
Paiva began exploring these vestiges of the West back in the 1970's and began photographing them in 1989 and has put together a simply amazing document of these rarely-examined objects and places. But more than just mere documents, he has used his wonderfully creative and inventive photo skills to transform them into brilliantly colorful images that are both cheerfully whimsical and somewhat forlorn feeling at the same time. His site contains hundreds of images and he has also produced two monographs: Lost America (Motorbooks International; out of print but available used) and Night Vision: The Art of Urban Exploration (Chronicle Books).
He uses a technique called light painting that involves using long exposures (often several minutes or longer) and then selectively coloring different portions of the scenes using both flashlights and accessory electronic flash units. The lights are colored with theatrical gels and he frequently uses several different color gels within a single shot to create striking color contrasts. Because the exposures are so long many of the shots also capture ghostly-looking regions of the ambient light and even trails of star light. Interestingly, Paiva works mainly on moonlight nights (almost always within four nights of the full moon) so that he can take advantage of bright skies.
The light-painting techniques that he uses took years to develop and since he began shooting in the film days there were, of course, no LCD panels or histograms to check--everything was an experiment. You can read in detail about his night photo techniques on his site (and how refreshing that he shares his techniques and tips so openly). Just reading about some of the dangers and obstacles that he faces in getting his shots (spiders, snakes, scropions, squatters), however, is more than enough to drive away the faint hearted. He's a good writer too, so you'll get a kick out of reading the details of how he makes his shots.
If ever you've driven past an old auto graveyard or a washed-up amusement park and thought they might make interesting photo subjects, then you have to see how far Troy Paiva has taken those ideas. With a bit of imagination and lots of long hours in often dangerous settings, he has managed to record a beautiful visual history of locales and objects that most of us will never see--many of which have since been bulldozed or buried and, were it not for these photos, would be lost to time. I found myself inspired to look at night photography in a new light and now have an even greater appreciation for the beauty of our abandoned past and I think you will too.
If you want to see a few thousand more of Paiva's photos, visit his Flickr photostream.
Friday, July 3, 2009
Celebrate the Magic of Fireworks: Method #2
In the last posting I talked about photographing fireworks using a tripod, remote release and time exposures. Oh, bother. Who (besides me) wants to go through all of that nonsense when what you really want is to just go have some fun at the local fireworks and maybe come home with a few nice snapshots. Last year I went to three fireworks shows and I think I was the only photographer there with a tripod (and I kept hoping no one would trip over a tripod leg in the dark). OK, I admit it, taking a tripod to the 4th of July fireworks is a bit of a pain.
But fear not, there is a simpler way to get good fireworks shots and it has worked so well for me that, believe it or not, unless there is a really important foreground that I want to include (see yesterday's photo) I just leave the tripod in the car and shoot hand held. I still feel insecure and unprepared without a tripod (as I would in almost any situation--especially at night), but I'm sure with time (and therapy perhaps), I'll get over it.
The method for photographing fireworks using a hand-held camera is simple: just raise the ISO speed to around ISO 800 and put the camera in the automatic or programmed exposure mode and shoot. Piece of cake. Even at that fast speed, however, you may find yourself shooting at slower shutter speeds than you feel comfortable with. There's an old rule for deciding what is a safe hand-held shutter speed and that is to invert the focal length of the lens and use that fraction as the lowest shutter speed you can safely shoot without a tripod. If you're using a 100mm lens, for example, try not to shoot at a speed slower than 1/125 of a second (the closest speed to 1/100 on most cameras).
Of course, with image-stabilization technology you can probably sneak by using a shutter speed even two or maybe three stops slower than that. So, again, if you were shooting with a 100mm lens, you could probably (probably) shoot safely with a shutter speed of 1/30 or even 1/15 second. (The traditional sequence of shutter speeds in that range is: 1/125, 1/60, 1/30, 1/15, 1/8, etc., but many digital cameras have additional in-between speeds, as well.) I was not using image stabilization for the shot above, but managed to get a pretty sharp picture at 1/8 second because I was resting the camera on the open window frame of my car.
The wider the lens you use the better your odds are at not chopping part of the bursts off and also at capturing large bursts. I shot this photo with an 85mm lens (127mm equivalent in 35mm, roughly) which is kind of long, but I was shooting from the roof of a parking garage that was a bit far from the actual event. Still, it took me a few wasted shots to figure out just the right zoom setting to fill the fame without a lot of black space.
In terms of exposure, I've had pretty good luck using the auto-exposure modes. My D70s and D90 bodies amaze me at being so accurate in such tough situations. But if the fireworks seem to be getting over-exposed, reduce your exposure either by using exposure compensation or by switching to the shutter-priority mode and reducing the shutter speed. I try to keep the lens at about f/5.6 or f/8 and only adjust the shutter speed.
Experiment. The beauty of photographing fireworks (and almost any night subject) with a digital camera is that you can check your compositions on the LCD immediately and make the necessary adjustments in both exposure and framing.
Thursday, July 2, 2009
Celebrate the Magic of Fireworks: Method #1
Like everyone, I love going to fireworks displays and the bigger the event (and the longer they last), the better. Hate the crowds, hate the traffic, hate carrying a tripod, but I love the displays. I turn into an instant five year old at the local Fourth of July fireworks and "ooh" and "ahh" at every burst and I'm crushed when they end. I really get a kick out of photographing them, too--though, as usual, I let myself get distracted by photography and shoot far more pictures than I should. In the past few years though I've tried to maintain a balance--half my time shooting, half my time just watching.
There are actually two different techniques that work for photographing fireworks: in one method you use long time exposures and a tripod and keep the shutter open; in the other you just shoot individual bursts with a handheld camera. I'll cover the former method today and the other tomorrow. Either works fine, but the one I'm going to write about tomorrow is probably simpler and doesn't require a tripod.
Using a tripod and shooting long exposures is the more traditional method of photographing fireworks, I think, and it's the best technique to use if you're trying to include a foreground (as in the shot of New London harbor show here) or when you simply want to fill the shot with lots of different light patterns. It's important to use long exposures and a tripod when the foreground is important because you need time for the darker areas to record. Here’s the basic procedure:
With your camera mounted on a tripod (and I tend to use a relatively wide-angle lens of about 20-28mm in 35mm terms), aim you camera at either the sky (if all you want are the fireworks themselves) or a scene in which the fireworks will play a part. To capture the shot of the harbor, for example, I arrived fairly early and managed to get a shot near the front of the wharf so that I could get the boats and water in the foreground. And at popular events, trust me, getting there early is half of the game.
With your camera set to manual exposure, set the shutter speed to "B" (which stands for "bulb" so that you can make long time exposures. Set the f/stop to a moderately small aperture (f/8 or smaller on a DSLR). I tend also to set a relatively low ISO speed of around 100 or 200 just to keep the very bright explosions from washing out. You will have to experiment with exposures (checking the LCD) as the night progresses.
To make the actual exposure, use a locking cable release (most digital camera makers offer an electronic cable release that has a locking capability) or a cordless remote to fire the shutter. In terms of composition, you pretty much have to wait for the first bursts to hit the sky to decide how to include both sky and foreground because you never know how high the displays are going to go. I often blow the first few shots because I'm still trying to figure out where the fireworks are going to "land" in the sky and often have to reposition the camera a few times to the exact foreground that I want. Don’t panic though if you think you’ve mis-framed the scene, just write-off the first few frames and make your corrections.
Once you think you've captured an interesting assortment of bursts, close the shutter. At this point I usually check the LCD carefully to see how close I am with both exposure and framing and make whatever adjustments are needed. If the fireworks appear to be overexposing (washing out), either use a smaller f/stop or a shorter shutter speed—or both. If the shots are too dark (usually a good thing because you can brighten dark shots a bit in editing, but it's impossible to bring back detail that isn't there), then open the lens slightly or increase exposure time.
Another trick you can use is to place a piece of black cardboard (or a lens cap if you're careful not to jiggle the camera) over the lens between bursts. I find that if the sky is dark enough, that’s not always necessary. Again though, experiment, check your LCD (the picture, not the histogram which is a complete waste of time in this situation because you ARE going to get highlight spikes regardless) and bracket the exposure factors a bit. There is a lot of exposure latitude here provided you're not overexposing. Don't overexpose!
Tomorrow we will look at a simpler, handheld method of photographing fireworks.
Wednesday, July 1, 2009
Take a Walk on the Weird (and Goofy) Side
This past weekend I went up to a huge air show in Rhode Island (more on that in an upcoming posting) and had a great time. On the way home we decided to take a wander along the coast of Narragansett Bay and revisit some old haunts. One of those old haunts was the tiny and beautiful little town of Wickford, Rhode Island, a town I love but haven't visited in a few years. There is something about the little harbor there that just attracts me and the town is full of amazingly beautiful old New England homes (it appears one whole street is being renovated with historical accuracy and it's just gorgeous).
Anyway, we wandered up and down several streets looking for the main commercial wharf (I completely forgot which street is was on), but eventually found it and it was just as pretty as I remembered. Beautiful as the harbor is, the thing that caught my eye (actually it caught my girlfriend's eye and she pointed it out to me) on the commercial wharf was this character (a halloween mask--I think it's Nixon--and fowl-weather gear over wood frame) hawking fresh lobsters. I love this kind of whimsical folk art and I'd photograph it everyday if I could find it. Left to their own devices people are incredibly imaginative and the person that created this "Lobsterman" obviously has a terrific sense of humor (and probably sells a lot of lobsters because of it).
Finding weird little vignettes like this is mostly just a matter of slowing down and paying attention to where you are. I was in such a hurry to see the view of the harbor from the end of the wharf that I drove right past this guy at first. Once I realized how cool he was with the late afternoon sun on his face and wearing his very hip shades (not to mention his blue hand), I spent about twenty minutes shooting him from every angle.
If you're traveling this summer, whether you're in a small town or a big city, you'll probably see stuff just like this. One summer while driving through Maine we stopped at an antiques/junk store and there was a great life-sized plastic cigar-store Indian on the front porch and I took several shots of it and they ended up being a spread in my book The Joy of Digital Photography. Tourist towns seem to foster this kind of visual insanity, maybe it's the locals' way for dealing with the crush of summer tourists. When you do find something fun to photograph, don't be shy about shooting it. The folks artists who create this stuff are generally not shy and they love the recognition.
If you're looking for something fun and different to shoot this summer, give yourself an assignment to find some inspired insanity--you'll have a great time looking for it and you'll probably come home with some completely original pictures.
Subscribe to:
Posts (Atom)